Tutorials
|
From Hick to Hipster
April 21, 2020
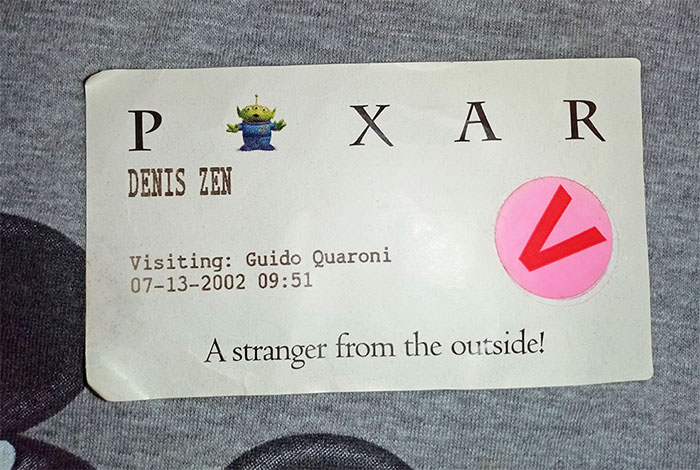
Here at RenderMan Products, we scour the globe in search of the most talented VFX artists on the planet, and then we invite the best of them to share their knowledge with mere mortals like the rest of us. Today Denis Zen is going to show us all how to get our groom on with RenderMan for Houdini in this hair-raising tutorial that’s not to be missed. So get ready, you’re in for some shear entertainment!
Often thought of as a tool for simulation, Houdini is a full-featured DCC, capable of grooming hair, look development, and lighting. In this tutorial, we'll be grooming a "Before and After" hairstyle, where we'll also learn how to use Pixar's production shaders and lights.
The process is similar for both supplied files, so I will cover the “after” version since it incorporates the latest tech with Houdini 18, including the new painting attribute node.
Going too much in depth would have led to a very long tutorial. For this reason I filled both scenes with notes so you can learn by exploring the files. I will also leave some useful links at the end of the tutorial for those who are interested in grooming as a subject matter.
I recommend you follow along with the downloaded scene. Remember to set the project (file > Set Project…) before you open it in Houdini. This will read the $JOB variable and find all the textures in the tex directory of the project and the head model in the geo directory.
I used one of 3D Scan Store’s great free head models.

Both Houdini projects (“Before and After” versions) are fully textured and ready to be rendered in turntable mode with RenderMan.
These are the steps I will go through:
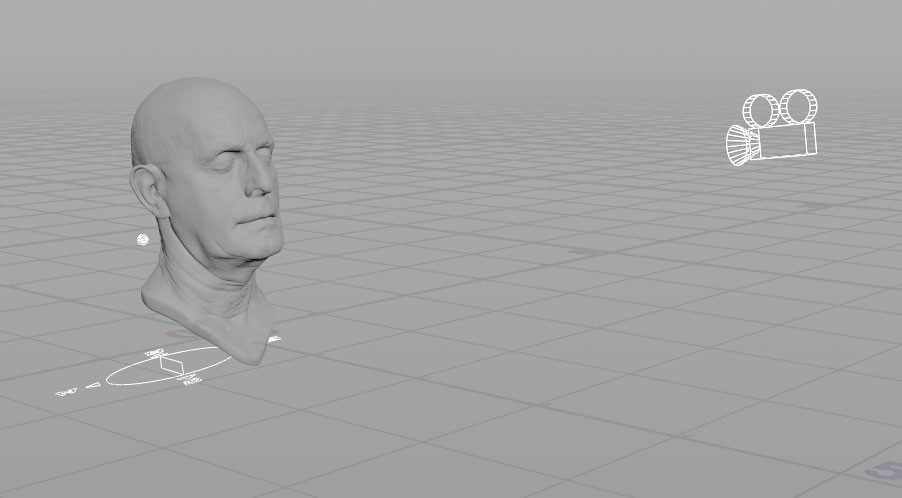
As the first step, we have to import our model into Houdini and build a very simple light setup to check our groom. This is very important since hair is very thin and the way light interacts with it is crucial for the styling and look development process.
For this first step (lighting setup will be covered later) a Pxr Environment Day Light is perfect. Simplicity and realism are key features of this light.
It’s also useful to create a new camera for rendering final frames. This allows you to move the perspective cam and always have your model framed (by the camera you created) in a consistent way.
To place objects in the middle of the scene press the ctrl + icon on the shelf
As you can see, PxrEnvDayLight is very interactive, which allows for great feedback during this master-lighting stage. You only need to adjust intensity and orientation.
To change light direction, you can use the rotation tool or manipulate the Basic controls (Latitude, Longitude etc) of the light.
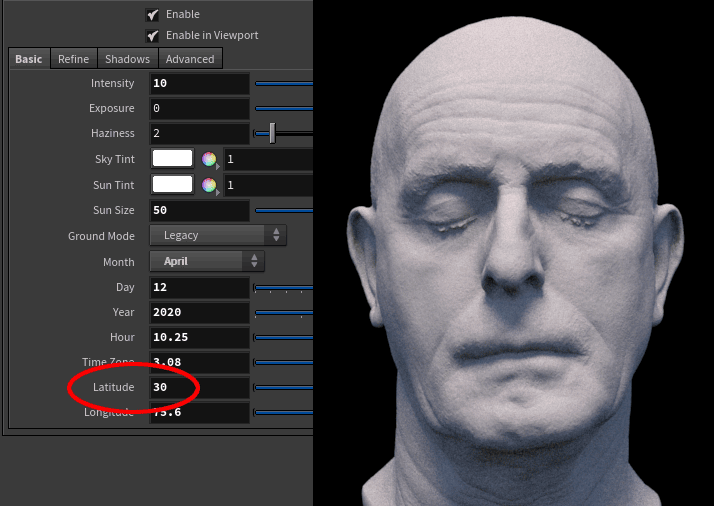
Latitude
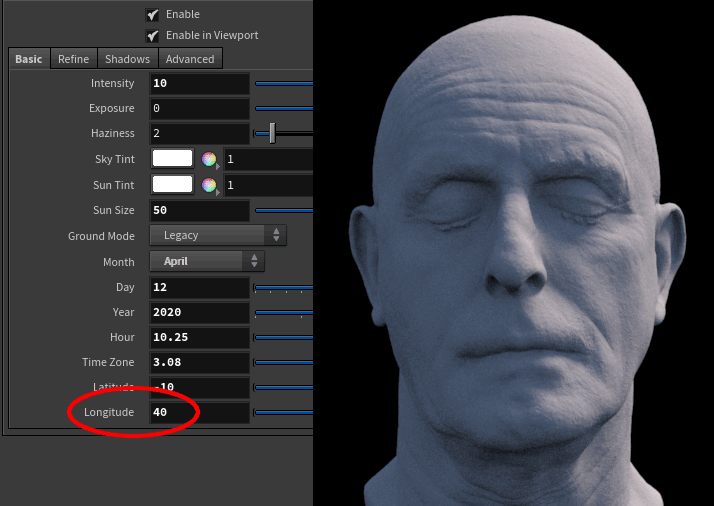
Longitude
You can also easily control the shadow softness by manipulating the Sun Size value.
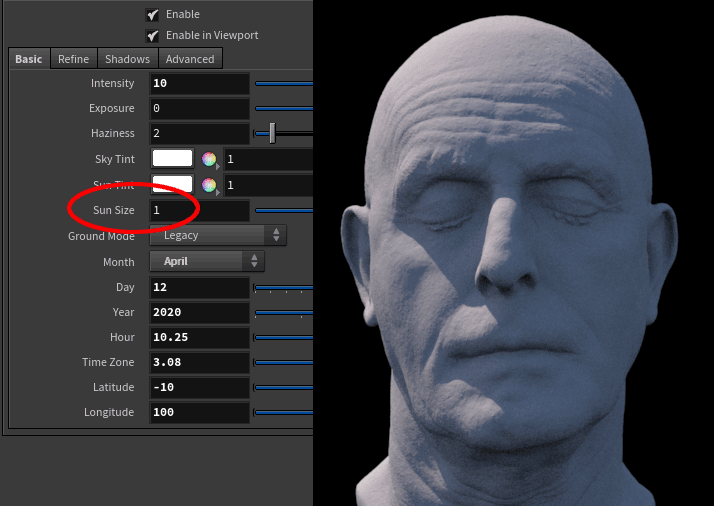
Sun size > Shadow softness
As you can see, the light has no transform because it’s an omni light; meaning, where it is placed does not affect the result.
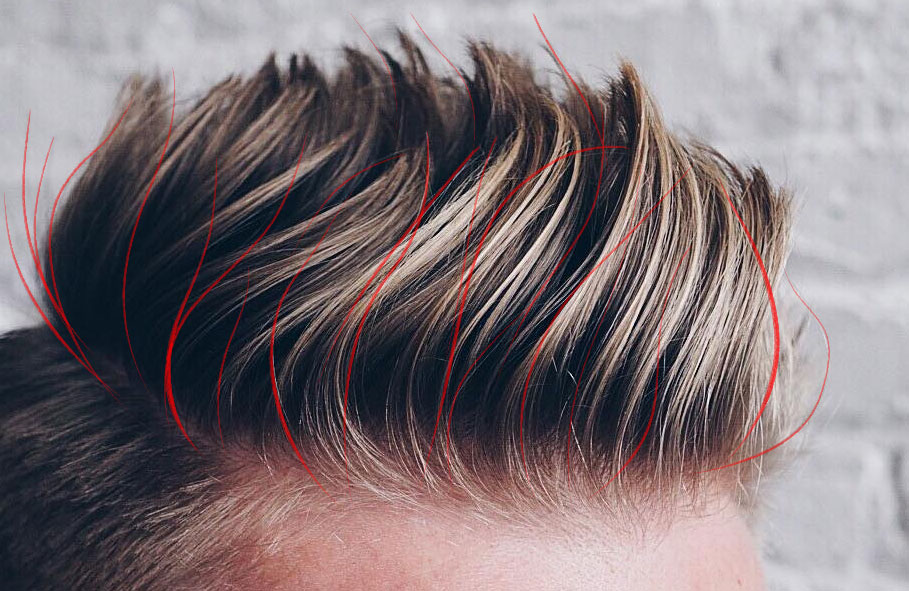
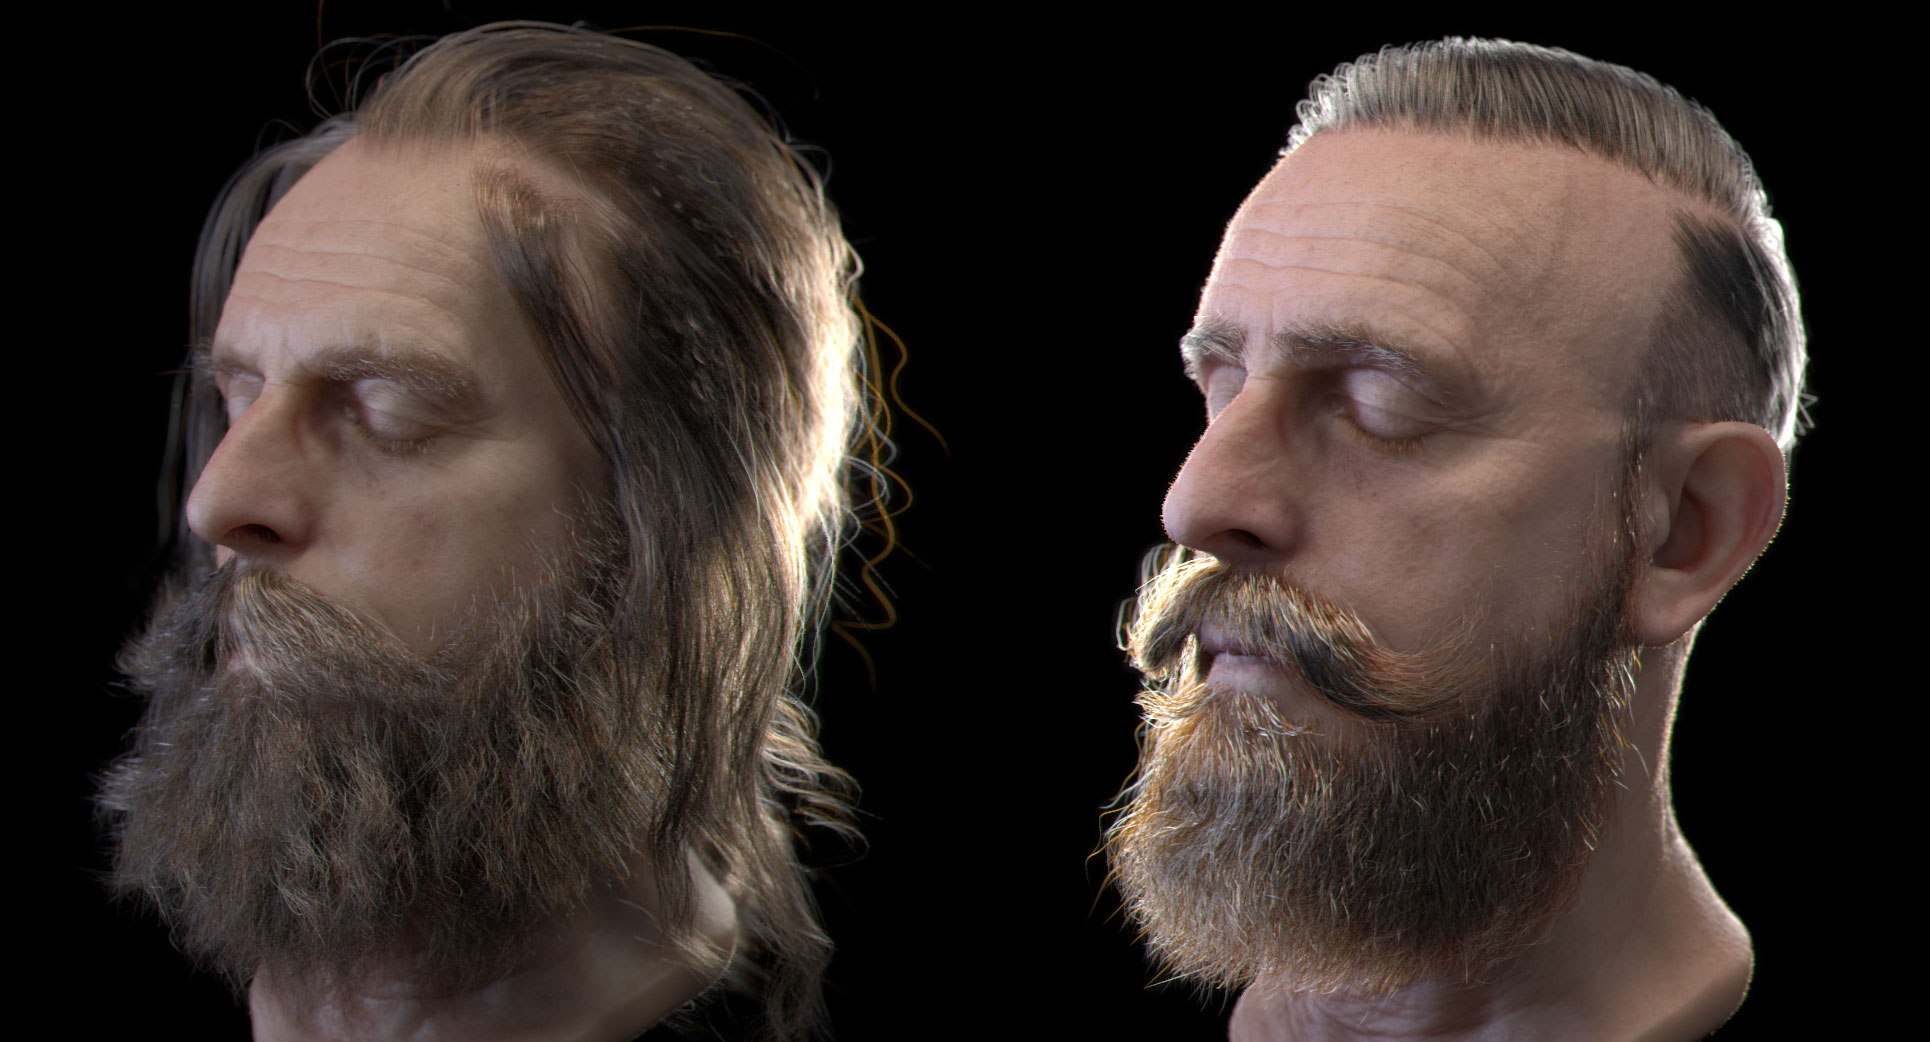
For a groomer (and as a general rule for photorealism) references are fundamental. Finding 360° hair references wasn't very easy, so I used the Beardbrand Youtube channel where at the end of each video the barber turns the client 360°. This is the result I was looking for:
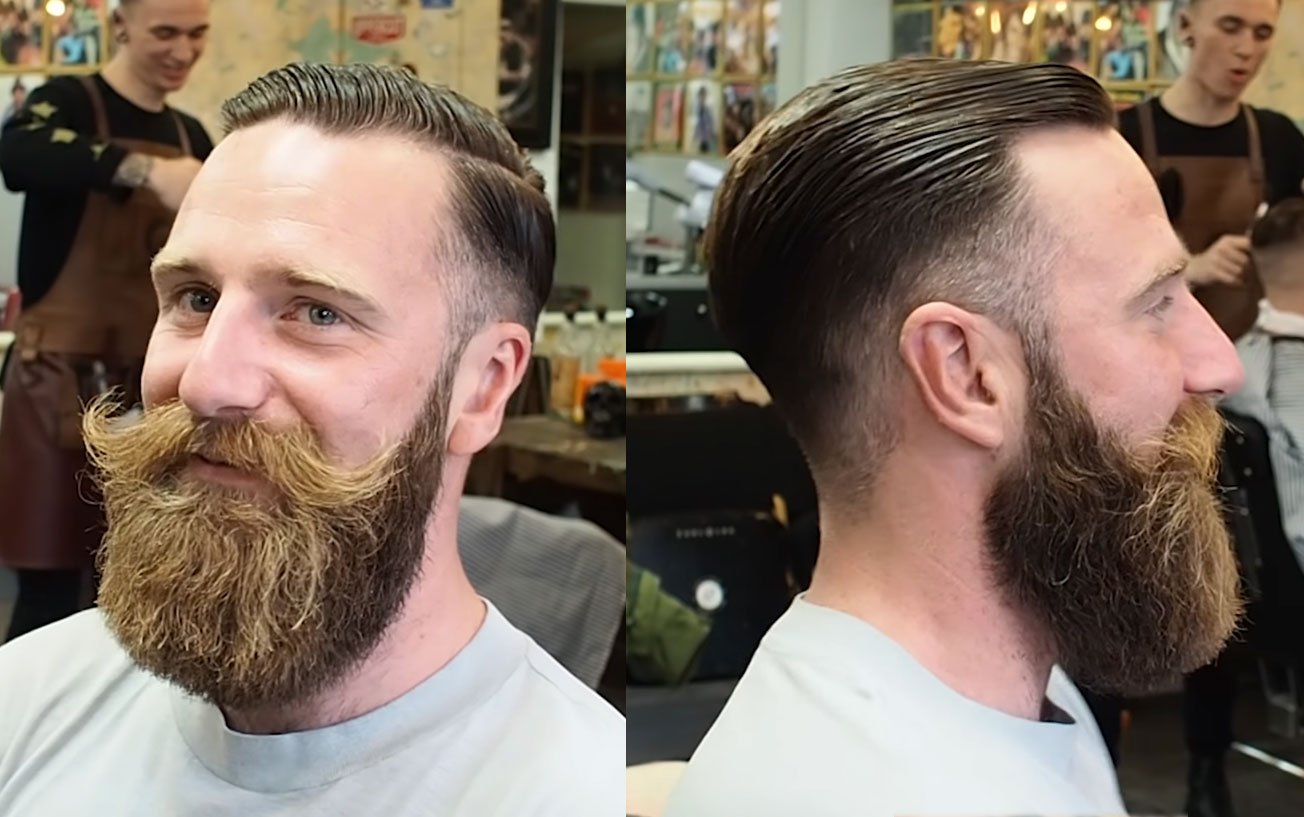
Looking good!
Grooming consists of 2 steps:
I love Houdini for its procedural workflow and even though the grooming tools are effective, I used (and normally use) Groombear, by Kamil Wacławiak. This toolset is amazing and lets you style hair very quickly.
You can easily bake this node nondestructively, giving you the ability to share your scene with someone who does not have this plugin, or an online render farm.
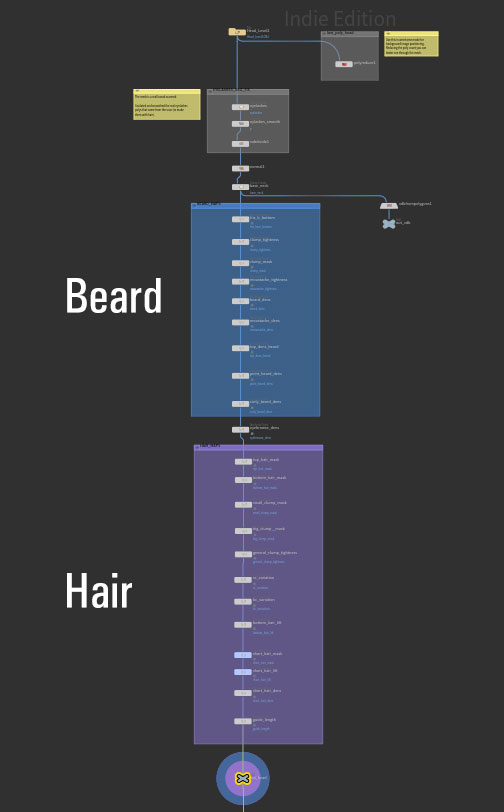
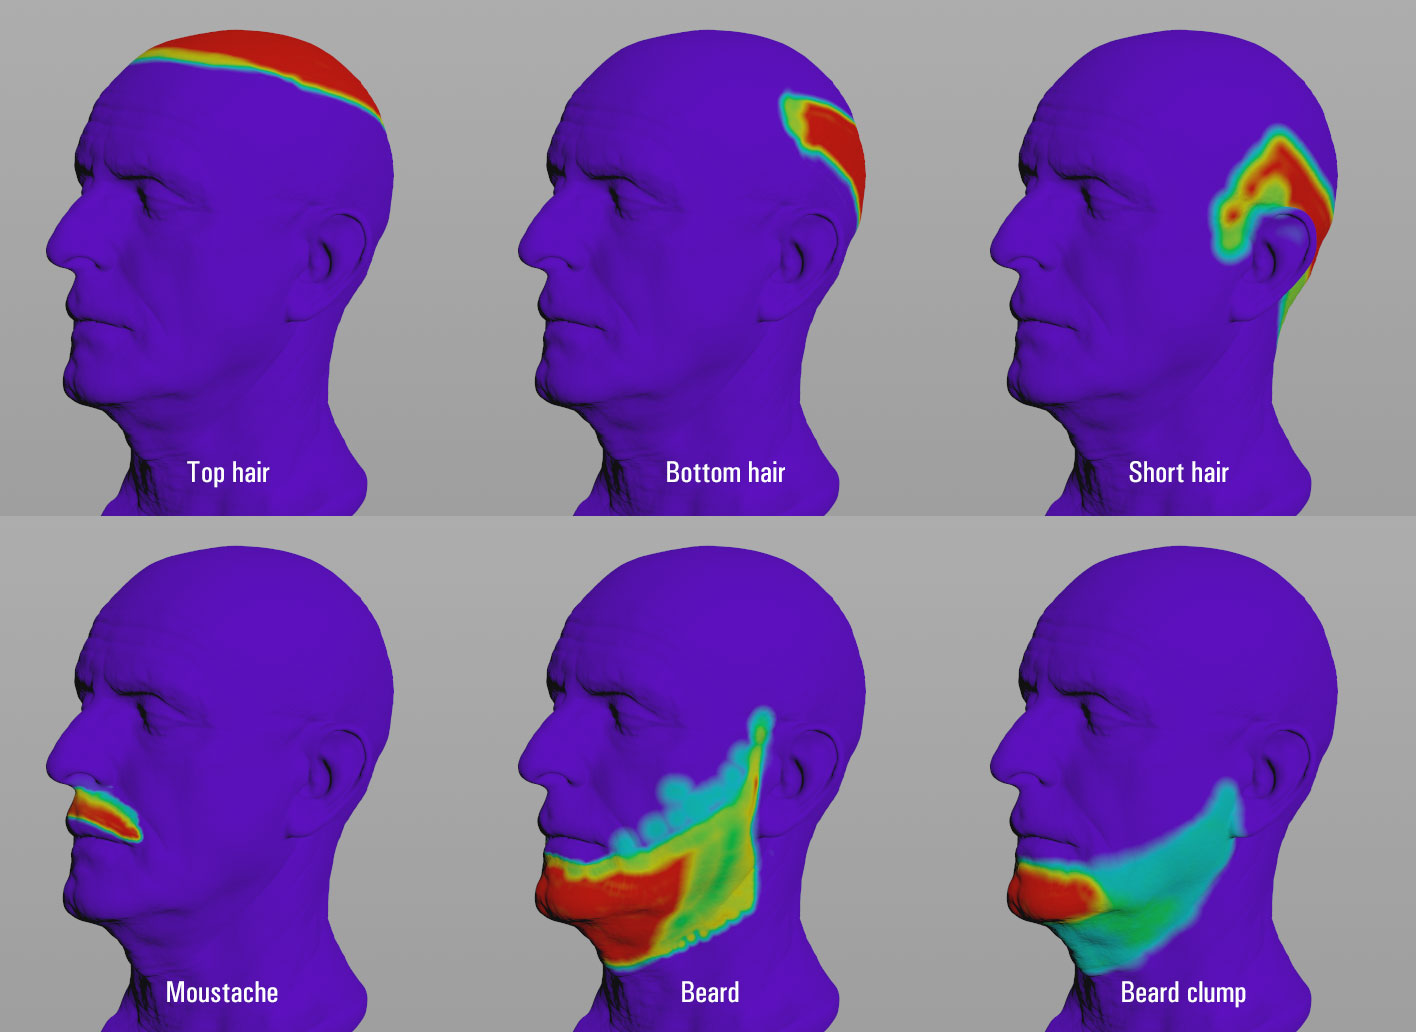
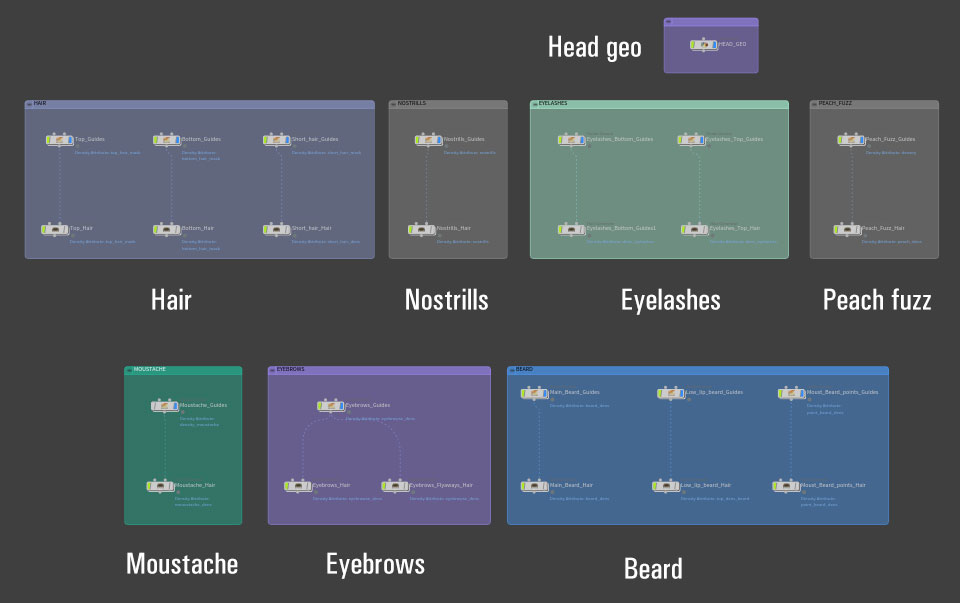
I divided the grooming in different parts and gave them separate guides and density maps:
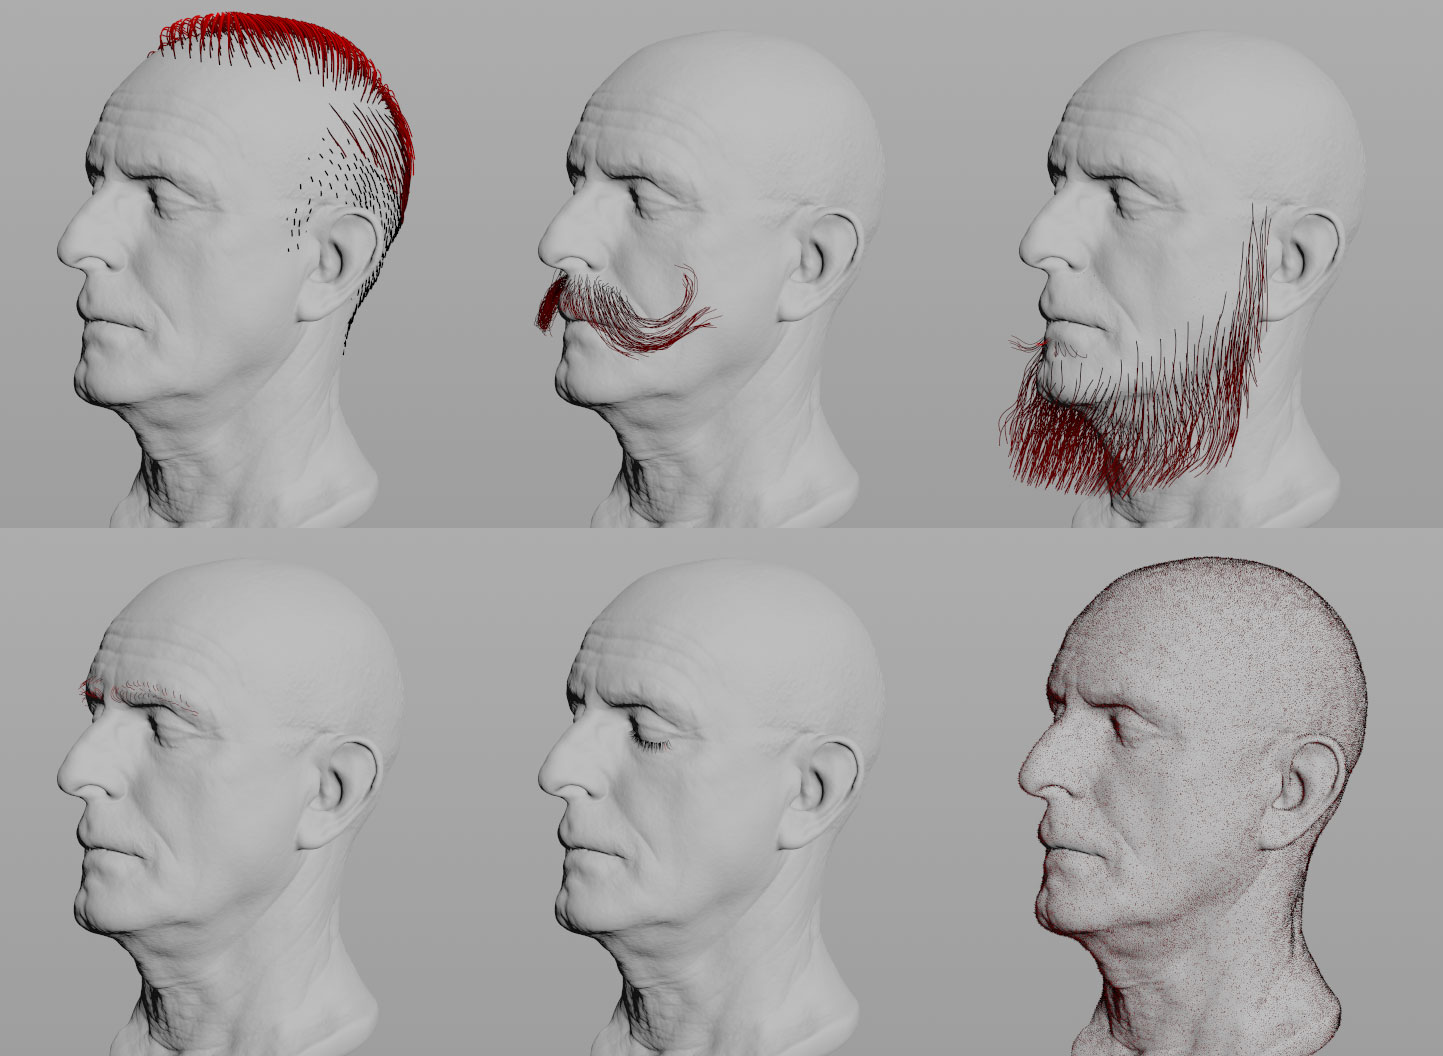
Styling guides is the key, it’s also the most difficult and time consuming aspect of grooming.
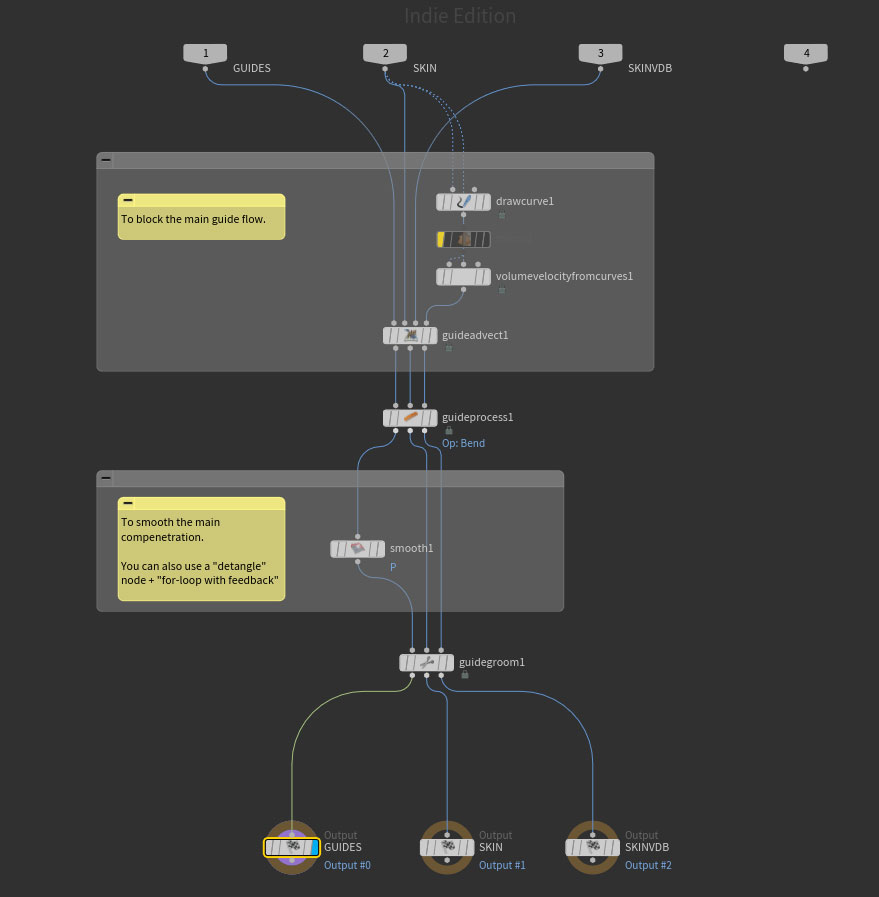
This section happens inside the Guide Groom node:
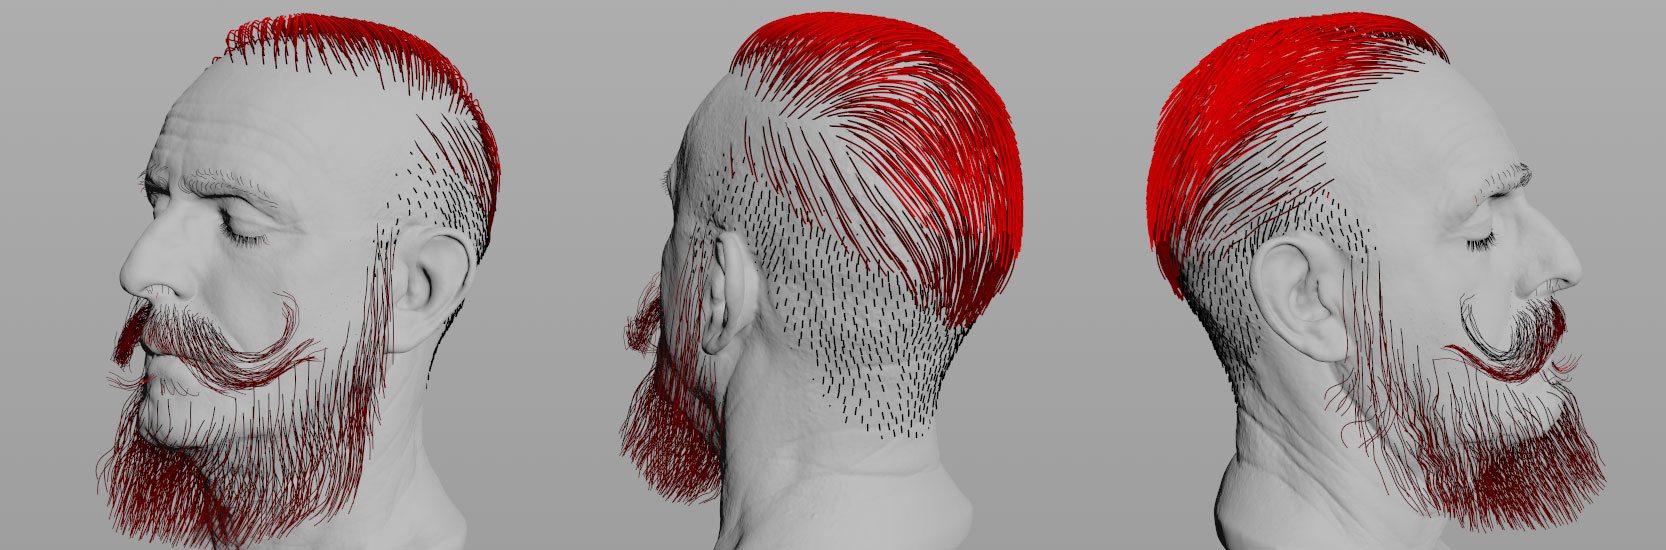
Top Hair Guide Setup
The process is not always the same. When possible, I like to have a real life approach and for this purpose Houdini has great tools. One of these useful tools is the Guide Advect tool, which allows you to easily block your hair by simply drawing strokes.
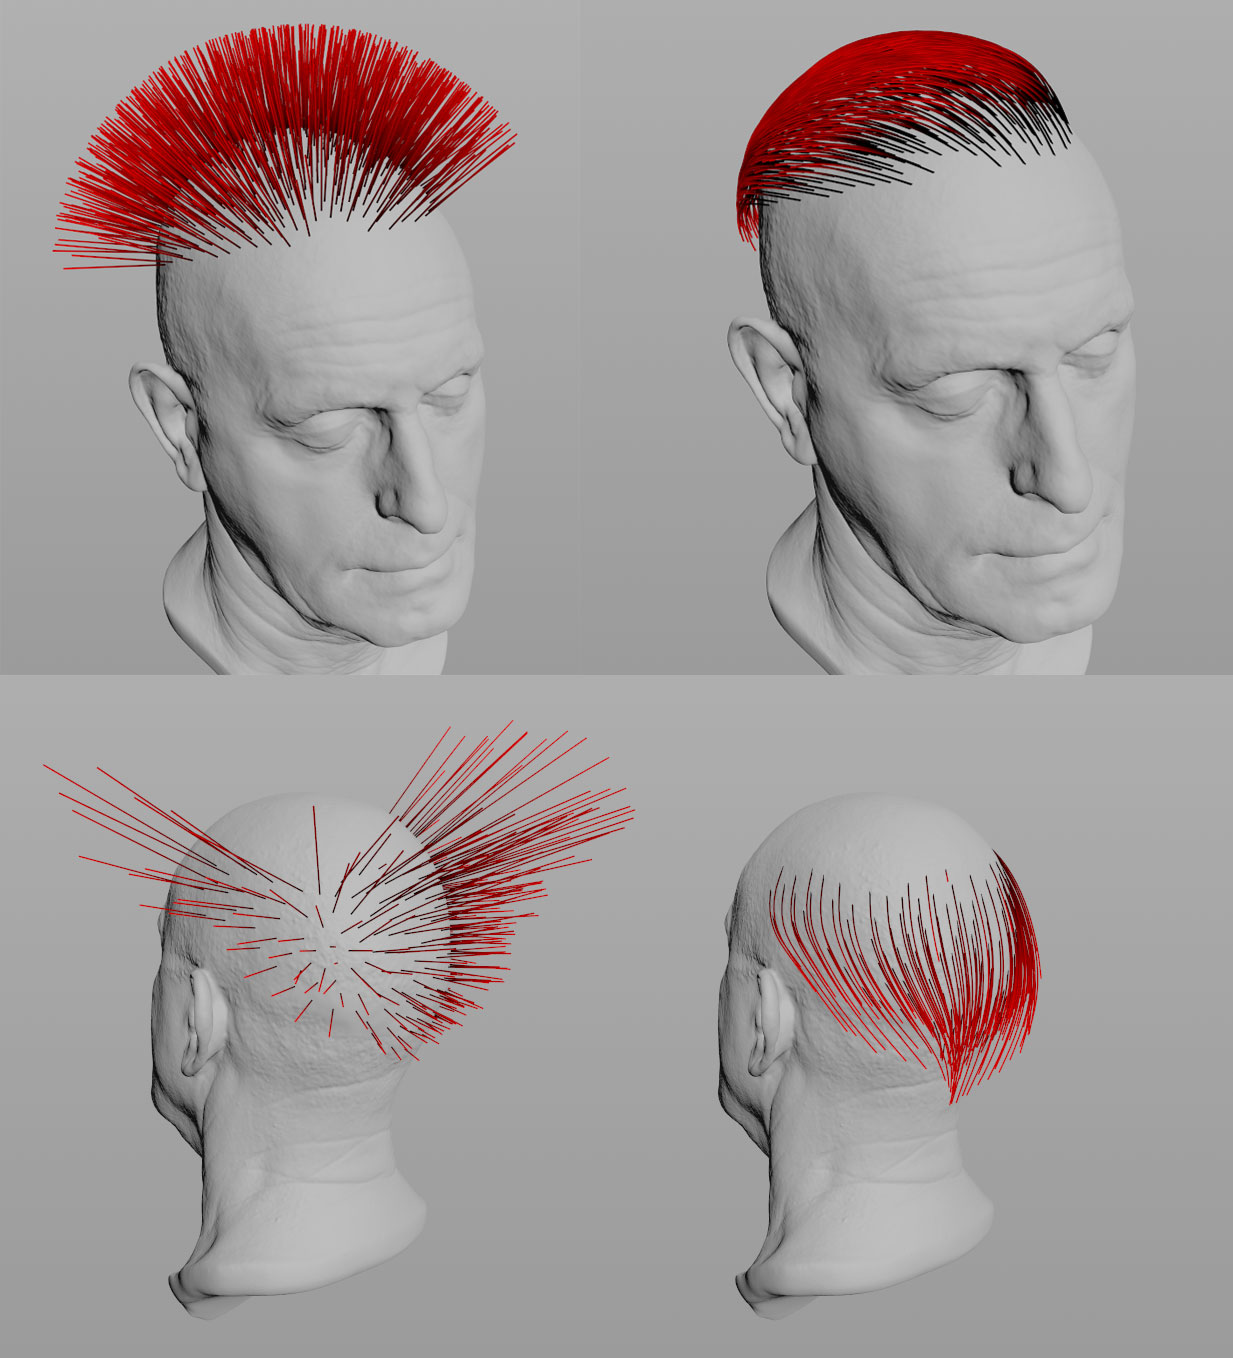
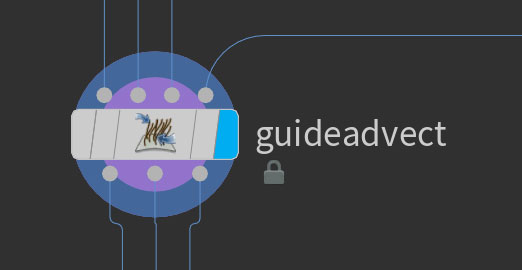
Guide Advect points through a velocity volume
During this process, I continue using Houdini grooming tools and GroomBear to style the guides following my references. This is not a difficult process, but it’s very time consuming if you want to make a believable digi-double.
This is the final result:
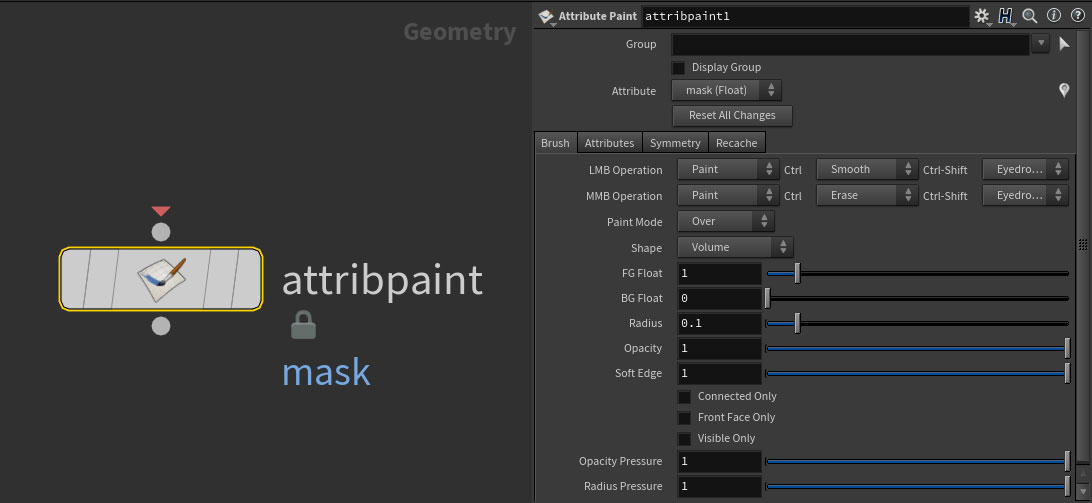
Next step is to paint the masks for each part. This is an important aspect of grooming, as it allows you to control how and where the hair grows using color maps.
Houdini 18 introduced a new version of the Attribute Paint node with great new improvements.
The more masks you paint the more control you can have. This is my map setup:
And here we're visualizing a few of them on the model:
Infrared color maps let you easily see even subtle density differences.
Now it’s time to style our hair, so for each guide section I created a Hairgen Generate node where I could add all the modifiers to make the hair look as real as possible.
Every hairstyle is different, but most of the time you will end up using the same modifiers. What makes a difference are their settings and combinations.
The most common modifiers are Clump, Noise, Bend, and Length.
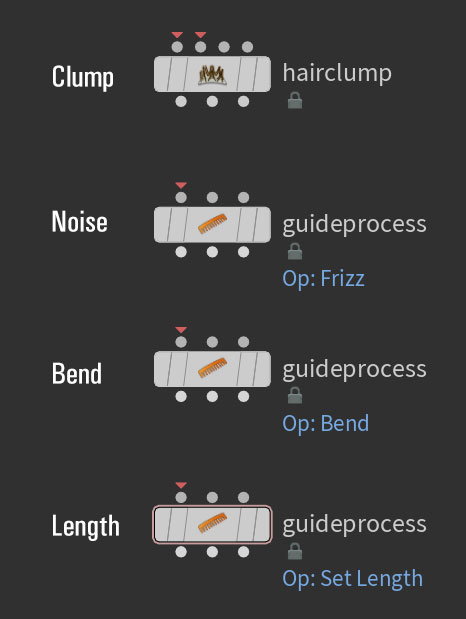
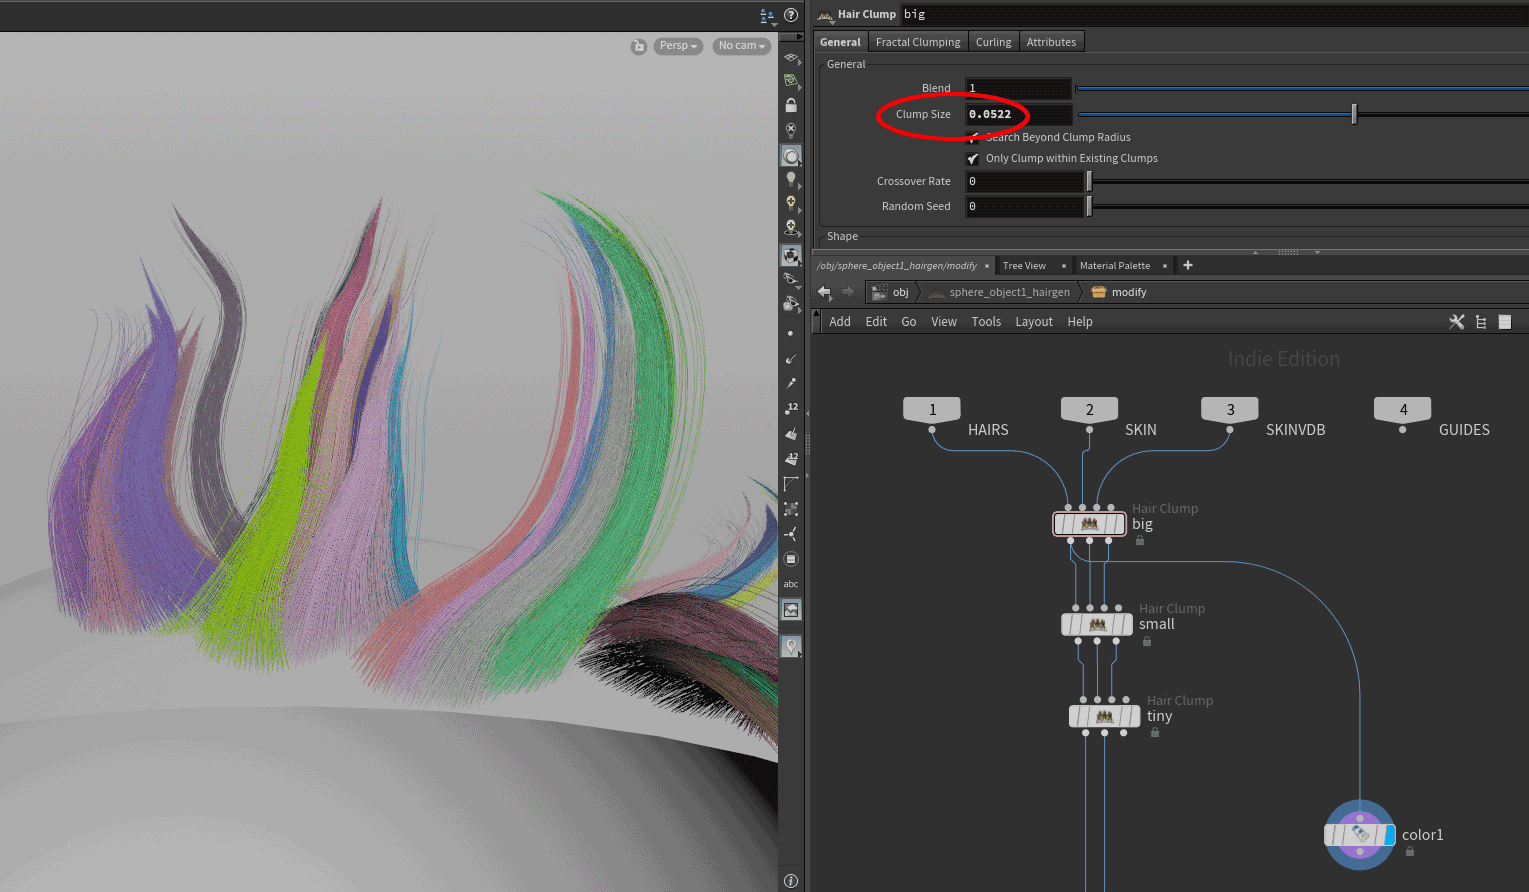
I generally start with the Clumps because they are the soul of every groom and their layering is a key feature.

You can do it in different ways.
Method 1
You can use the Clump Size setting of the Clump node and decrease its value for each layer.
Method 2
The Houdini clump node has a Fractal Clumping option that is great.
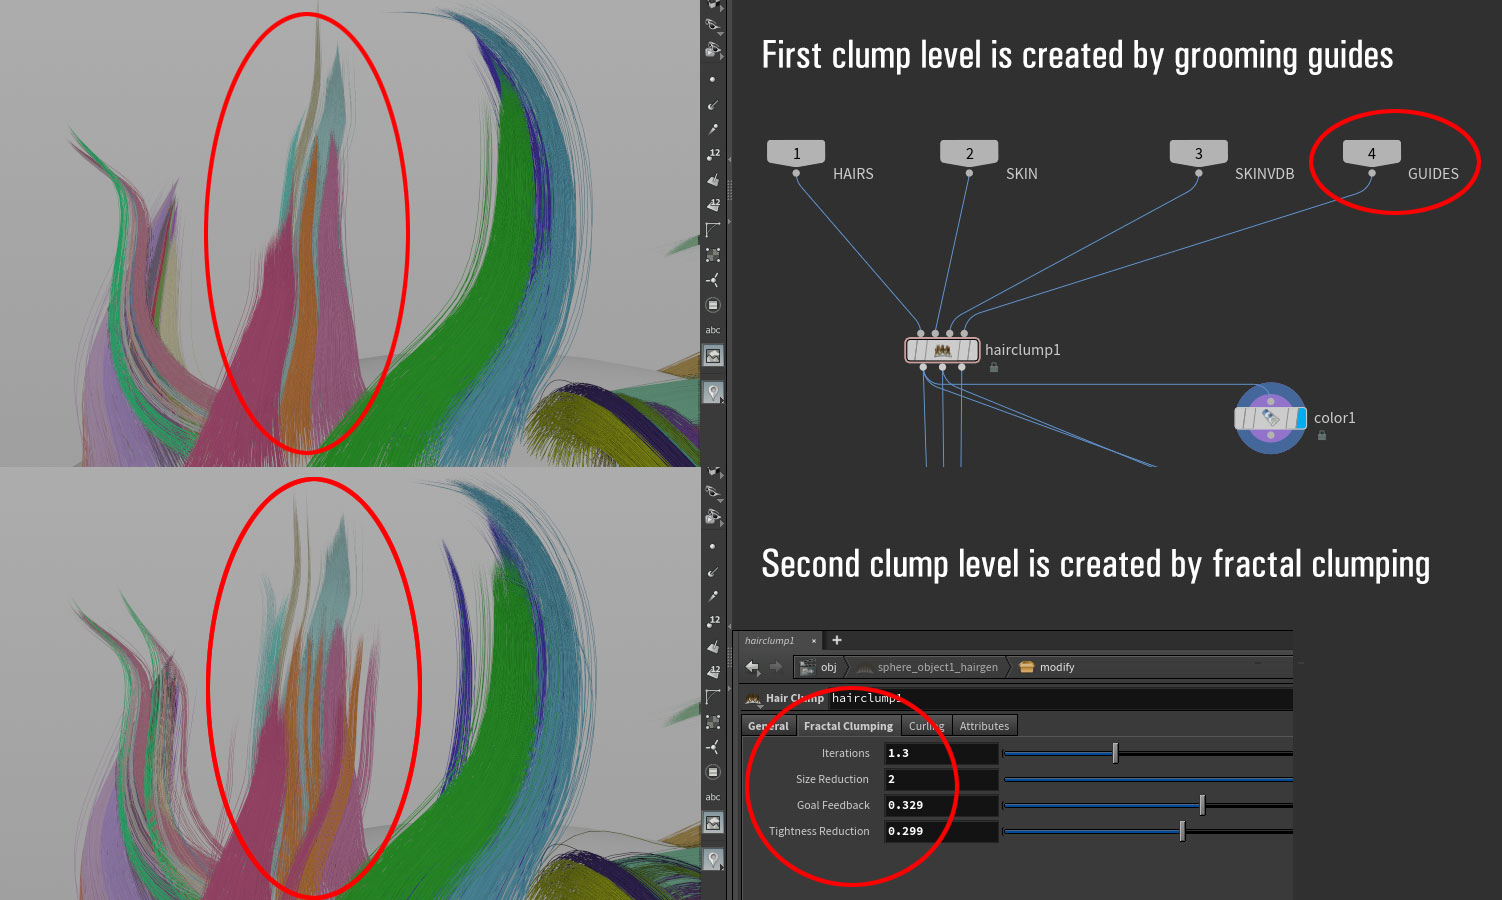
Using the settings of the Fractal Clumping tab you can subdivide the main clump using just one node.
Method 3
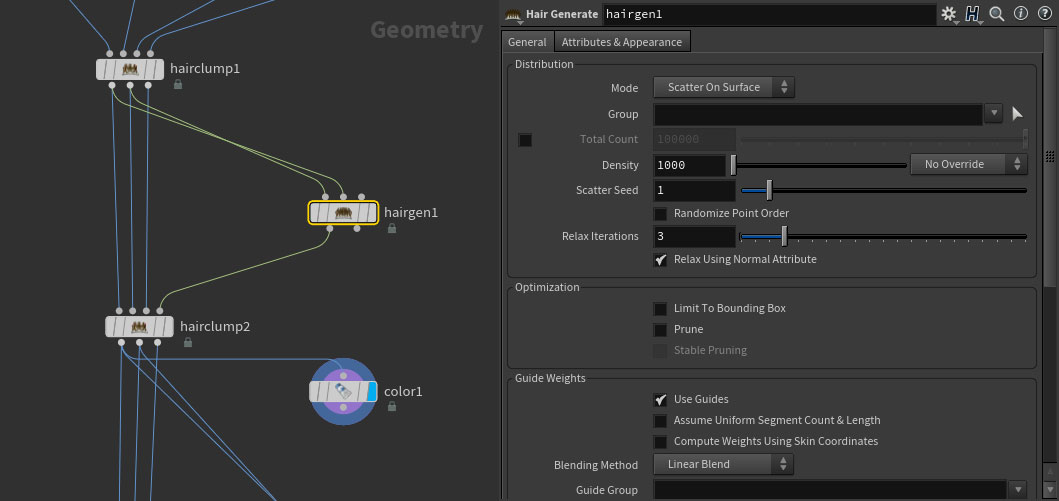
Another way to create clump layers is connecting a Hair Generate node into the Custom Clump Curves input of the Clump node. This way you can have more control and even add modifiers to the hair/guides:
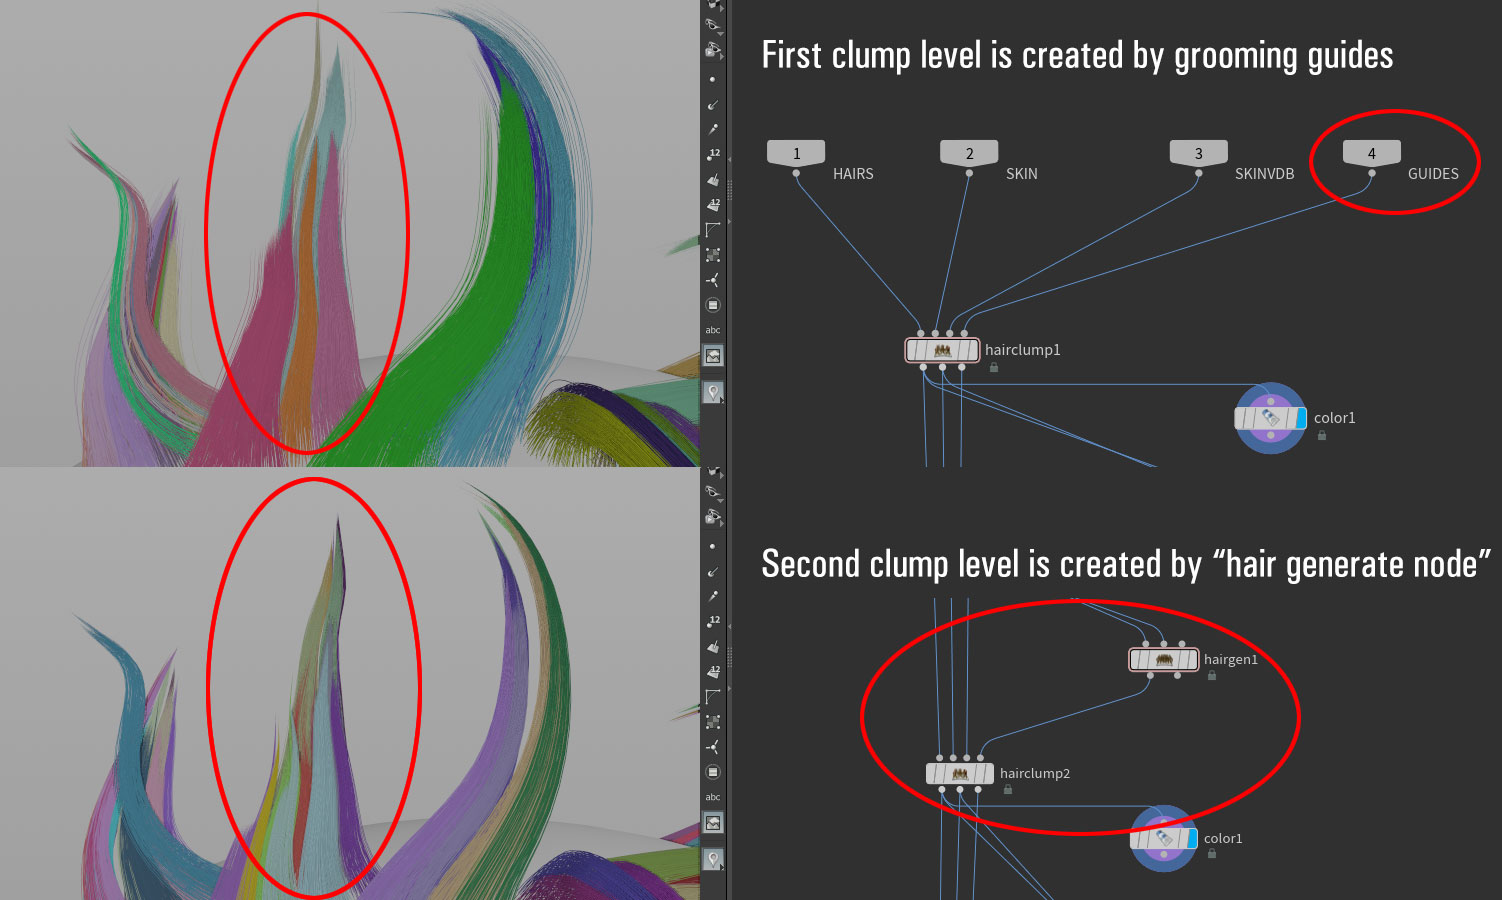
You can make the first layer with the Hair Generate Node as well. The advantage of using this node is that you can better control the clumping of curves by using the node parameters (density, masks etc.):
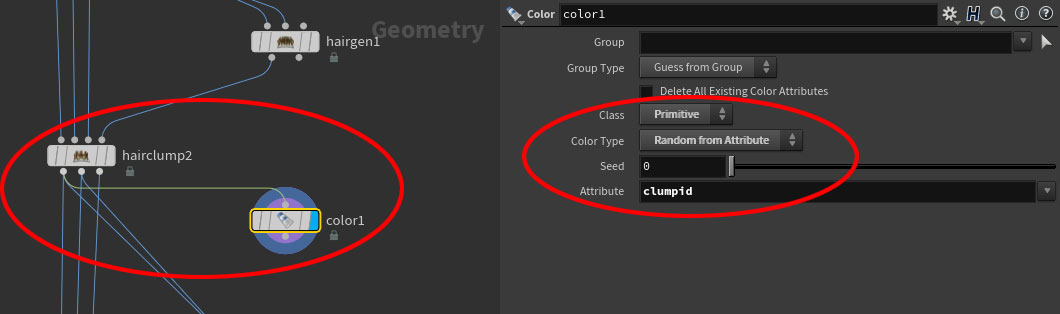
To clearly visualize your clumps you can connect a Color node to the first output (Guides) of the hairclump node and assign a clumpid variable
After this, I use a noise modifier like the Frizz node to “give life” to hair. By tweaking its settings you can get almost any noise effect you need.
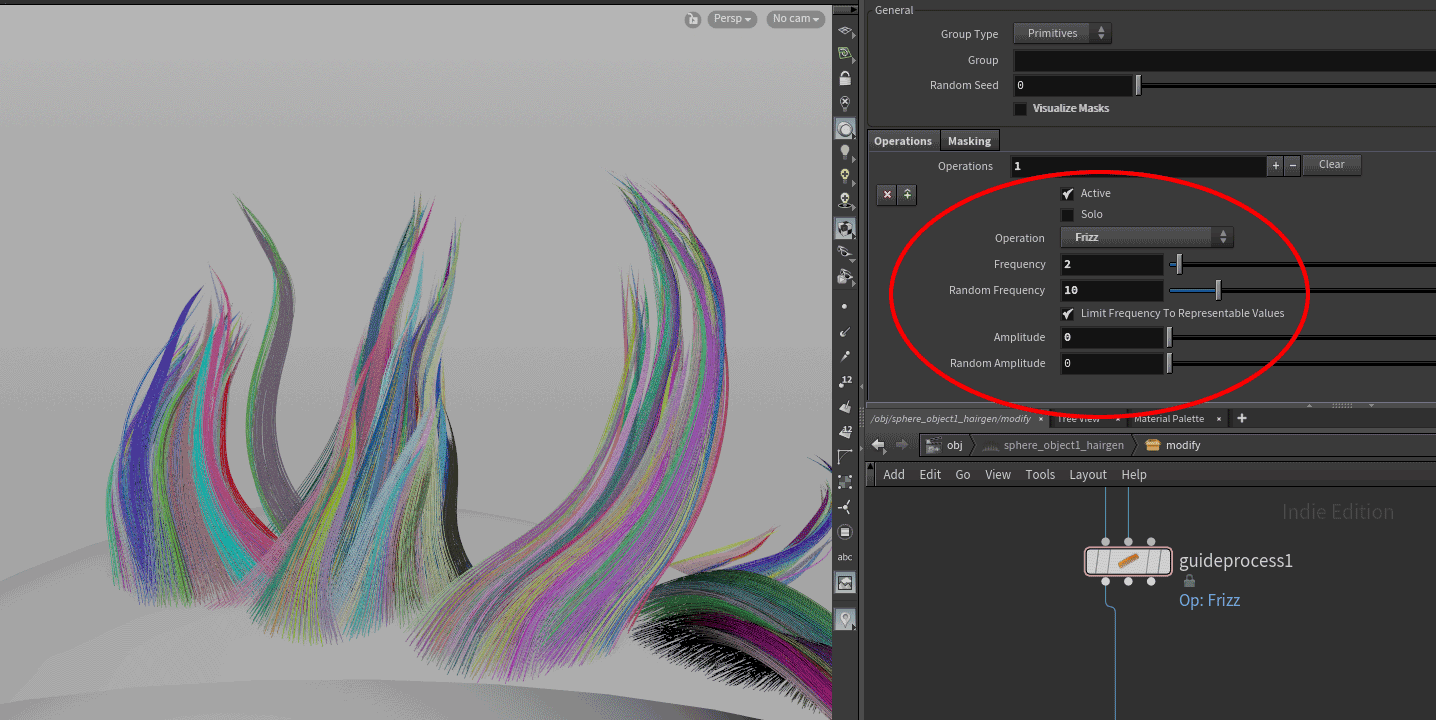
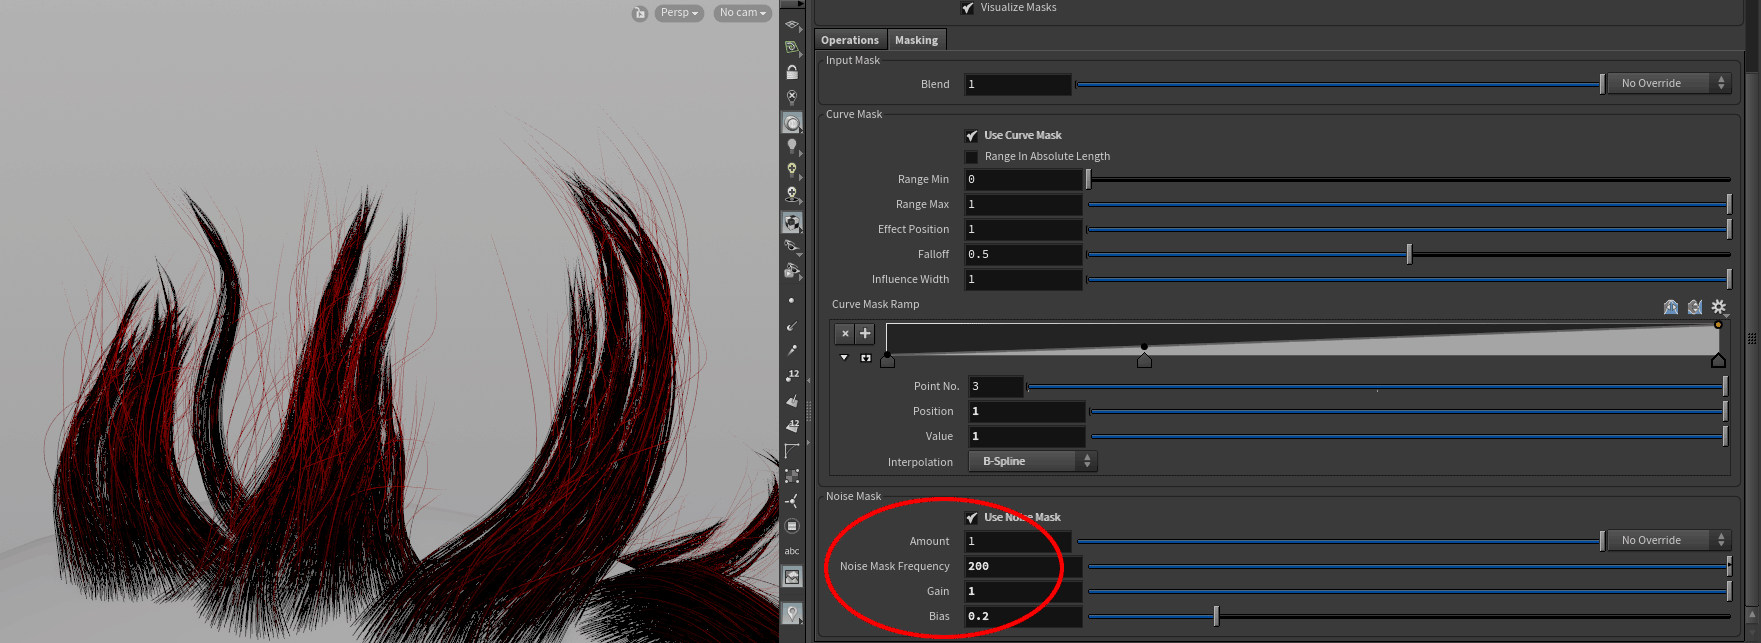
This node is very useful for achieving another key aspect of real hairstyle: flyaway hair. Which are a small series of hair strands which frizz up due to dryness, static energy, hair product, and other reasons.
To get flyaway hairs, use the Noise Mask of the masking option tab. Set Gain to 1 and tweak Noise Mask Frequency and Bias settings to decide how many flyaways you need:
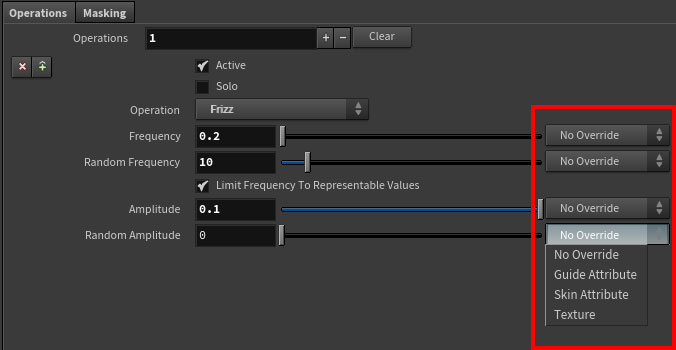
Variation is the other key aspect for getting realistic hair and Masks are very important for this. Use them to drive as many attributes as you can, because hair consists of about 150K individual hair strands that, depending on many elements (dirt, age, length, gender, etc.), create a wide range of patterns.
In addition to the paint attribute masks we just saw, almost every Houdini node attribute has a menu that lets you choose between different kind of masks.
Unfortunately Houdini does not have a “noise” brush like Maya, so if you want some grunge effect, you have to import texture maps from external paint applications.
Another useful modifier to aim hair and make it look real is the Bend node. Use it in combination with its Curve Mask option:
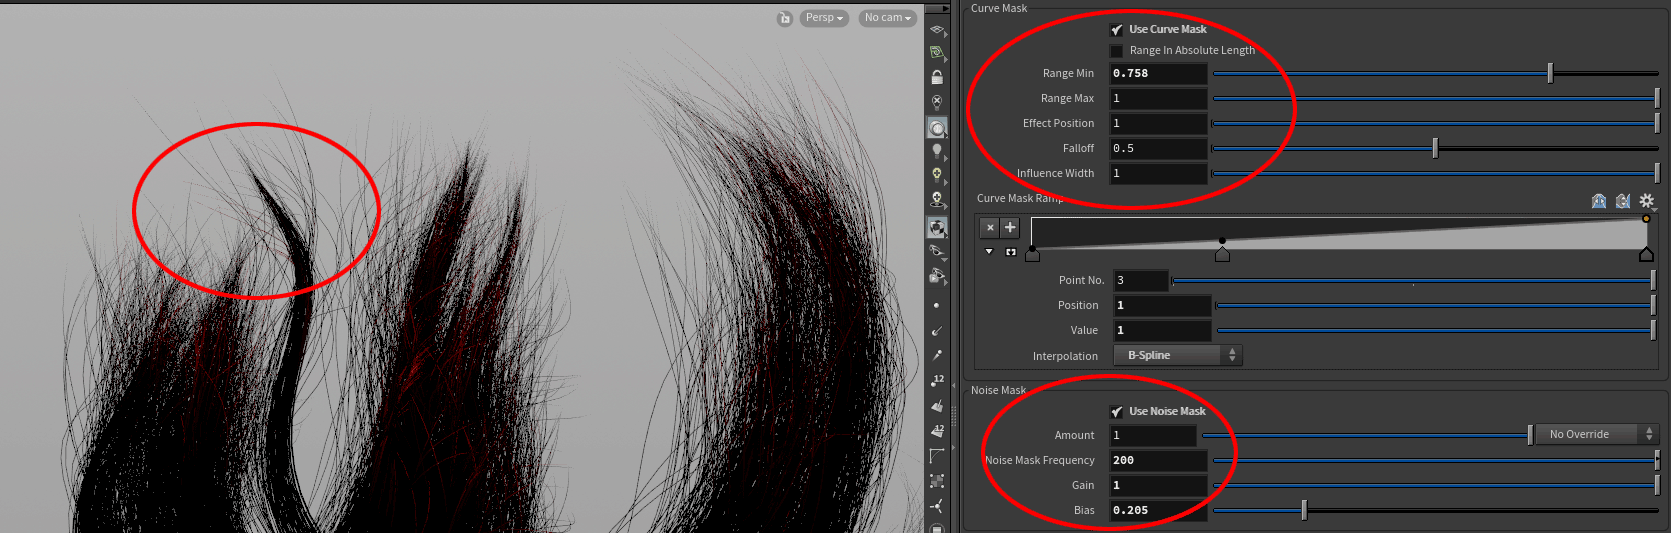
Setting the Effect Position and Range Min and Max you can decide which part (red) will be affected (check Visualize Masks to see it).
One last tip for hair realism is the Curl option in the Clump node. Very low values work well in most situations.
No Curl. Notice how regular the results are.
With Curl. More natural hair patterns. Sometimes it’s subtle, but every small detail counts.
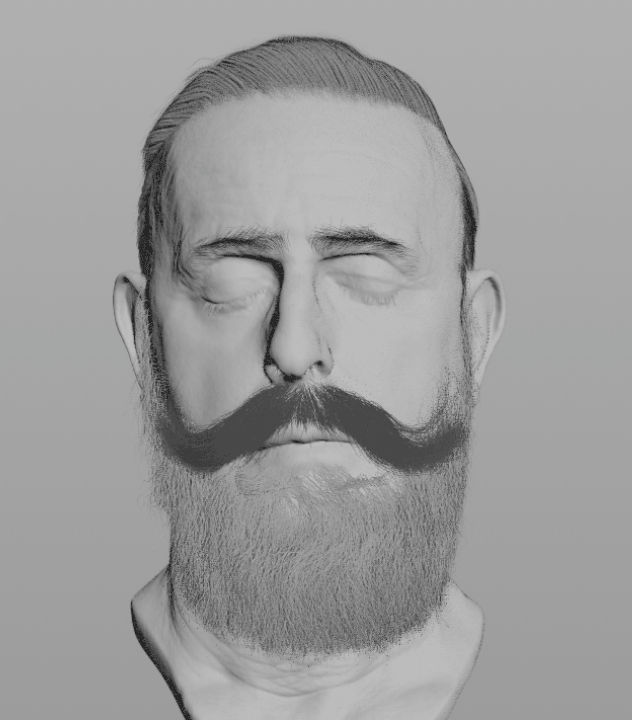
We can apply the same techniques to the moustache and the beard as well. The only differences are in the modifier settings, so get creative!
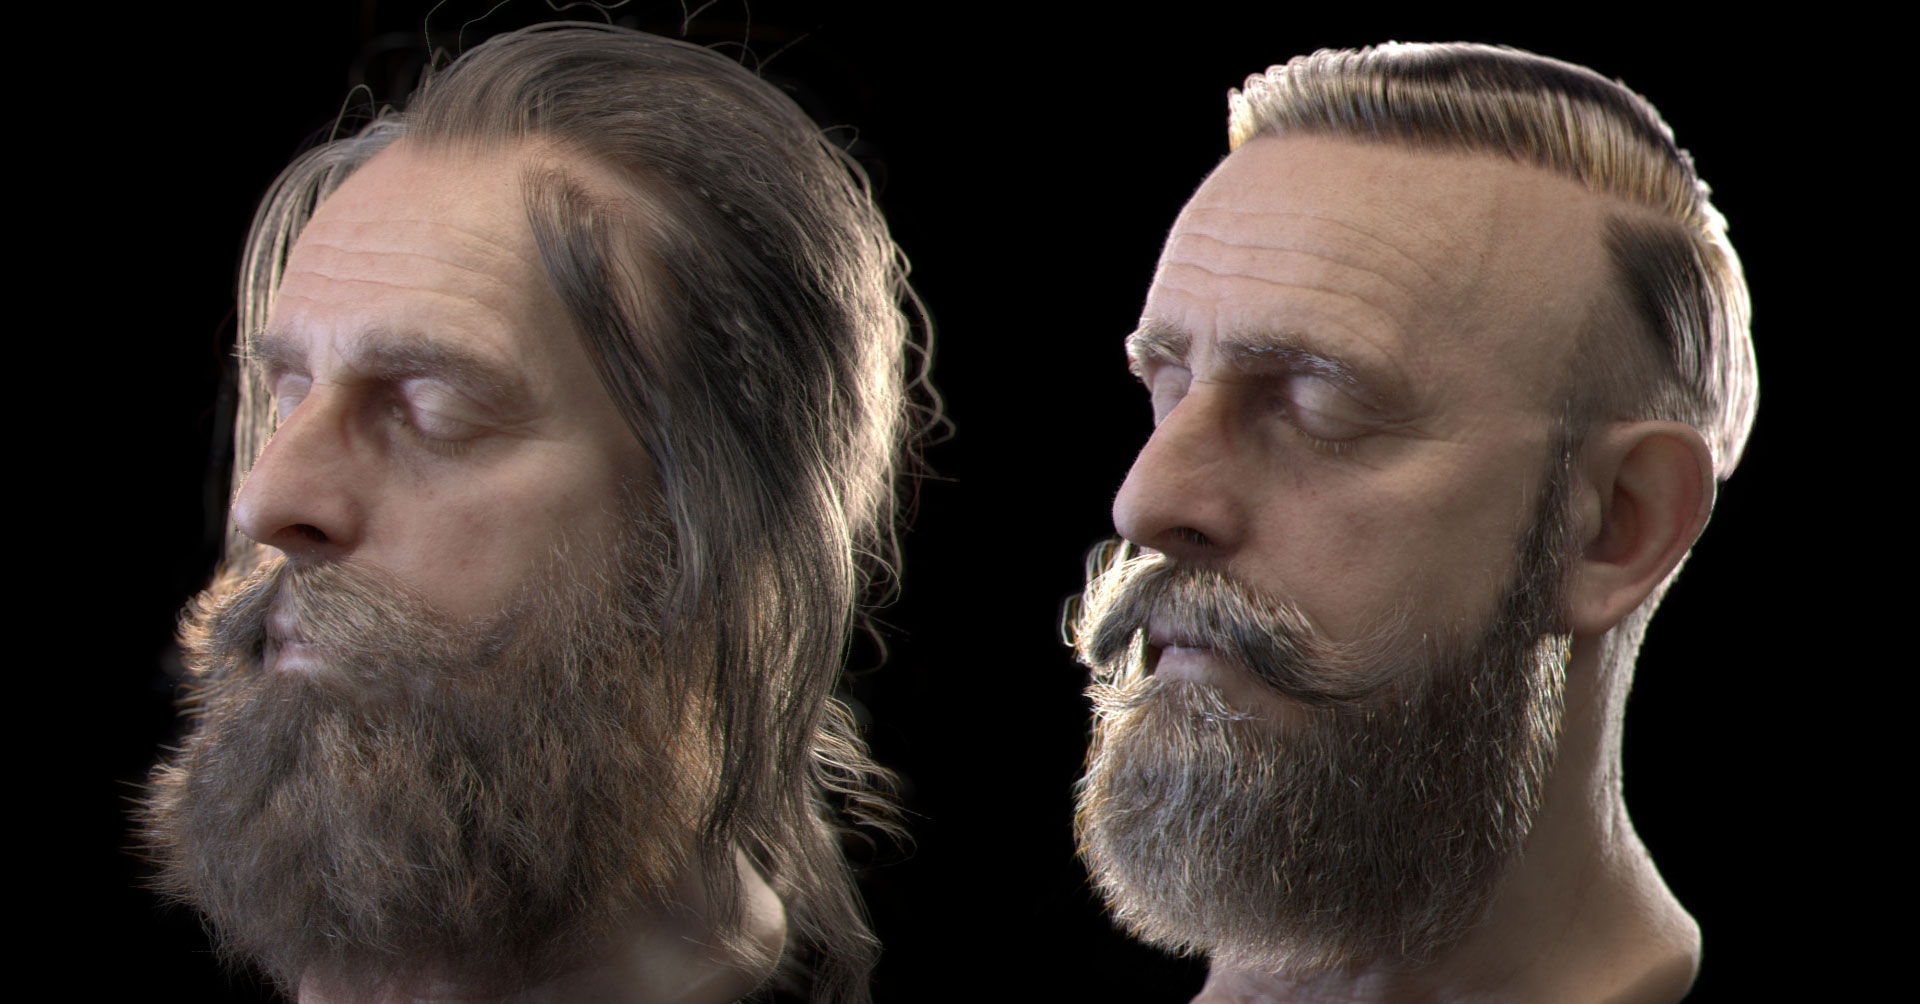
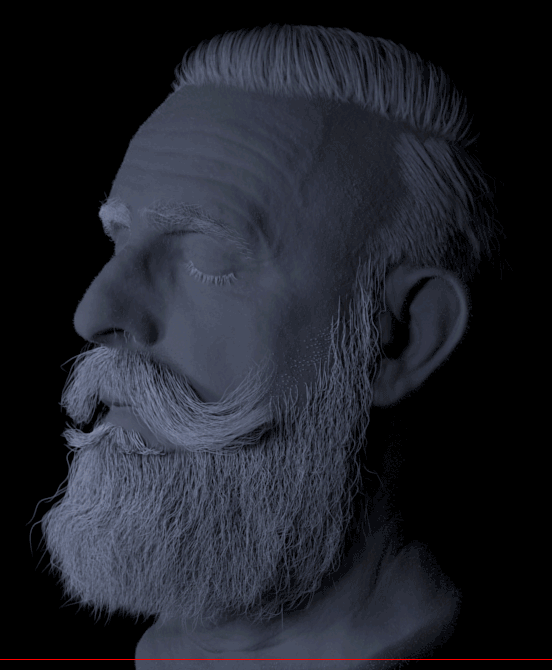
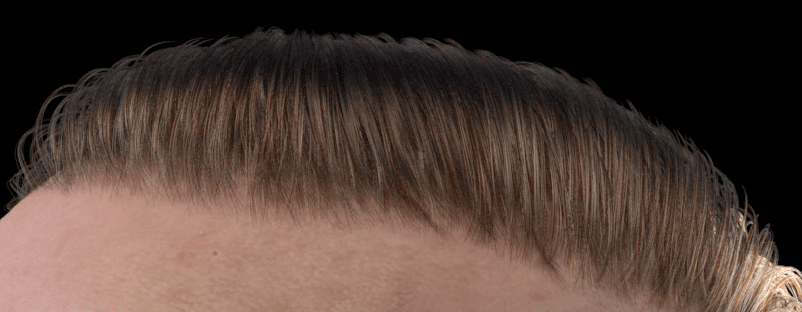
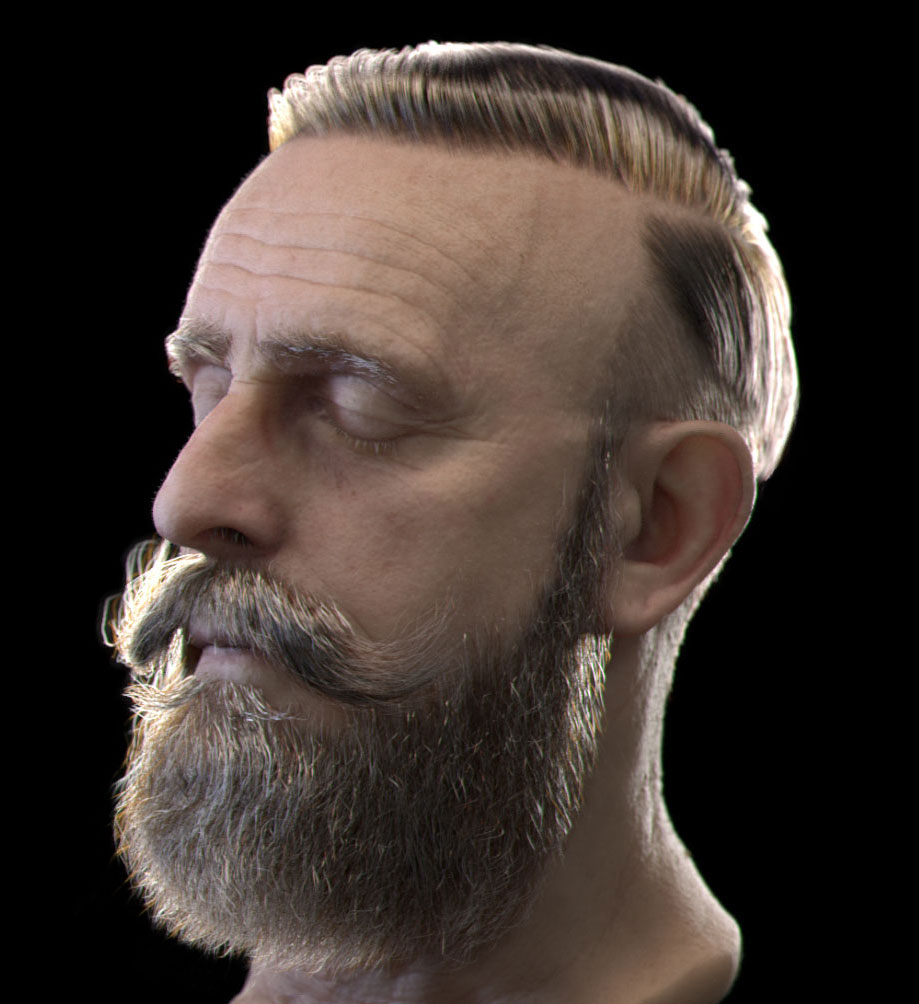
This is the final result:
Now that we got the hair style we were looking for, it’s time to put some lights and start shading the model.
Light setup is very important because it lets you check the hair flow and the general appearance. If you want to render a turntable it’s important that your model renders in an appealing way in 360°.
I usually start with a three point lighting setup (key, fill, back) and then add other lights to make sure all angles work well:
To better understand how lights affect your model, isolate them one at a time.

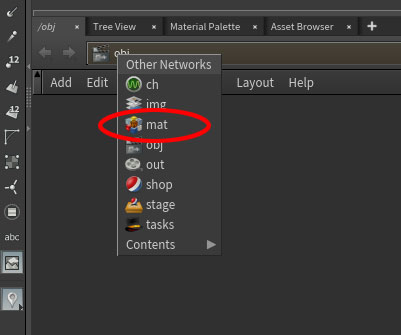
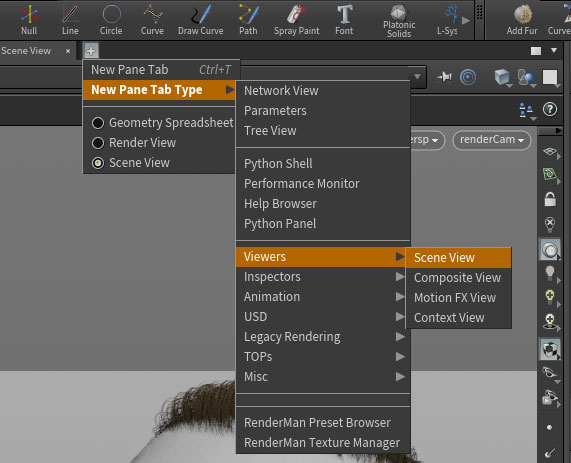
Houdini is divided in Networks:
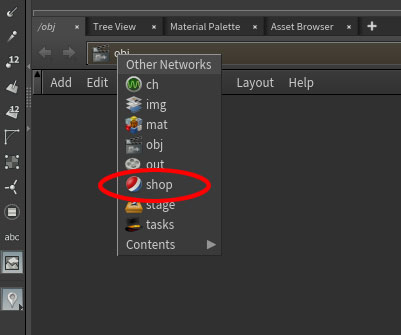
Shop is the place where you usually build your shaders.
Before building the final shaders I usually use two simple gray ones:
With these I can quickly check my hair and the tone difference helps me identify gaps or other problems in my groom. Once I’m happy, I'll build the final ones.
RenderMan shader color is not visible in the Scene View and when applied the model appears grey. To overcome this you have to build a native Houdini material in the material network:

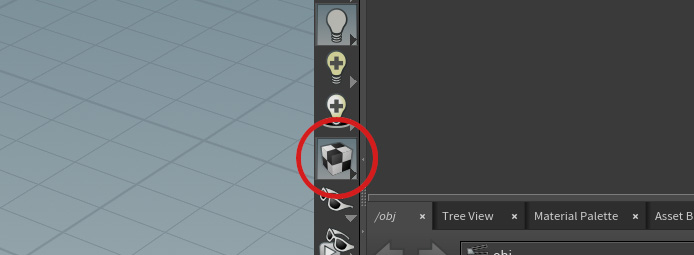
To visualize the material click the Texture icon on the Scene View right toolbar:
If you don’t see the shader applied, close the current Scene View and open a new one:
Let's create a simple skin shader...I won’t do shading in-depth since there are some great tutorials out there (see the links at the end) and the purpose of this training is to give you a general idea of the process I used in Houdini.
Fortunately for us, 3D scan store models come with all the textures ready to use. Before connecting the textures you need to convert them to .tex files. The simplest way is to use the RenderMan Texture Manager, which handles all the texture conversion for you.
You can also use txmake, which lives in $RMANTREE/bin.
A quick trick to convert textures is to open an empty command prompt, drag and drop the txmake executable in the cmd window (instead of writing the path), and then drag and drop the texture you want to convert.
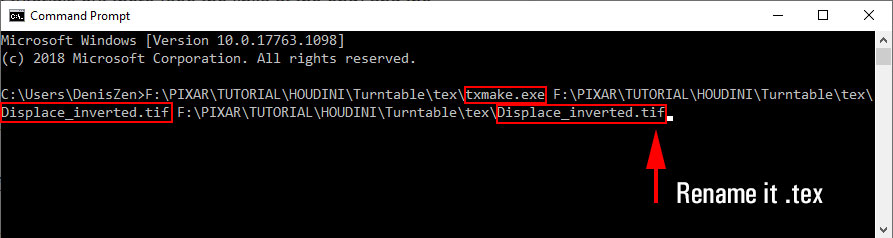
To quickly save the new tex file, drag your texture twice in the cmd window and give the last one a .tex extension.
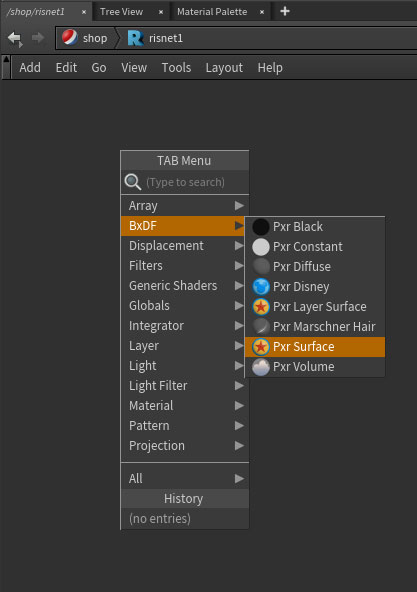
Once you’ve converted your textures, create a RIS Shader Network (click the icon in the RenderMan tab), then go inside the newly created network and create a PxrSurface material.
Inside this node you can build your material.
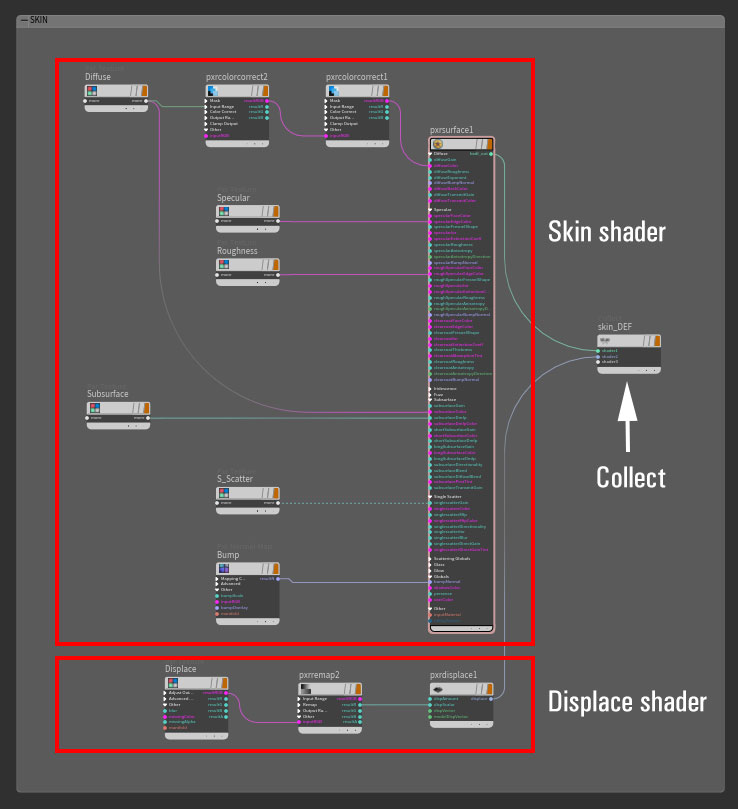
As you can see, I divided the final material in two, a BXDF and a Displacement, both of them connected through a Collect node. PxrSurface deals with surface shading and PxrDisplace with geometry.
As a groomer I don’t go crazy with the shading because it is typical in production for the look-dev guys to further refine this, so I simply connected the maps (Diffuse, Specular, Normal etc.) to their inputs and tweaked some general shader settings.
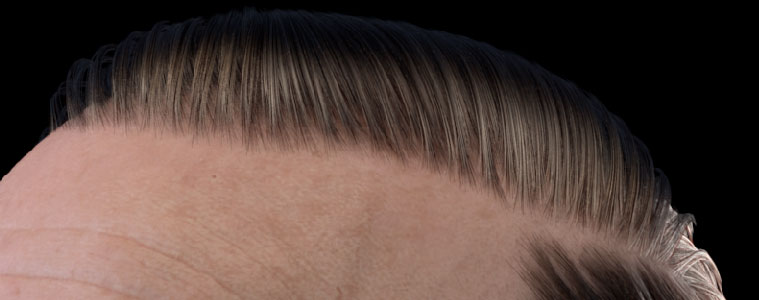
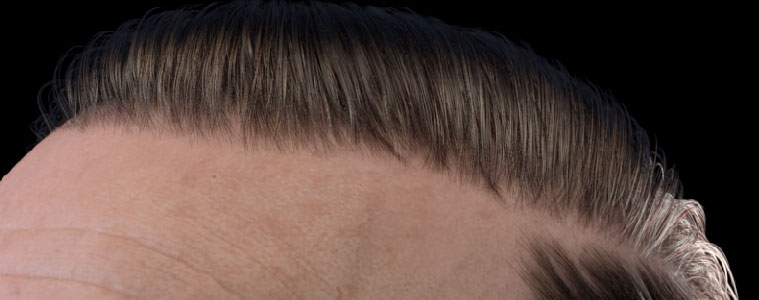
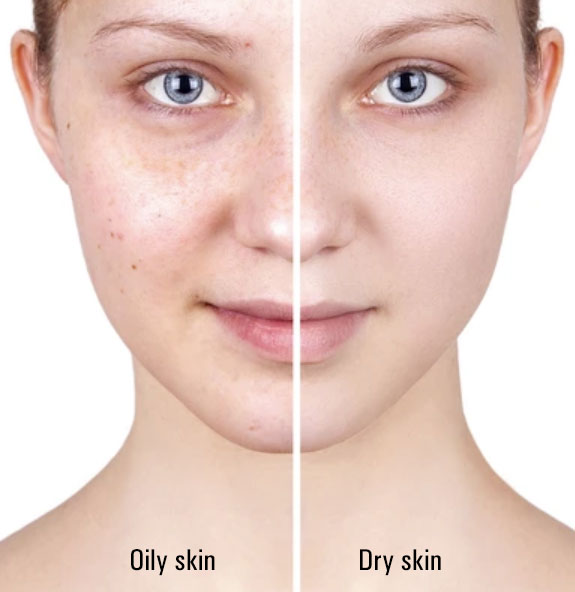
Note how the “before skin” is more shiny/oily than the “after” one. This happens when grease and dirt cover the skin. You can adjust this using different specular maps and values.
If you want to learn some more in-depth shading topics, check out these useful trainings:
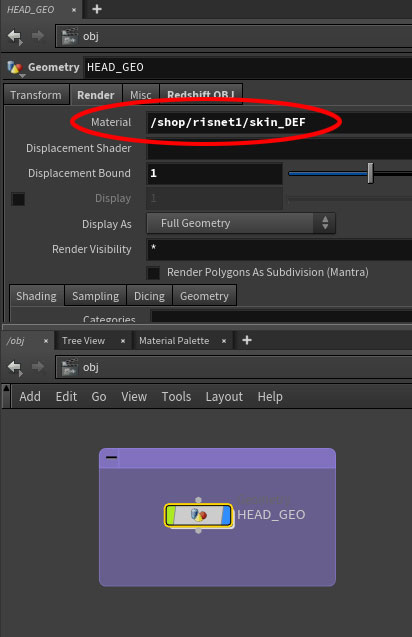
Once you are ready to apply it to your model, load it in the Material parameter of the Render tab of the Geo node:
For the hair, I made four different shaders to have the variation I discussed before:
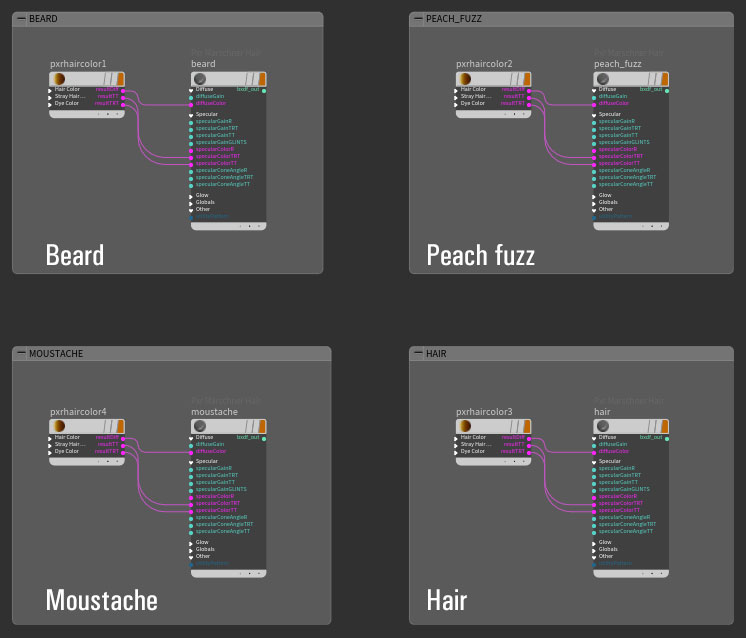
As you can see each shader consists of two parts:
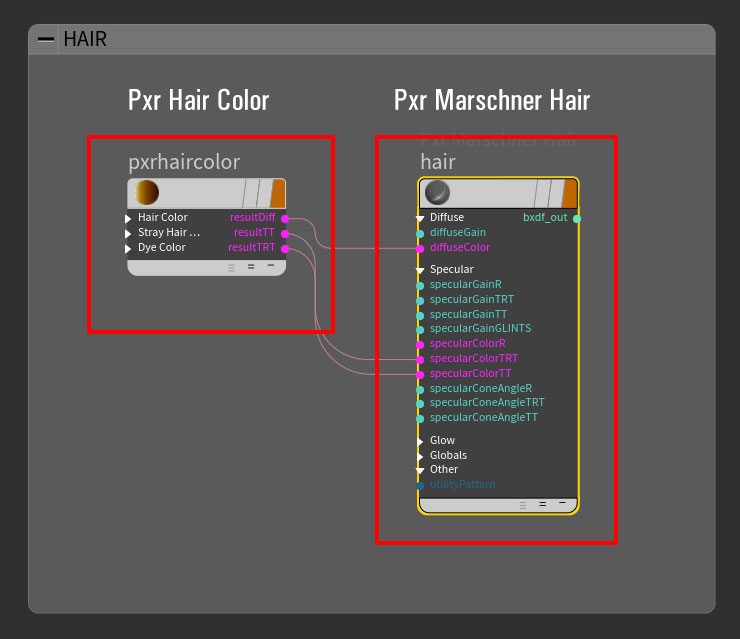
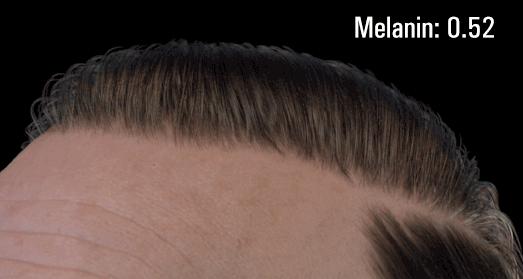
PxrHairColor is a melanin-based pattern, so we can go from blond to dark by changing a single slider:
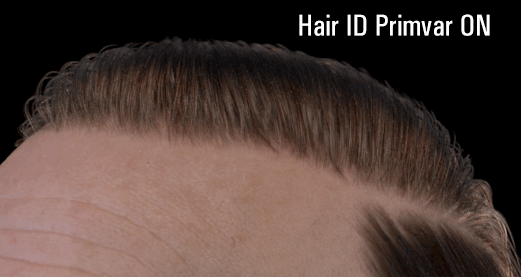
Another very important setting you have to pay attention to is the Hair ID Primvar, which will give each hair strand a unique value. If hairIndexPrimvar is empty, none of the randomizing options will work.
Look at the difference:
PxrMarschner Hair shader deals with the physical shading aspects of the hair. By changing the specular settings (Primary, Secondary, and Transmit) you can go from a shiny/wet look to a softer one:
For a hair color deep dive, the docs are a great resource:
Now it’s time to render our model. As a groomer, my deliverables generally include rendering a turntable at 360°, but instead of rotating the model, I prefer to rotate the camera, which avoids hair cooking times. To achieve this:
The null drives everything:
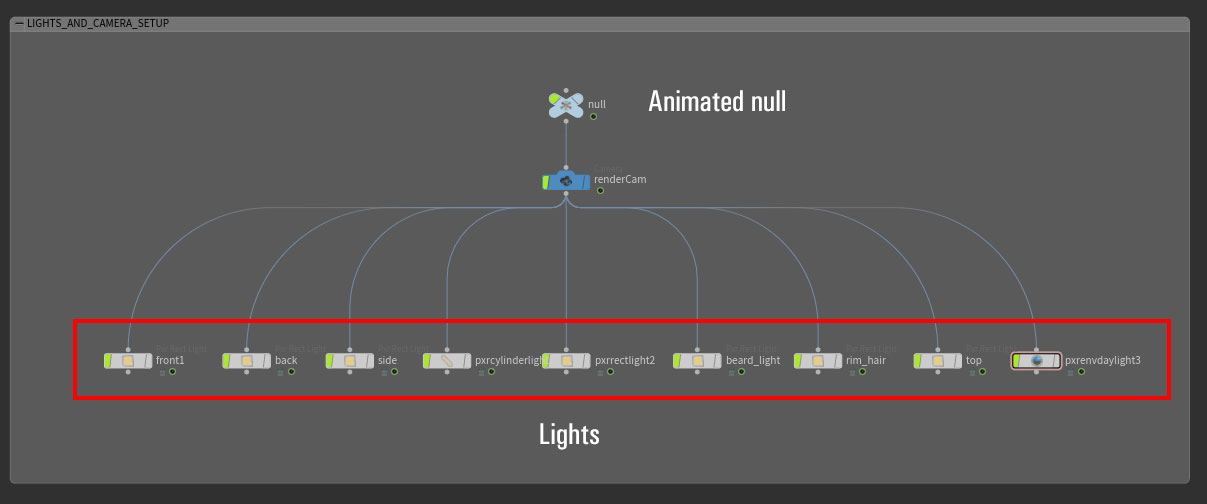
Before parenting the lights remember to check the Keep Position When Parenting option in the light Transform tab to avoid the light moving from its position.
To create a RIS node, go to the Out Network, press Tab and choose RenderMan from the dropdown menu:
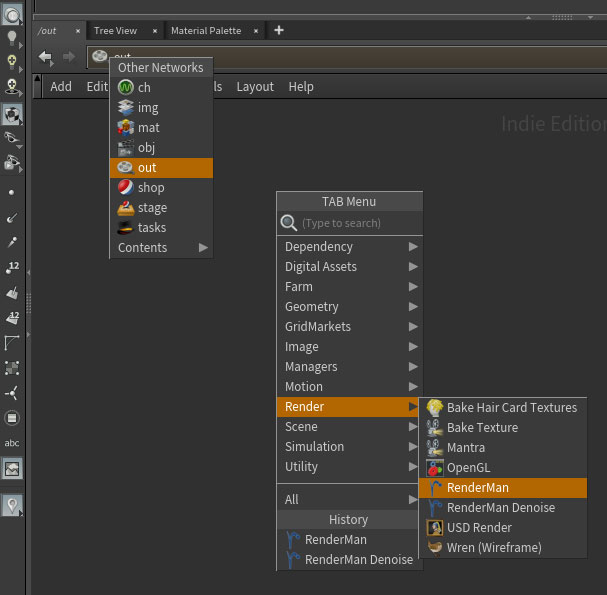
Click the RIS node you just created to access its setting in the Parameter Pane Tab (or press P).
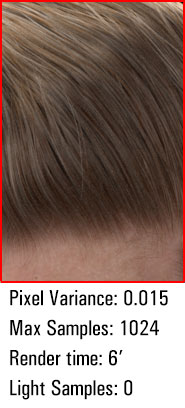
Rendering shaded hair is very time consuming and you have to pay great attention to your settings, especially for the Sampling. I did many tests and these values are a good tradeoff between speed and quality:
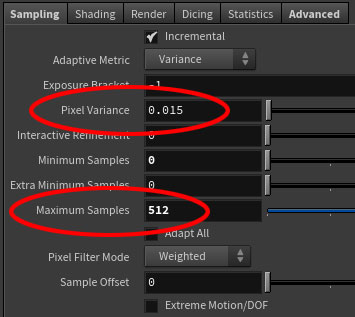
Noise is more evident in the darker parts of the image. To get rid of it you can reduce the Pixel Variance and/or increase the Maximum Samples:
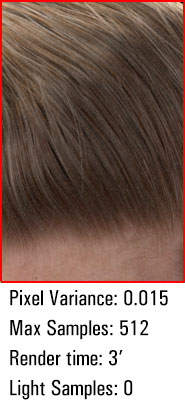

As last resort you can increase the Light Samples in the Advanced tab of the light settings:
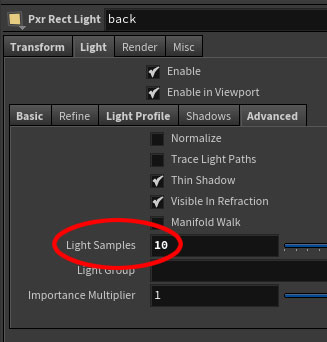
With these settings the noise is less, the light sampling is cleaner, but render times increase.
If you want to learn more about rendering efficiently, check out this great Debugging and Optimization training.
It’s extremely important to remember that every rendered image needs to be post-processed if you want to increase photorealism, because of this I don’t go crazy with render settings, I prefer to render many passes and then rely on compositing for my final look in Nuke.
To choose which render pass to save go to the Out Network, select the RIS node and in the Parameters Pane Tab select Images:
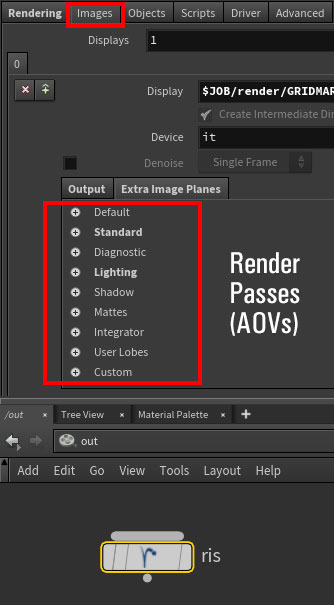
These are the passes I generally use for compositing:
Adding render passes does not increase rendering times, so feel free to choose whichever ones you need and save the rendered files as openEXR (.exr).
After all the hard work, here comes my favorite part! Modifying our image using our rendered passes in Nuke.
If the commercial version of Nuke doesn’t fit your budget, you can download the apprentice version for personal use.
The first effect that is fundamental for realism is depth of field. Although DOF in post is not pixel perfect as doing it in-render, many times it’s better to do it in post because:
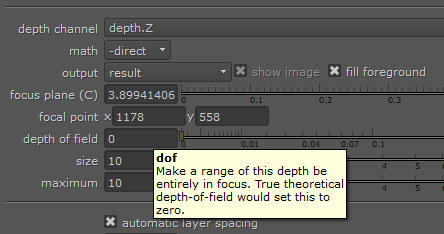
Using the z (depth) pass, life is easy and in seconds you can decide which part of your image is in focus:
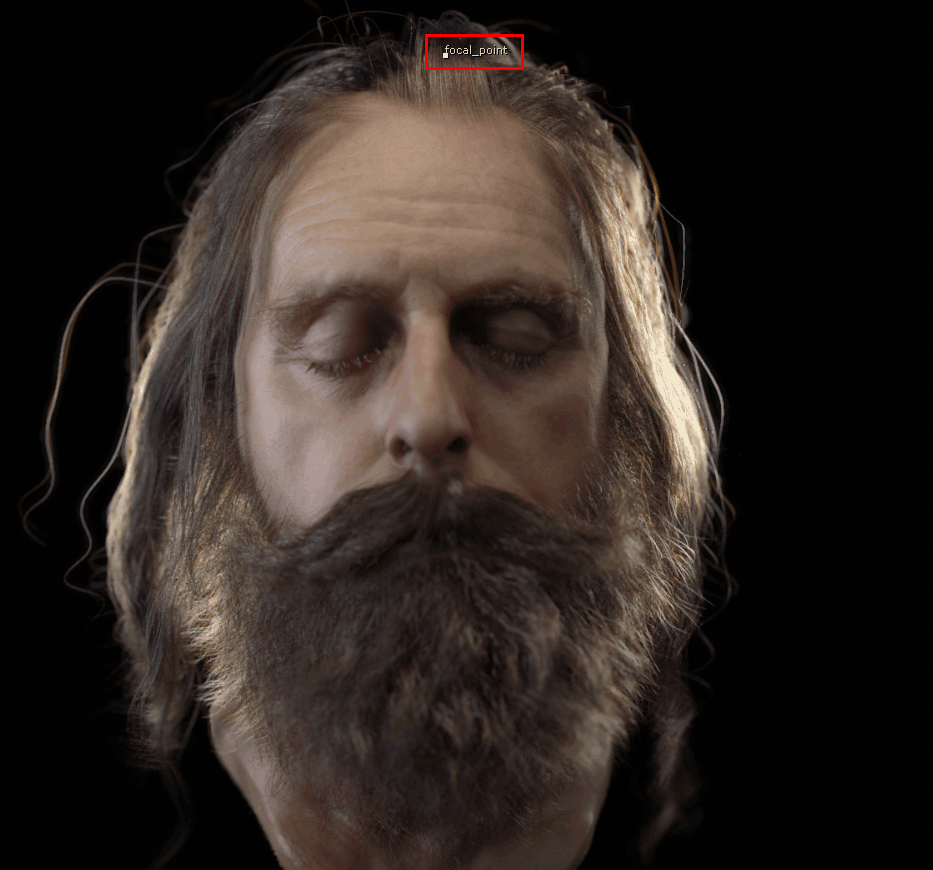
Simply create a ZDefocus node
Nuke's tooltip offers useful explanations if you hover your mouse cursor over the field's value.
To use the other passes you have to “extract” them from the .exr file using a Shuffle node:
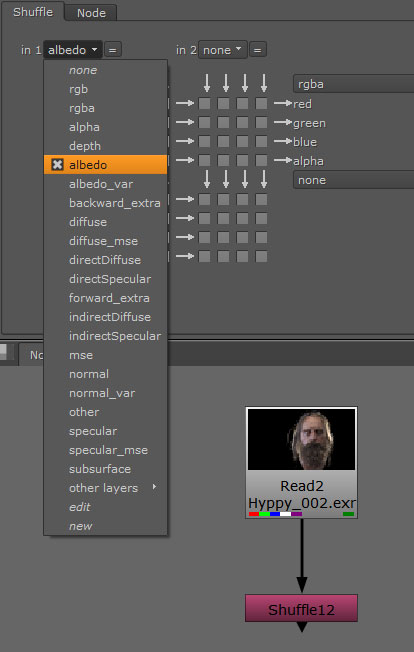
Once you get the proper passes shuffled you’ll want use them as masks for your color grading.
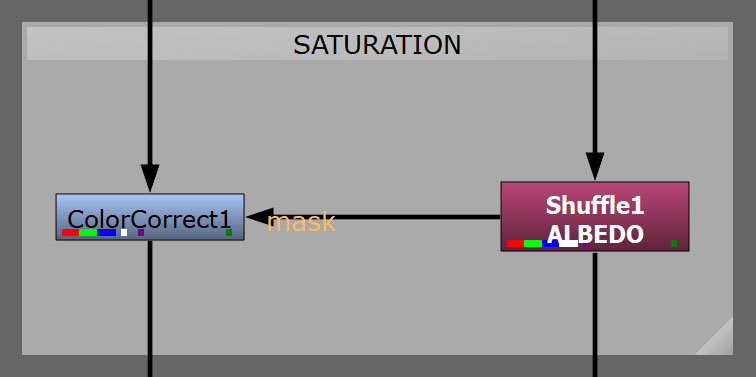
Now you can apply Nuke Color Correction nodes to get the final look. This is the simple network I used to correct my image:
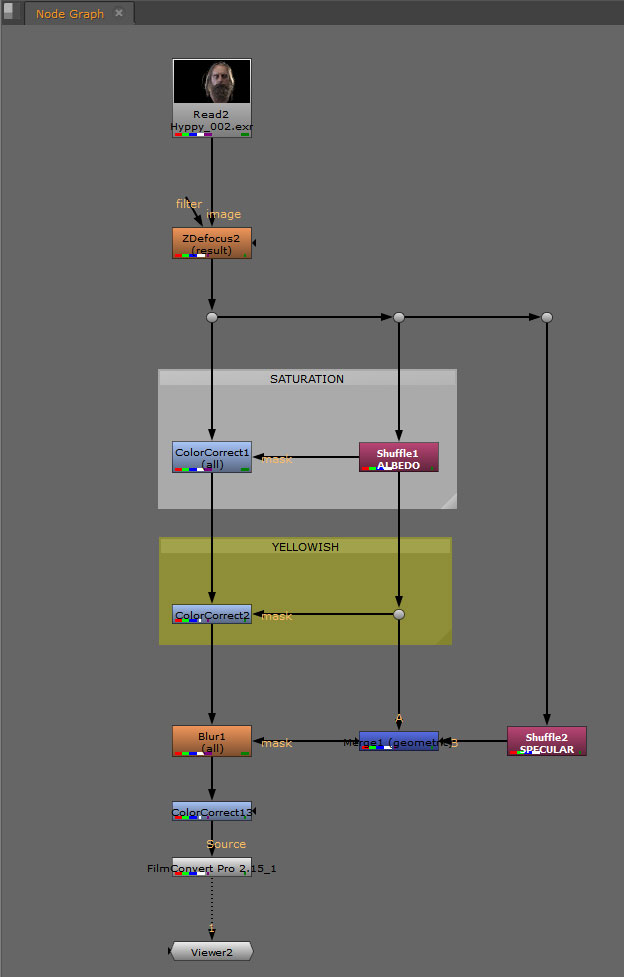
And this is one possible result:
Far away from being exhaustive, I hope I covered all the main steps from groom to render, which I hope will give you some new ideas for your creative toolbox.
Once you understand the grooming process you can apply it to all the other options out there: Xgen, Yeti, or Ornatrix to name some of the most popular in production.
Before heading off, I’ll leave you with some useful grooming links:
With 20+ years of experience as a professional and educator, Denis Zen works mainly in Houdini but has a strong understanding of 3D in general. 22 years ago, Denis started the first ever long term course for Maya 1.0 in Italy, and today, has developed a passion for grooming.
Students that attended his courses now work for some of the top studios in the world, including Disney, ILM, Weta, and more.