Deep Compositing
Deep Compositing
November, 2010 (Revised: August, 2012)
Introduction
RenderMan Pro Server 16 introduces first class support for deep compositing applications through an extension of the deep file format, and added support for direct rendering of deep compositing images. Deep compositing allows for the accurate compositing of disparate rendered elements with multiple objects whose depths may intersect in ways which prohibit the use of standard 2D compositing techniques.
Deep Compositing Images
Generating Deep Compositing Images
In previous releases, deep output from the renderer was constrained to special display modes (i.e. "deepopacity"). This is now no longer the case. A primary mode such as RI_RGBA, RI_RGBAI, or any arbitrary output variable (AOV) can now be sent to the deepshad display driver. These AOVs will be rendered as deep compositing output.
For example, a simple RGBA deep compositing image can be created using the following Display syntax:
Display "scene.dtex" "deepshad" "rgba" "string subimage" ["scene.rgba"]
The use of the "subimage" parameter is encouraged as a way of uniquely identifying the subimage. In conjunction with a naming convention, this will allow applications to be able to recognize the type of data stored in the deep compositing image and react accordingly. We will cover this point in greater detail later.
An arbitrary color computed by a shader as an AOV can be output as a deep compositing image:
DisplayChannel "color diffuse"
Display "scene.dtex" "deepshad" "diffuse" "string subimage" ["diffuse.rgb"]
However, since compositing applications must have access to an alpha channel in order to composite, a color by itself is generally not useful. We can instead combine the color with the standard alpha channel (this assumes the color is premultiplied in the shader with Oi):
DisplayChannel "color diffuse"
DisplayChannel "float a"
Display "scene.dtex" "deepshad" "diffuse,a" "string subimage" ["diffuse.rgba"]
If the arbitrary color channel should be instead compositing using a separate variable other than Oi, we can use the "interpretation" and "opacity" arguments to the Display to indicate this scenario:
DisplayChannel "color diffuse"
DisplayChannel "color diffuseopacity"
DisplayChannel "float diffusea" "string opacity" "diffuseopacity"
    "string interpretation" "alpha"
Display "scene.dtex" "deepshad" "diffuse,diffusea" "string subimage" ["diffuse.rgba"]
In PRMan 16, the deep texture file format has been extended to support multiple subimages. We can now render directly to a single image with multiple subimages by specifying the same filename. Files other than the first must be specified with a '+' sign, otherwise they will replace the first subimage. The following will produce a single file with two subimages:
DisplayChannel "color diffuse"
DisplayChannel "color diffuseopacity"
DisplayChannel "float diffusea" "string interpretation" "alpha"
    "string opacity" "diffuseopacity"
Display "scene.dtex" "deepshad" "rgba"
    "string subimage" ["scene.rgba"]
Display "+scene.dtex" "deepshad" "diffuse,diffusea"
    "string subimage" ["diffuse.rgba"]
Along with the full generality of AOVs and the ability to combine subimages into one file, we can also take advantage of multiple camera rendering. The following RIB demonstrates how to render a left eye image and a right eye image simultaneously, with the assumption that the left eye is rendering using the world camera and the right eye is rendering using a Camera named "right". The resulting single file will have two subimages, one for each eye.
DisplayChannel "color Ci"
DisplayChannel "float a"
Display "scene.dtex" "deepshad" "Ci,a" "string subimage" "lefteye.rgba"
Display "+scene.dtex" "deepshad" "Ci,a" "string subimage" "righteye.rgba"
    "string camera" "right"
In a more complicated setup where the right eye and left eye cannot share Ci (due to view-dependent shading), we may have shaders that are computing a separate rightCi and rightOi AOV. The following RIB demonstrates how to output a single image for that situation.
DisplayChannel "color Ci"
DisplayChannel "float a"
DisplayChannel "color rightCi"
DisplayChannel "color rightOi"
DisplayChannel "float righta" "string opacity" "rightOi"
    "string interpretation" "alpha"
Display "scene.dtex" "deepshad" "Ci,a"
   "string subimage" "lefteye.rgba"
Display "+scene.dtex" "deepshad" "rightCi,righta"
  "string subimage" "righteye.rgba" "string camera" "right"
Viewing Deep Compositing Images
A deep compositing image that has been rendered can be viewed with the venerable sho utility. If you render the example RIB file provided in the examples/deeptexture subdirectory of your PRMan distribution, you can view the resulting file "scene.dtex" using sho:
> prman scene.rib
> sho scene.dtex
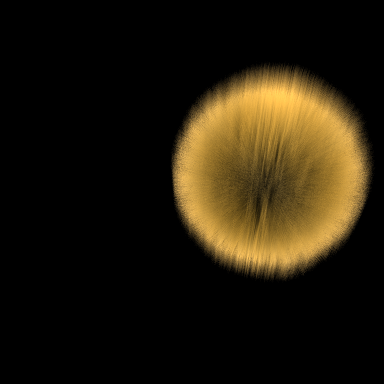
Which should result in an image that looks like this:

At first glance, nothing very much is going on here. An odd assortment of geometry has been placed in a RIB file; PRMan has rendered an image from that RIB file; and the result can be viewed, much like any other TIFF or OpenEXR image. The real power of the deep representation becomes more apparent when the deep compositing image is viewed with the dsview utility:
> dsview scene.dtex
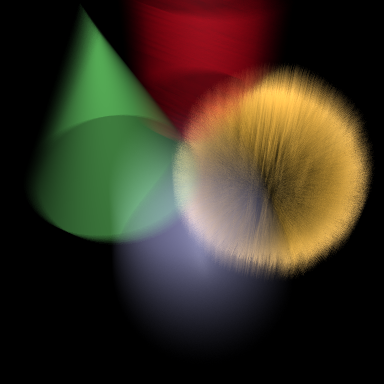
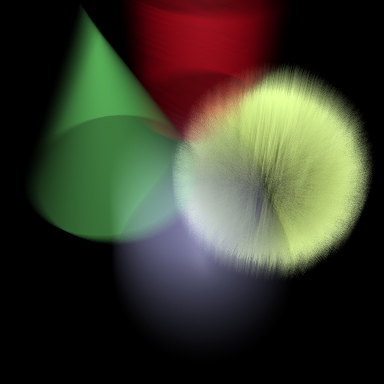
Loading the image with dsview and clicking the left mouse somewhere in the middle of the intersection of the blue sphere and the ball should give you something like this:
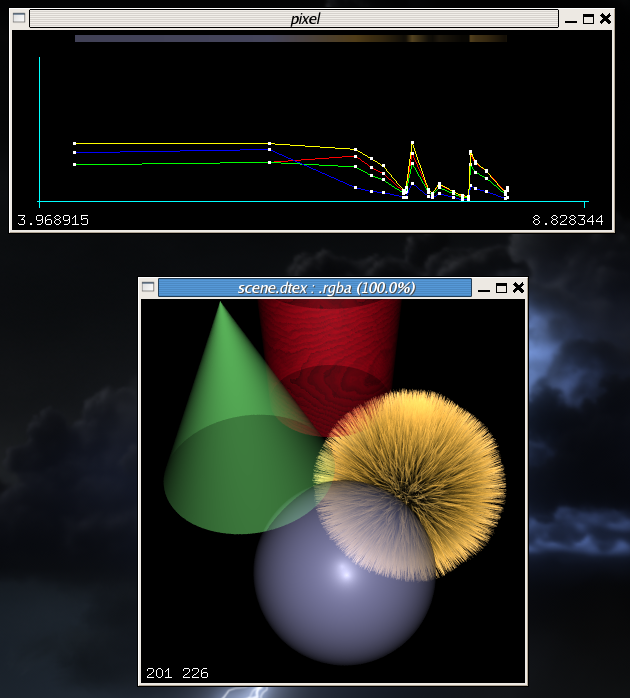
Now the complexity of the deep representation is more obvious in this view. The pixel window displays a graph of the depth and color of all samples down the pixel shaft. The yellow line graphs the alpha channel, while the red, green, and blue lines graph the red, green, and blue color channels. The colored bar above the graphs is colored using the color of each sample. You can now see that the image is "deep", and contains two widely spaced samples from the blue sphere, along with several clustered samples from the fur patch. The main image window of both sho and dsview display only the fully composited results of each pixel. This will become more obvious later on.
Subimages and Naming Conventions
In PRMan 16.0, the deep texture file format was extended with support for multiple subimages and an arbitrary number of channels. With this change comes the question: is it better for separate colors to be placed in their own subimages, or should they be placed in a single subimage? We do not take a strong view on the matter. Here are some considerations:
- Color data from separate cameras cannot be placed in the same subimage. This is because the depth functions are very different, and they cannot share Z values. PRMan automatically enforces this anyways because cameras are bound to the Display line, not to the DisplayChannel line.
- The number of channels stored in a subimage always include a depth. If the depth can be shared between color channels because the information came from the same camera then repeatedly specifying the depth for each subimage may be redundant.
- A standard naming convention in order to establish a clear data interpretation is easier to establish with colors in separate subimages.
- Both lossy and lossless compression may be more efficient with colors stored in separate subimages.
With regards to naming convention of subimages, the convention used by tools such as sho and dsview is to inspect a period-separated suffix. If the name of the subimage has a suffix that begins with "rgba", and the number of channels in the subimage is equal to or greater than 4, those utilities will interpret the subimage as a deep compositing image with the RGB channel data starting at 0 and the A channel in channel 4. (Note that this allows for RGBAI images to be named as ".rgbai" and still be viewable in sho.) We encourage users to adopt this convention through use of the "subimage" parameter to the "Display" line, but we also realize that this may not be suitable for all pipelines or workflows.
Compression
By their nature, deep compositing images can be very large. The size of these images is determined chiefly by depth complexity, but is also determined by PixelSamples. This latter point may prove surprising, since there is no analogy in the 2D case. When generating a deep compositing image, subpixel functions are filtered into a single pixel function. This incurs a certain amount of loss of information, analogous to the spatial information lost when a subpixel 2D image is filtered into a pixel 2D image. However, a lot of interesting data in the depth dimension still remains, and is initially retained in the pixel function.
PRMan adopts several compression strategies to deal with these very large images. A lossless compression is applied to the file; this is mostly transparent to the user (and to manipulators of deep images using PRMan's APIs). More importantly, it also uses a lossy compression scheme. The lossy compression scheme determines the accuracy in depth of the pixel function, and is controlled by Option "limits" "float deepshadowerror". Setting the compression scheme to a high value will result in lower numbers of samples stored in each pixel function; this can be verified by using the dsview or txinfo utilities.
It is important to realize exactly when this lossy compression matters. Setting deepshadowerror to a very large value has zero to very little visual effect on a deep compositing image if that image is simply rendered and viewed. However, if that image is used as part of a deep compositing process and combined with other images, unacceptable errors may result in the composite. If we think about the process of depth compositing, it should be clear why: the accuracy depends on having a sufficient sampling down the depth of each pixel such that the depth order of geometry can be correctly constructed. If the deepshadowerror has been such that all such samples have been lossily compressed to only a few samples, the depth order cannot be correct and the composite is wrong.
The default value of 0.01 is very conservative and results in fairly large files, but should result in files that can be correctly depth composited with subpixel accuracy. This subpixel accuracy can be traded off against the size of the files on disk by setting the compression threshold higher.
Compositing
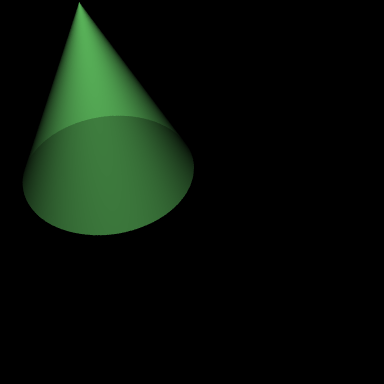
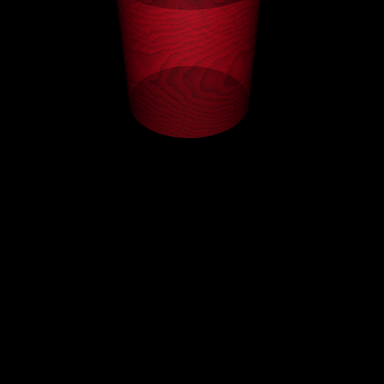
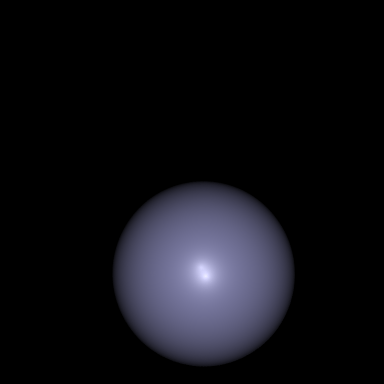
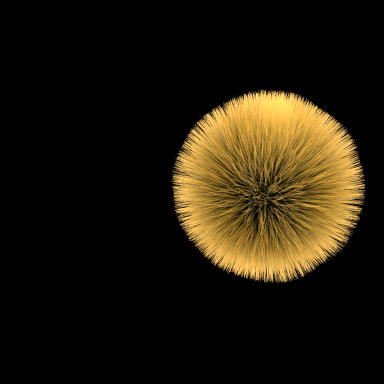
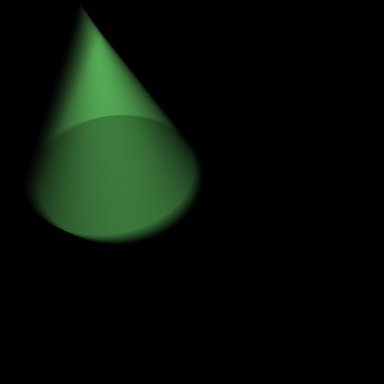
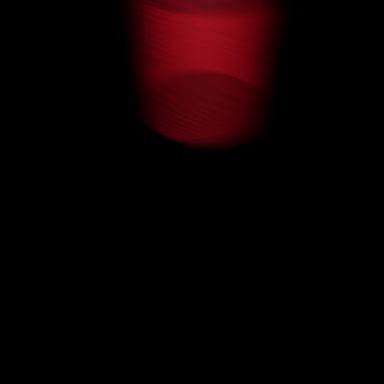
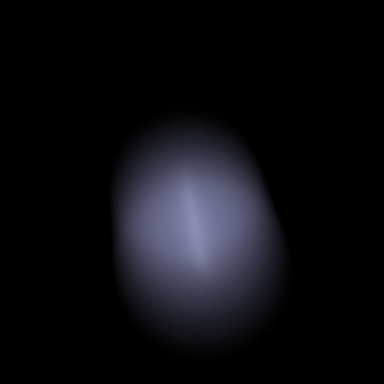
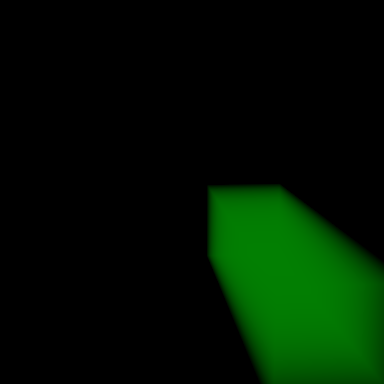
Deep compositing images are well suited for compositing scenes with transparent objects that have complicated depth interactions. Consider the random assortment of geometry in the previous section. If we were to render each element (the green cone, the red cylinder, the blue sphere, and the yellowish clump of fur) as separate 2D images, it is not easy to composite these back together into a single image with the correct result. But it is trivial to do so when rendered as deep compositing images.
As an example, we have provided a RIB file in the examples/deeptexture subdirectory of your PRMan distribution with the four elements going to four separate deep compositing images. If you render and view these, you should see the following images.
> prman multilayer_scene.rib
> sho fur.dtex bluesphere.dtex redcylinder.dtex greencone.dtex
|
|
|
|
The deep composite of these four images is accomplished simply by taking the four images and combining them with dtexmerge in any order, into a new merged deep composite output.
> dtexmerge fur.dtex bluesphere.dtex redcylinder.dtex \
      greencone.dtex scene_merged.dtex
> sho scene_merged.dtex

Deep compositing can handle arbitrarily complicated situations involving motion blur. The multilayer_scene_moving.rib file renders the same four elements, each with a transform blur, going into four separate deep compositing images. Again, these can be viewed independently:
> prman multilayer_scene_moving.rib
> sho fur_moving.dtex bluesphere_moving.dtex redcylinder_moving.dtex \
      greencone_moving.dtex
|
|
|
|
And then composited using dtexmerge to create a new merged deep compositing image with motion blur correctly resolved. Notice that the blue sphere is colliding with the green cone; this would be a situation particularly difficult to composite correctly using 2D techniques.
> dtexmerge fur_moving.dtex bluesphere_moving.dtex \
      redcylinder_moving.dtex greencone_moving.dtex \
      scene_merged_moving.dtex
> sho scene_merged_moving.dtex

Programmer's Perspective and Applications
Compositing
In releases prior to PRMan 16.0, users have been able to use libdtex to manipulate deep shadow images. Starting with PRMan 16.0, a new and improved C++ binding has been provided; the following discussion will make use of this version of the API.
In general terms, deep images simply store many samples for each pixel in the image. These samples are sorted in increasing depth order, but the deep texture format itself places no other constraints on the data. However, there may be constraints on the data depending on the deep image's intended purpose. For example, programmers manipulating deep shadow images produced by PRMan's deepopacity mode will find that the pixel representation is a monotonically decreasing function starting at 1.0 which stores the accumulated transparency as a function of depth. This is an optimal representation when these files are used for shadowing purposes.
Similarly, deep compositing images are optimized for compositing purposes. Therefore, the constraint on the data is that the samples stored at each depth are intended to be premultiplied color and alpha values, such that when the standard over operator is used in increasing depth order, a fully composited image will result.
From a programming perspective, correct display of deep compositing images is simple to accomplish. A convenience function has been provided that will composite a deep pixel containing RGBA data into the fully flattened, composited form:
if (image->GetPixel(x, y, pixel) == k_ErrNOERR) {
    float rgba[4];
    pixel->Composite(0, 3, rgba);
}
The pixel must, of course, actually contain RGBA data; the Composite method expects two arguments which indicate the channel offsets to the RGB and A data. It will then composite the results into a buffer containing at least four floats. The result is a fully composited 2D pixel. This is the routine used by sho and dsview to deliver results to the framebuffer.
Deep compositing is also very straightforward. Given the pixel representation as described above, the act of combining two deep compositing images to produce a new composite image requires only that each pixel function be merged: all samples that were in both images should be kept in the new image, but sorted in depth order.
We provide the full source code for dtexmerge as part of the librix distribution in the file RixDeepTextureMerge.cpp. This file can be used as a starting point for writing your own utilities to manipulate deep images. For now, we will focus on the inner pixel loop of RixDeepTextureMerge.cpp. After loading a pixel from the first image, all pixels from subsequent images are merged in place, creating an ever-increasing chain of deep compositing samples. After all input images are read, we simply deposit them into the output image. The output image can then be manipulated with DtexCompositePixel to produce a 2D composited result if desired.
// Start off the output pixel as a copy of the first image
outPixel->Clear(nch);
if (inImage->GetPixel(pixelx, pixely, outPixel) !=
    RixDeepTexture::k_ErrNOERR)
{
    fprintf(stderr,
            "Unable to get input pixel at %d %d from %s.\n",
            x, y, inImage->GetName());
    continue;
}

// Merge pixels from other images
for (i = 1; i < nInFiles; ++i)
{
    inImage = inImages[i][j];
    inPixel->Clear(nch);
    if (inImage->GetPixel(pixelx, pixely, inPixel) !=
        RixDeepTexture::k_ErrNOERR)
    {
        fprintf(stderr,
                "Unable to get input pixel at %d %d from %s.\n",
                x, y, inImage->GetName());
        continue;
    }
    outPixel->Merge(inPixel, 0, 3);
}

// Write output pixel
if (outImage->SetPixel(pixelx, pixely, outPixel) !=
    RixDeepTexture::k_ErrNOERR)
{
    fprintf(stderr,
            "Unable to set output pixel at %d %d\n", x, y);
    continue;
}
Operating on Identified Objects
PRMan allows objects in the scene to be tagged with an integer identifier via the use of Attribute "identifier" "int id". These integer identifiers can be output into a deep compositing image as an AOV much like any other:
DisplayChannel "float id"
Display "scene_moving.dtex" "deepshad" "Ci,a,id"
    "string subimage" "scene.rgbai"
There are two points of note. First, these identifiers should not be composited, nor should they be compressed. Therefore, PRMan will take special care to avoid compressing samples with disparate Attribute "identifier" "id", but only when "id" is specifically requested as an output on the deep compositing image. Second, these identifiers are of type int, whereas the native data type of a deep pixel is float. To avoid loss of unique ids, the raw bit representation of the int is stored in the float. This requires special care when casting to avoid getting the wrong id.
Once these identifiers are present in the deep compositing image, a host of interesting operations are now available. For example, suppose that we have a complicated render where we desired to perform a color grading operation only on a specific object in the scene. If a deep compositing image is generated containing "id" information, we can write a program that performs that color grading operation by looping over the deep compositing pixel data.
As a concrete example, consider the file "scene_moving.rib" provided in the examples/deeptexture subdirectory of your PRMan distribution. It contains Display lines identical to those shown above. The rendered output should be similar: it is the same picture in the previous section, except that all elements were generated in one pass.
Now, it happens that the four objects in the scene were tagged with Attribute "identifier" "int id". In particular, the clump of fur has an id of 2. Suppose we want to alter the color of that clump of fur without rerendering. We can do that by writing some code which iterates over the deep pixels in the deep image, and also the samples within each pixel. We can extract the id information for each sample (in this particular case, it's in the fourth channel), and based on an id match, perform some arbitrary color operations:
// Apply a gamma function and swap the red and
// green channels. This code assumes the
// number of channels is 5.
int numPoints = pixel->GetNumPoints();
for (i = 0; i < numPoints; ++i) {
    float z, data[5];
    pixel->GetPoint(i, &z, data);
    int id = *(int*) &data[4];
    if (id == 2 && data[3] > 0.0f) {
        float r = data[0];
        float g = data[1];
        float b = data[2];
        data[0] = powf(g / data[3], 0.45) * data[3];
        data[1] = powf(r / data[3], 0.45) * data[3];
        data[2] = powf(b / data[3], 0.45) * data[3];
    }
    pixel->SetPoint(i, z, data);
}
Writing the deep pixels back out to a deep compositing image results in a dubiously recolored fur ball with the other elements remaining unaffected:
Holdout Mattes
Even if we are not interested in performing the composite using deep images, they can still be used as a way of augmenting a traditional 2D compositing pipeline.
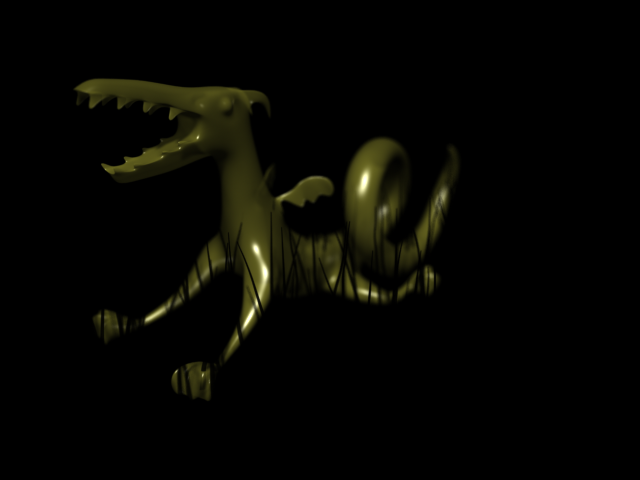
Suppose we are rendering a semi-transparent object nestled amongst some complicated geometry.
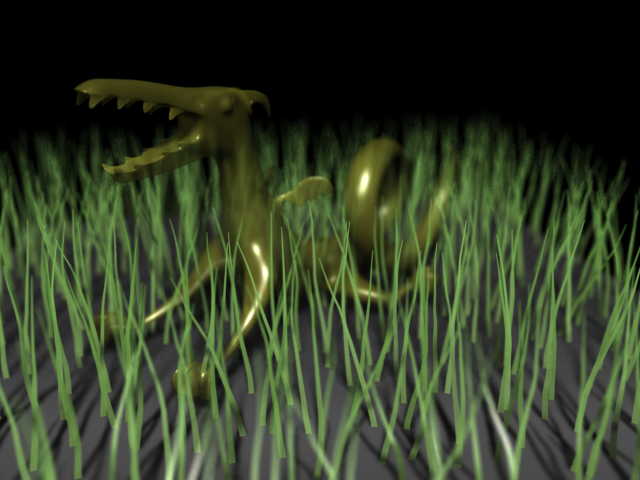
It is possible to separate this image into two layers, one layer being the dragon and the other being the grass and ground plane, such that the two layers can be 2D composited one over the other resulting in the same merged image. However, because of the complex interaction in depth of the geometry (compounded by the presence of depth of field), separation cannot be easily done by issuing geometry in separate RIB files. Instead, we can take advantage of the renderer's matte facility: we render one set of the geometry in its own layer, then render the second set of geometry with the first set held out using RiMatte 1. Along those lines, if we render the grass as its own layer, then render the dragon with the grass as a matte object, we would get the following two images:
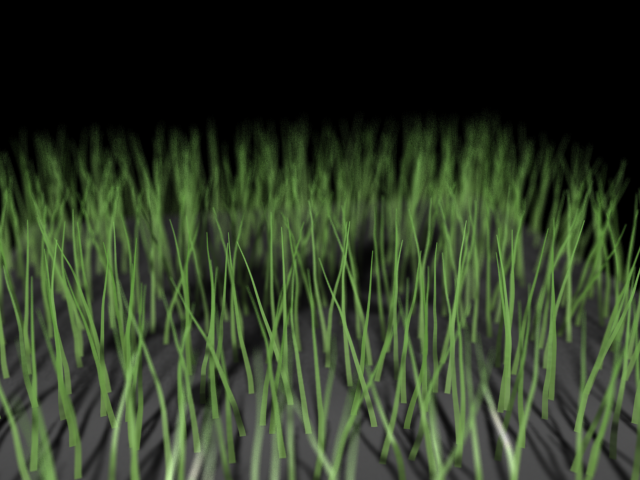
These images can be trivially comped using tiffcomp:
> tiffcomp merged.tif = grass.tif over dragon.tif
The drawback of this approach is that the matte geometry ends up being rendered twice. It is often the case that in the matte pass, trivial shaders can be substituted, but shading is not the only cost of the render - for example, a procedural generation system may have to execute twice just to emit the geometry in RIB form.
We can avoid this extra rendering cost by using a deep compositing arbitrary output from the first layer as a matte file for the second layer.
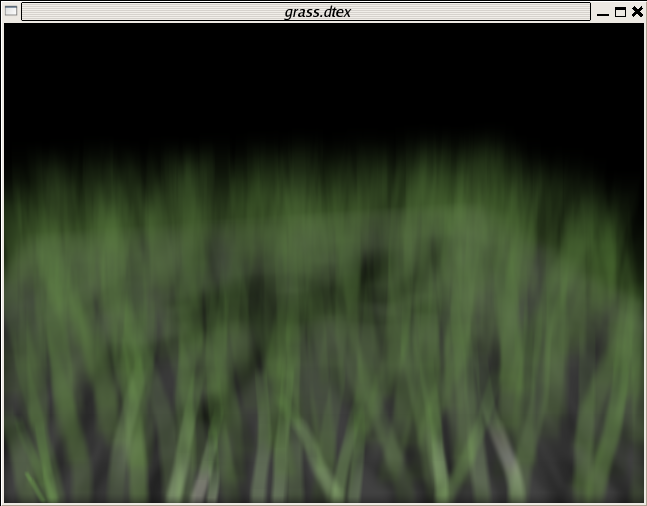
First, we can render the grass as usual, but also create an auxiliary grass.dtex file - this second file is the matte file.
DisplayChannel "Ci"
DisplayChannel "a"
Display "grass.tif" "tiff" "rgba"
Display "+grass.dtex" "deepshad" "Ci,a" "string subimage" "grass.rgba"
Then we render the dragon layer. This time, we do not need to reference the grass geometry, but we do need to reference the grass.dtex we just rendered as a matte file:
Display "dragon.tif" "tiff" "rgba"
Hider "hidden" "string[1] mattefile" ["grass.dtex"]
This results in two images, grass.tif and dragon.tif, which can be trivially comped using the same tiffcomp invocation as before:
> tiffcomp merged.tif = grass.tif over dragon.tif
For more complicated matte scenarios, multiple matte files may be specified, as well as their subimages:
Display "dragon.tif" "tiff" "rgba"
Hider "hidden" "string[2] mattefile" ["grass.dtex:0" "leafpile.dtex:1"]
With this approach, we have now avoided the cost of rendering any geometry twice. There are some caveats with this approach. Deep texture maps are limited to pixel resolution, not subpixel resolution. Hence, the accuracy of the element rendered using the matte file will not be subpixel accurate. (Keep in mind that one loses subpixel accuracy in the final 2D composite anyways.) Also, it is worth noting once more that deep texture maps have a lossy compression applied down Z. The extent of this compression is a disk space vs accuracy tradeoff: smaller files will mean a less accurate matte.
Interactive Defocus
As previously mentioned, deep images store many samples for each pixel in the image. Depending on the opacity cull settings, these samples not only represent data from the nearest object to the camera but also contain information on objects that may normally be occluded by the nearest opaque object. With this extra information, and the depth information stored in each sample, we can perform extra operations such as performing a defocus on a deep composite image outside of the normal render pipeline.
We provide example source code for an OpenGL based interactive defocus application as part of the librix distribution in the file RixDeepTextureDefocus.cpp. This example was written to target the OpenGL 2.0 API with the framebuffer object extension and relies on the glut and glew libraries. It draws points for every sample read out of a deep compositing file, with radius computed by a vertex shader; this shader computes the radius using the distance of the sample away from the camera and the depth of field settings. An offscreen framebuffer is used to guarantee 32 bit per channel color, which is needed for accuracy. The depth of field settings can be changed interactively: the f-stop is controlled by the +/- keys, the focal length is altered by dragging the left mouse button, and the focal distance is altered by dragging the right mouse button. An example of the image drawn by this program is shown below.
This example code has some shortcomings which are left as an exercise to the reader:
- The blending mode used assumes that the hardware supports destination alpha.
- It assumes that every point in the file fits in host RAM (since it performs a sort of all points by depth), and also assumes that every point in the file also fits in GPU RAM. The first could be solved by operating only on smaller regions of the entire image at a time. The second is solveable by avoiding the use of a vertex buffer object (however, this may affect performance).
- An assumption is made that the image was rendered with ScreenWindow -1 1 -1 1; this affects the computation of the point radius in the vertex shader.
- OpenGL imposes several limitations related to the antialiasing of small points, which proves especially problematic for points that are near a radius of 1. The example code avoids point antialiasing altogether, which usually means the "disks" that are drawn are actually small squares. This can lead to some obvious image artifacts when the circle of confusion is very small (particularly when transitioning from a "disk" which is actually one square pixel to a "disk" which is 2x2, four square pixels). Depending on the OpenGL implementation, these problems may be alleviated by drawing a more complicated shape with triangles (e.g. a hexagon for every point; this is easily accomplished using a geometry shader if the OpenGL implementation supports it), or by supersampling (by increasing the size of the framebuffer object and downsampling the result) and drawing antialiased points.
Volume Segments
Samples originating from volumes can now be flagged in deep compositing image output. We have chosen to indicate this with a negative sign on the values in the alpha channel. When this occurs, it indicates that the region down the pixel shaft from that sample until the next sample is within a volume and that that particular sample came from the volume. If the volume would end before the next sample, we insert a fully transparent (zeros in all channels but Z) sample in order to mark the end of the volume region. There are no overlapping volume regions within a pixel; any embedded geometry or overlapping volumes will cause the regions to be subdivided and resolved into disjoint spans before output.
Note that the color and positive alpha on a volume sample represent the integrated values over the region. This format (together with the lack of overlapping regions) was chosen so that taking the absolute value of the alphas is the only change needed to make compositing down the chain of samples in the pixel give the final pixel color, as before. (Both the DtexCompositePixel() and DeepPixel::Composite() functions from libdtex and librix, respectively, have been updated this way.)
Adding:
/prman/deepcomp/flagvolumes off
to the rendermn.ini file will disable the flagging of volumes and revert to generating deep images that are fully backwards compatible with PRMan 16 output.
As a convenience when working with these images, we have added two new calls to our deep APIs. The libdtex version is:
int DtexMergePixelEx(
    DtexPixel *dest, DtexPixel *src,
    int rgbChannel, int alphaChannel);
This merges the contents of the src pixel into the dest pixel, much like the existing DtexMergePixel() function. However, it is aware of our convention for flagging volume samples and will subdivide volume regions as necessary for embedded geometry, as well as resolve overlapping volume regions to produce volume samples with the combined light contribution and extinction coefficient properties from both volumes. This combination takes into account the potential interactions between the volumes wherein light contributed by one volume may be attenuated by the other.
In order to do this, the function needs to know which are the color and alpha channels. We follow the convention of DtexCompositePixel() in specifying these and the assumption of three contiguous color channels plus a single alpha channel. Any extra channels will be passed through unchanged or copied from the most recent volume sample in either pixel.
The analogous new method in the librix API is:
int DeepPixel::Merge(
    DeepPixel *src,
    int rgbChannel, int alphaChannel);
With regard to tools, both the dsview and 'it' utilities properly display the new deep images. Furthermore, dsview has been updated so that the graph of the pixel function displays the absolute value of the data from each channel, but indicates the presence of a negative sign by a hollow point instead of a solid point.
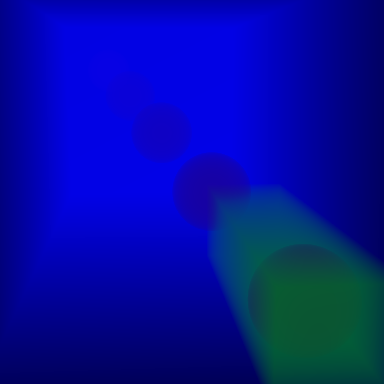
An example of taking three images with volumes and merging them is shown below. The lower right image is the result of applying dtexmerge to the other three. Notice that the samples from the blue volume are correctly being split and smoothly attenuating the spheres as they receed into the distance.
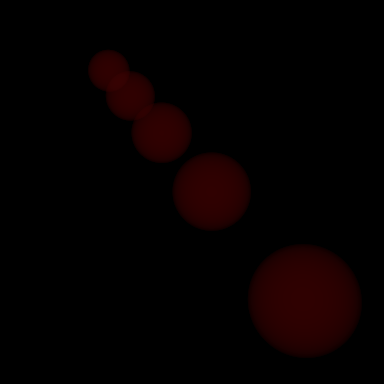
|
|
|
|
If we examine a pixel through the lower right sphere in dsview, you can see that the light contribution and extinction coefficient properties of the volumes have been mixed, particularly in the middle segment where all three volumes overlap:
Future Directions
In PRMan 16.0 deep compositing pixel functions only store accurate samples up until the first opaque object. This limits the ability to perform operations such as removing opaque objects by their identifier, or perform defocus on deep compositing images. We plan to address this limitation in a future release.