The Network View
The Network View
The Network View is where you can understand how your appearances interact to create a shader. The Network View is always providing context about where you are in a shader's network and how the changes you make affect downstream appearances.
The Network View also allows you to change the construction of your network by making and breaking connections between appearances. The Network View consists of these components:
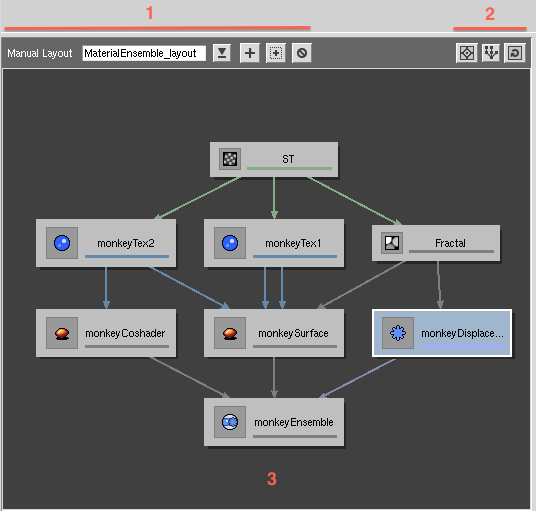
Graph Layout Controls
Controls the layout selection for display.
Arrangement Controls
Control whether appearances are arranged automatically or manually; toggle auto-focusing of selections..
Graph Canvas
This is where nodes for the selected network/layout are displayed.
Graph Layouts
Whenever any nodes are visible in the Network View, it is displaying the contents of a Graph Layout. The Graph Layout tracks the appearances being displayed, the current focus, and how nodes within the layout are arranged.
Whenever an appearance is selected (or created), the Graph Layout containing that appearance is loaded into the Network View. If no Graph Layout exists, one is created. The name of the current Graph Layout is displayed in the Graph Layout Controls. A Graph Layout's name is automatically chosen when it is created. You are free to change this name.
Next to the name field for the Graph Layout is a pulldown menu. When the selected appearance exists in multiple layouts, you can use this pulldown to select which layout to display.
The last set of buttons in the Graph Layout Controls allow you to create a new Graph Layout or delete the current one.
Arranging Nodes
Every Graph Layout has an arrangement mode. By default, a Graph Layout is configured for automatic arrangement. In this mode, Slim automatically arranges the appearances in a network. Any changes to the network will cause the layout to be rearranged in an optimal manner. Automatic arrangement is indicated by the illuminated toggle on the right of the Arrangement Controls.
If you prefer to arrange the appearances in a layout yourself, disable Automatic Arrangement using the aforementioned toggle. With Automatic Arrangement disabled, you can position nodes as you wish. If you wish to invoke Slim's arrangement method, press the Arrange Graph button on the left of the Arrangement Controls.
Users with larger networks can also take advantage of the selection focusing toggle button, which will bring a node selected in the Palette View into focus in the Graph Layout window.
Creating Appearances
There are several ways to create new appearances in Slim. Any of these methods will affect the Network View.
- If you use the Palette View in Create Mode, any new appearances will be given a new Graph Layout unless you use the "add to layout" (arrow) button to explicitly add the appearance to the current layout.
- If you create a connection in the Appearance View via the Property Menu, the new appearance will automatically appear in the current layout.
- You can invoke the Graph Context menu by holding down the right mouse button on the background of the graph canvas. This will present a few graph commands, along with a menu of possible apppearances to create. Appearances created in this method will automatically be added to the current layout.
Connecting Appearances
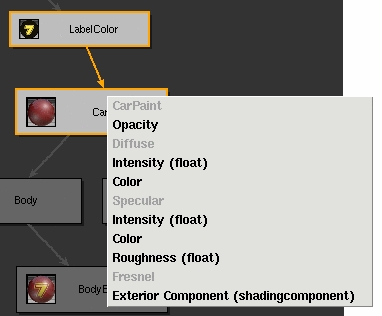
You can use the Network View to connect the output of an appearance to the input of another. To begin a connection, click on the source or upstream appearance with the middle mouse:
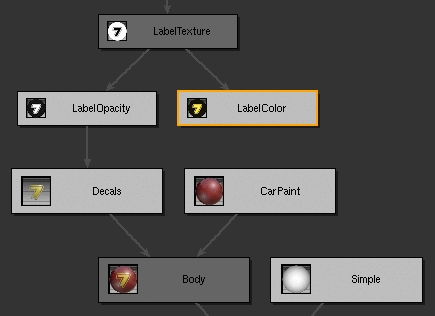
The selected appearance will be illuminated in orange. If the appearance has multiple outputs, you will be presented with a menu from which to select the output to connect. Otherwise you can begin selecting the destination or downstream appearance.
All valid downstream appearances will remain brightly lit. Any appearances that are dimmed cannot accept a connection from your upstream appearance.
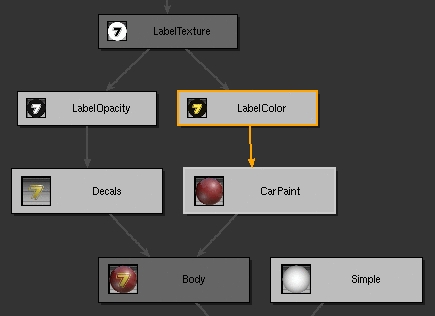
Move the mouse to drag the connection to your destination appearance of choice. Note that you do not need to continue holding the mouse button; this allows you to pan or zoom the graph as you search for your downstream appearance. To cancel the connection, simply click on the background of the graph canvas.
To complete the connection, click the middle mouse button again on your selected downstream appearance. You will then be presented with a menu of inputs in the downstream appearance. Select from the menu the parameter you wish to connect and the connection is made.
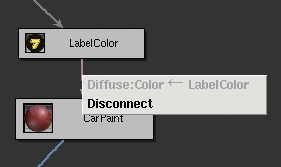
If you wish to break a connection, select the edge representing that connection with the middle mouse. This will present you with a menu with which you can disconnect: