RenderMan Controls
RenderMan Controls
Control over RenderMan global settings, passes, outputs, and render layers is consolidated in a single window, the RenderMan Controls. The RenderMan Controls window is accessed via the Maya Windows menu:
Window > Rendering Editors > RenderMan/REYES or RenderMan/RIS > RenderMan Controls...
Or the RenderMan menu:
RenderMan > Advanced RenderMan Controls...
Or via the icons in the RenderMan and Rendering shelves.
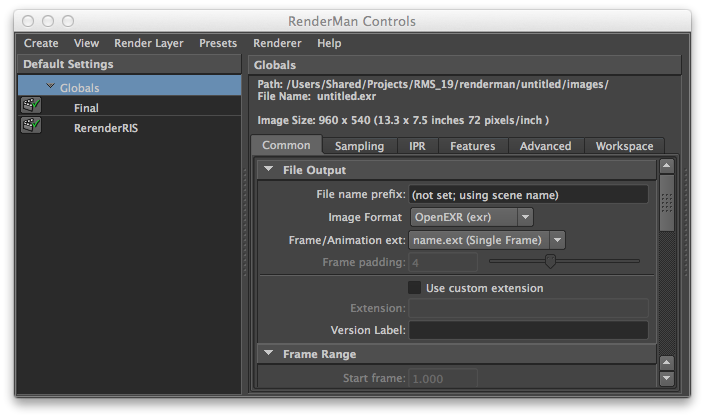
Default Settings
Upon opening, the Default Settings of the RenderMan Controls window provides access to all the Globals tabs: Common, Quality (in REYES mode) or Sampling (in RIS mode), IPR, Features, Advanced, and Workspace. Instead of a Passes tab, individual pass settings are accessed by selecting a pass in the Settings panel. All of these settings can be accessed on a per-layer basis via the Render Layer menu.
Pass and Job Settings
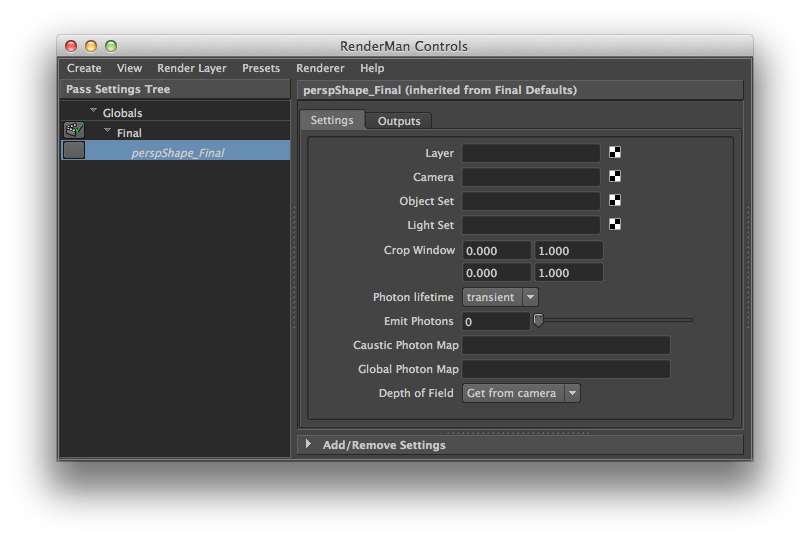
In addition to their global default settings, users can view and control the settings based for their passes (select Pass Settings Tree from the View menu) or the job components (select Job Tree from the View menu). Note that the Settings tab is the same as the Pass Settings available via the Passes tab of the RenderMan Globals.
Both views present a way of looking at your scene's hierarchy, its various components, and their interdependencies, and they both offer you control over pass settings (including disabling and reuse) and creating or deleting outputs.
Users can also create certain passes from the Create menu. Note that, generally, the RIS workflow is single-pass, so the view here is simplified (Final, Preview, and Txmake). Users can switch between RenderMan/RIS and RenderMan/REYES via the Renderer menu, and the Controls will update accordingly.
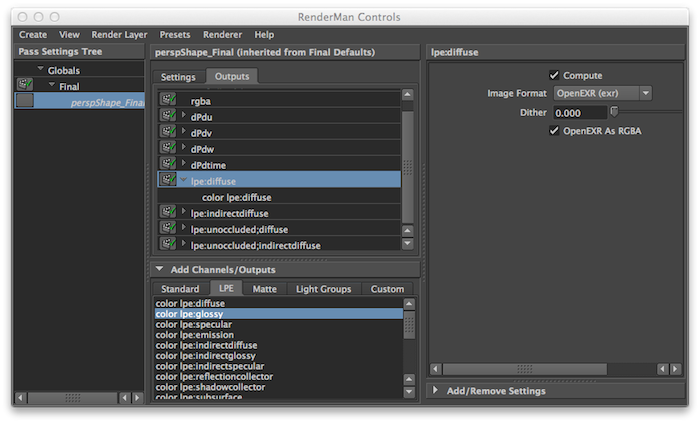
Outputs and Channels
Outputs can be created for any pass and will respect that pass's settings and render layer. Select the pass from either the Pass Settings or Job Tree view, toggle to the Output tab and click on Add Channels/Outputs. Channels are grouped under separate tabs for Standard, Compositing, Maya, and Custom in REYES mode, and Standard, LPE, Matte, Light Groups, and Custom for RIS. You can select channels one by one, or in groups, and add them as individual outputs, or as a single, multi-channel output (this defaults to an OpenEXR, but can be changed to TIFF in the Output Settings panel).
Tip
The current implementation of "it" is limited to 16 channels when displaying OpenEXR images, and the channels are restricted to a single type. Users can, however, add additional, "sub" outputs to employ more channels and/or types, with the caveat, once again, that each output can have no more than 16 channels, all of a single type.
Channels are grouped en masse under the All Channels grouping as well as under their respective outputs on a per-display basis. Channels can be combined or deleted from these listings in the pass's Output tab after the fact, as well.
Selecting a channel or output in from the listings on the Output tab will display its settings in the Output Settings panel. By default we offer settings for the output's format and dithering or the channel's name. Additionally, additional attributes can be added to the output via Add/Remove Settings.
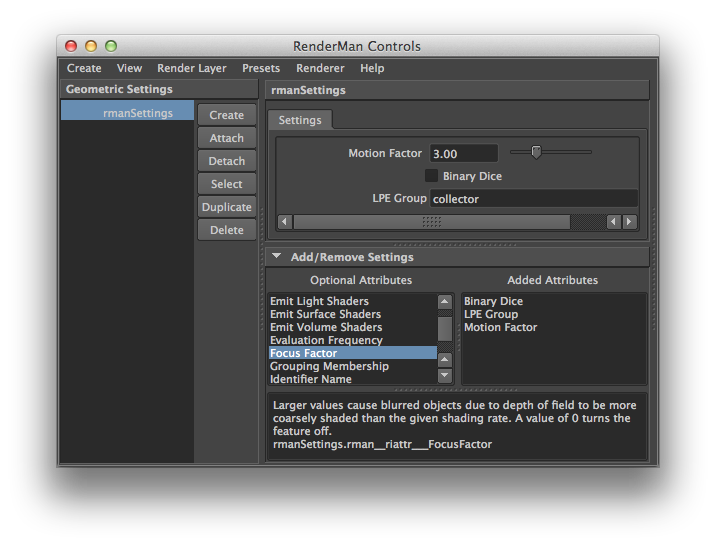
Shared Geometric Attributes
Control over Shared Geometric Attributes is also under the RenderMan Controls umbrella. A Shared Geometric Attributes node (rmanSettings) can be created via the RenderMan Controls' Create menu. Shared Geometric Attributes can be used to attach arbitrary RenderMan attributes to multiple Maya nodes in one fell swoop. Create the SGA, add the attributes, and attach at will.