RIS Shading
RIS Shading
Using PRMan's new RIS mode with RenderMan for Katana is, by and large, straightforward. The shaders are still loaded via the Material or PRManShadingNode nodes and the configuration of the PRMan renderer still happens using the PrmanGlobalSettings and PrmanObjectSettings nodes.
For more detailed information about RIS itself, please consult the RIS Users' Guide in the RenderMan Pro Server documentation, but a simple rundown of the basic steps for using RIS in RfK is provided below. Users should also check out the Simple examples that follow this intro, as well as the Learning Resources, now including Videos!
Rendering
PRMan and RfK do not render using RIS mode by default. As discussed in the Getting Started document, both the Integrator and Hider settings need to be adjusted for RIS rendering:
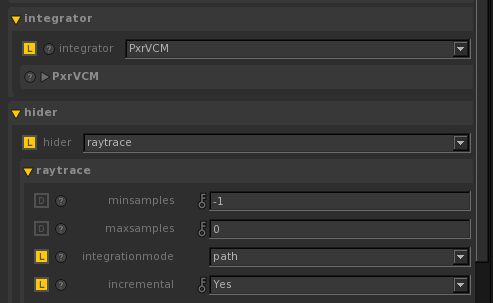
In the PrmanGlobalSettings node, look for the Integrator group and select either the PxrVCM or PxrPathTracer. Which one you choose will depend on the needs of your scene. To grossly over-simplify this decision, a reasonable rule of thumb is to use the Path Tracer for outdoor scenes or scenes that are using direct lighting primarily, and VCM for scenes that are indoors or use a lot of indirect illumination.
Note: technically any integrator other than none will enable RIS rendering, however these are the two most common integrators and should be sufficient for most general cases.
Also in PrmanGlobalSettings, set the Hider to raytrace and configure the raytrace hider's integration mode to be path. If the integrator is set to PxrVCM, then "incremental"` must be enabled as well. Other integrators do not require "incremental".
The quality of your results is essentially controlled via your Sampling settings in the PrmanGlobalSettings node, particularly Max Samples (prmanStatements.hider.raytrace.maxsamples) and Pixel Variance (prmanStatements.pixelVariance) settings. Consult the help popups for specific information about the various settings. For more basic information, check out the Sampling section of the RIS Users Guide.
Shading
Shading in RIS mode is broken down into three elements: Materials (bxdfs), Patterns and Lights as described below.
Materials
RPS ships with built-in production-quality materials (aka shaders or "Bxdfs") that serve as the basis of shading in PRMan's RIS mode. These materials include:
- A new LM Materials shading system that combines simple, production-ready primary shaders (or "substrates"), based on real materials, with a powerful layering workflow designed to provide best-in-class results,
- Our implementation of Disney's principled BRDF, PxrDisney, and
- Additional simpler implementations of materials for hair, skin, and glass, as well as basic materials, including matte and constant shaders, and a Bxdf "blend" material for combining the characteristics of more than one Bxdf in a single material.
For Reyes rendering RfK includes a suite of RenderMan RSL shaders which are discussed in Reyes Shading.
Patterns
RPS also includes a plethora of Pattern nodes, supporting a myriad of methods of manipulating your shading, including:
- Textures
- Bumps
- Colors
- Manifolds
- Geometric Functions
- Scripting Nodes
- Additional Utilities
Lights
Lighting is done with Geometric Area Lights, introduced in RenderMan 18. Version 19 introduces important refinements and enhancements to optimize lights for RIS.
Next Steps
Examples
There are several examples found in the RfK distribution which take advantage of RIS rendering. A good place to start is the teapots_RISShaders.katana scene It is the RIS version of the original RfK "teapots" example scene which demonstrated the capabilities of the RMS shader suite included with RenderMan for Katana.
Other "Quick Start" examples to help get you up and rendering...
Note: these tutorials and examples reference Maya scene files. Currently the equivalent Katana scenes are not available, yet!
RIS 101 - Videos!
New and Updated Tutorials