RfM & Slim
RfM & Slim
Note
There were important changes in RMS 4 that users should be aware of. For an overview, please take a moment to read The Transition Guide.
Introduction
RenderMan for Maya has several key features to aid and abet the integration of Slim into your RfM workflow. At the "plumbing" level, users should be sure to read the Asset Management and Sessions documentation. This section is intended to cover the basics of the interoperation of RfM and Slim, both on a deep, "under the covers" level and on a practical level.
Great care has been taken to create a smooth Slim experience when working in conjunction with the RfM plugin. Users are able to do their work where they need to, either in the Slim UI or in Maya after appearances have been added to a Maya scene. Users can adopt a strictly Slim-centric workflow, such that the only apparent point of interaction between Slim and Maya is in the attachment of Slim nodes to Maya nodes, or a Maya-centric workflow in which instances of Slim nodes are added to Maya at a UI level, accessible via the Hypershade/graph and Attribute Editor, or a hybrid approach that leverages both workflows.
"Tethering"
Depending on your workflow preference, Slim can be "tethered" to RfM in one of two modes: tight or loose. Starting with RMS 3, the tight tethering mode is recommended. When tightly tethered, Slim's session data is stored in your Maya scene file, much like in days of yore, when Slim interacted with Maya through MTOR. Improvements over the MTOR-style tight tethering include the ability to start and stop Slim during your Maya session, as well as the reduced requirement for Slim's presence during Maya sessions that don't edit Slim session data. In tight tethering mode, we support Slim appearance binding wherein the Maya shading group binding mechanisms take a back seat to Slim's requests. Slim's shader binding allows you to associate Slim-side shaders, coshaders, ensembles, RIB boxes, and adaptors to individual nodes in your Maya DAG. Python source that embodies the Slim binding behavior is included for your perusal and can be found here: $RMSTREE/scripts/rfm/slim.py.
In the deprecated loose tethering configuration, Slim's session data is stored in external session files, which are managed according to your site's/project's Asset Management preference. The actual setting of the tethering mode is done via the SlimTetherMode preference in the RenderMan_for_Maya.ini file.
By default, RMS ships in "tightly tethered" mode. If you'd prefer to be loosely tethered, you should set the preference in a duplicate ini file containing your site-specific overrides and place it in a separate directory, referenced via an $RMS_SCRIPT_PATHS environment variable.
In either tethering mode the contents of Slim session data is the same and includes unique IDs, created by Slim, that serve to tell RfM and Slim which palettes and appearances are associated with a given Maya scene file.
Adding, Attaching, and Binding
Once an appearance is created in Slim, users can do what they will with it via the Appearance menu. For general use, users can elect to Add to Scene, or users can select Attach to attach the appearance directly to a selected Maya object. Users can also Select Attached to see what objects in there scene are using the Slim appearance in question. Note that each of these actions can also be access via right-clicking on a given appearance.
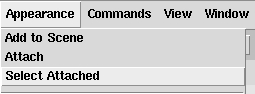
Adding or Attaching via the Appearance menu
Adding an appearance creates an instance of that appearance in Maya, where it exists independent of Slim and its parent. As such it is included as part of Maya's "Existing Materials", and users will have access to it via Maya's usual mechanisms, via which it can be manipulated and attached to Maya nodes in the same way as any Maya material.
Attaching an appearance directly from Slim is quite different. In this case, the act of attaching creates a unique ID at the point of attachment. This ID refers back to the appearance in Slim, and Slim retains "ownership" of the appearance.
Edit in Slim
If the situation calls for it, and you need to edit an appearance at a level of granularity that your added appearance does not allow (e.g. to add more parameters, or to change a parameter type from internal to external, or to a Tcl expression, or whatever), you can go backwards, reopening the appearance in Slim via the Edit in Slim button in the Maya Appearance Editor. Note that the corresponding Slim appearance needs to exist - you cannot delete an appearance from a palette and expect Slim to be able to open what is consequently an arbitrary .slo file.
Slim appearances that have been added to a Maya scene (as well as RenderMan Shader nodes) also have a Reload button. This will reload an updated .slo file from disk. The .slo file could have been updated by an artist working in Slim or editing the raw .sl data, and then recompiling (in Slim, e.g. by clicking on the Preview swatch).
Slim/MTOR Legacy Appearances
Certain special appearances that Slim used in conjunction with MTOR in the RenderMan Artist Tools have been superceded by equivalent workflows that have been implemented in the RenderMan for Maya plugin itself, rather than in Slim.
- Archiver
- Users can now use Maya's Export menu to export RIB archives.
- Ensemble Adaptors
- Ensemble Adaptors are not supported by RenderMan for Maya. Instead, there is a special RenderMan Attribute that can be added to Maya Shading Groups via the Attributes menu of the Attribute Editor: Add Adaptation. The adaptation attribute appears under the Extra RenderMan Attributes.
- MapGen
- Instead of MapGen nodes, users should use a Reference Pass.
- RIB Box
- RIB Box functionality can be achieved via Ri for MEL, or RIB Boxes can be added to Shading Groups/Engines via the Attributes menu. Shading Engines can be named to follow the convention implied by: *rmanFrame*, *rmanWorld*, in order to "inject" the shaders at pre-worldbegin and post-worldbegin. Currently, we only output RIBBoxes in the frame context and all shaders in the world context.
- TCL Box
- In place of Tcl Boxes there is a Tcl Expression Manager, accessed via the Attributes menu, that allows users to control shader paramets via Tcl expressions. For complete details, please see the Tcl Expressions page.