Tutorials
|
Louise
© Eisko
November 02, 2018
In this tutorial, we'll use Eisko's great head scan to render a photorealistic head using RenderMan's latest tech. We're also taking advantage of a fine micro displacement map generated from the original 4K map thanks to Cronobo's Nexture.
In the Maya project you'll find a rigged head with a neutral light rig and a non-rigged head with Sci-Fi lighting.
In the following sub-chapters we will break down the creation of the scene with useful tips and tricks:
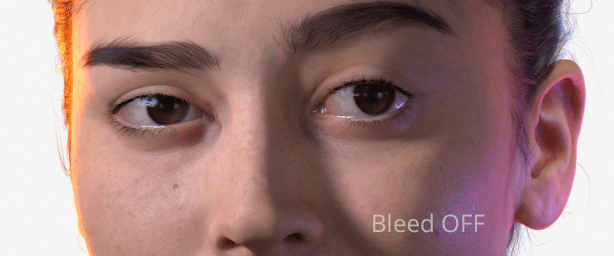
To start, let's take a look at the original reference.

That's a lot of detail! As we can see, photorealistic skin can be a challenge. There is a lot of nuance in skin and a lot of the effect is dependent on very small visual differences, especially in light absorption and specular intensity.
Before breaking it all down, let's see our RenderMan turntable.
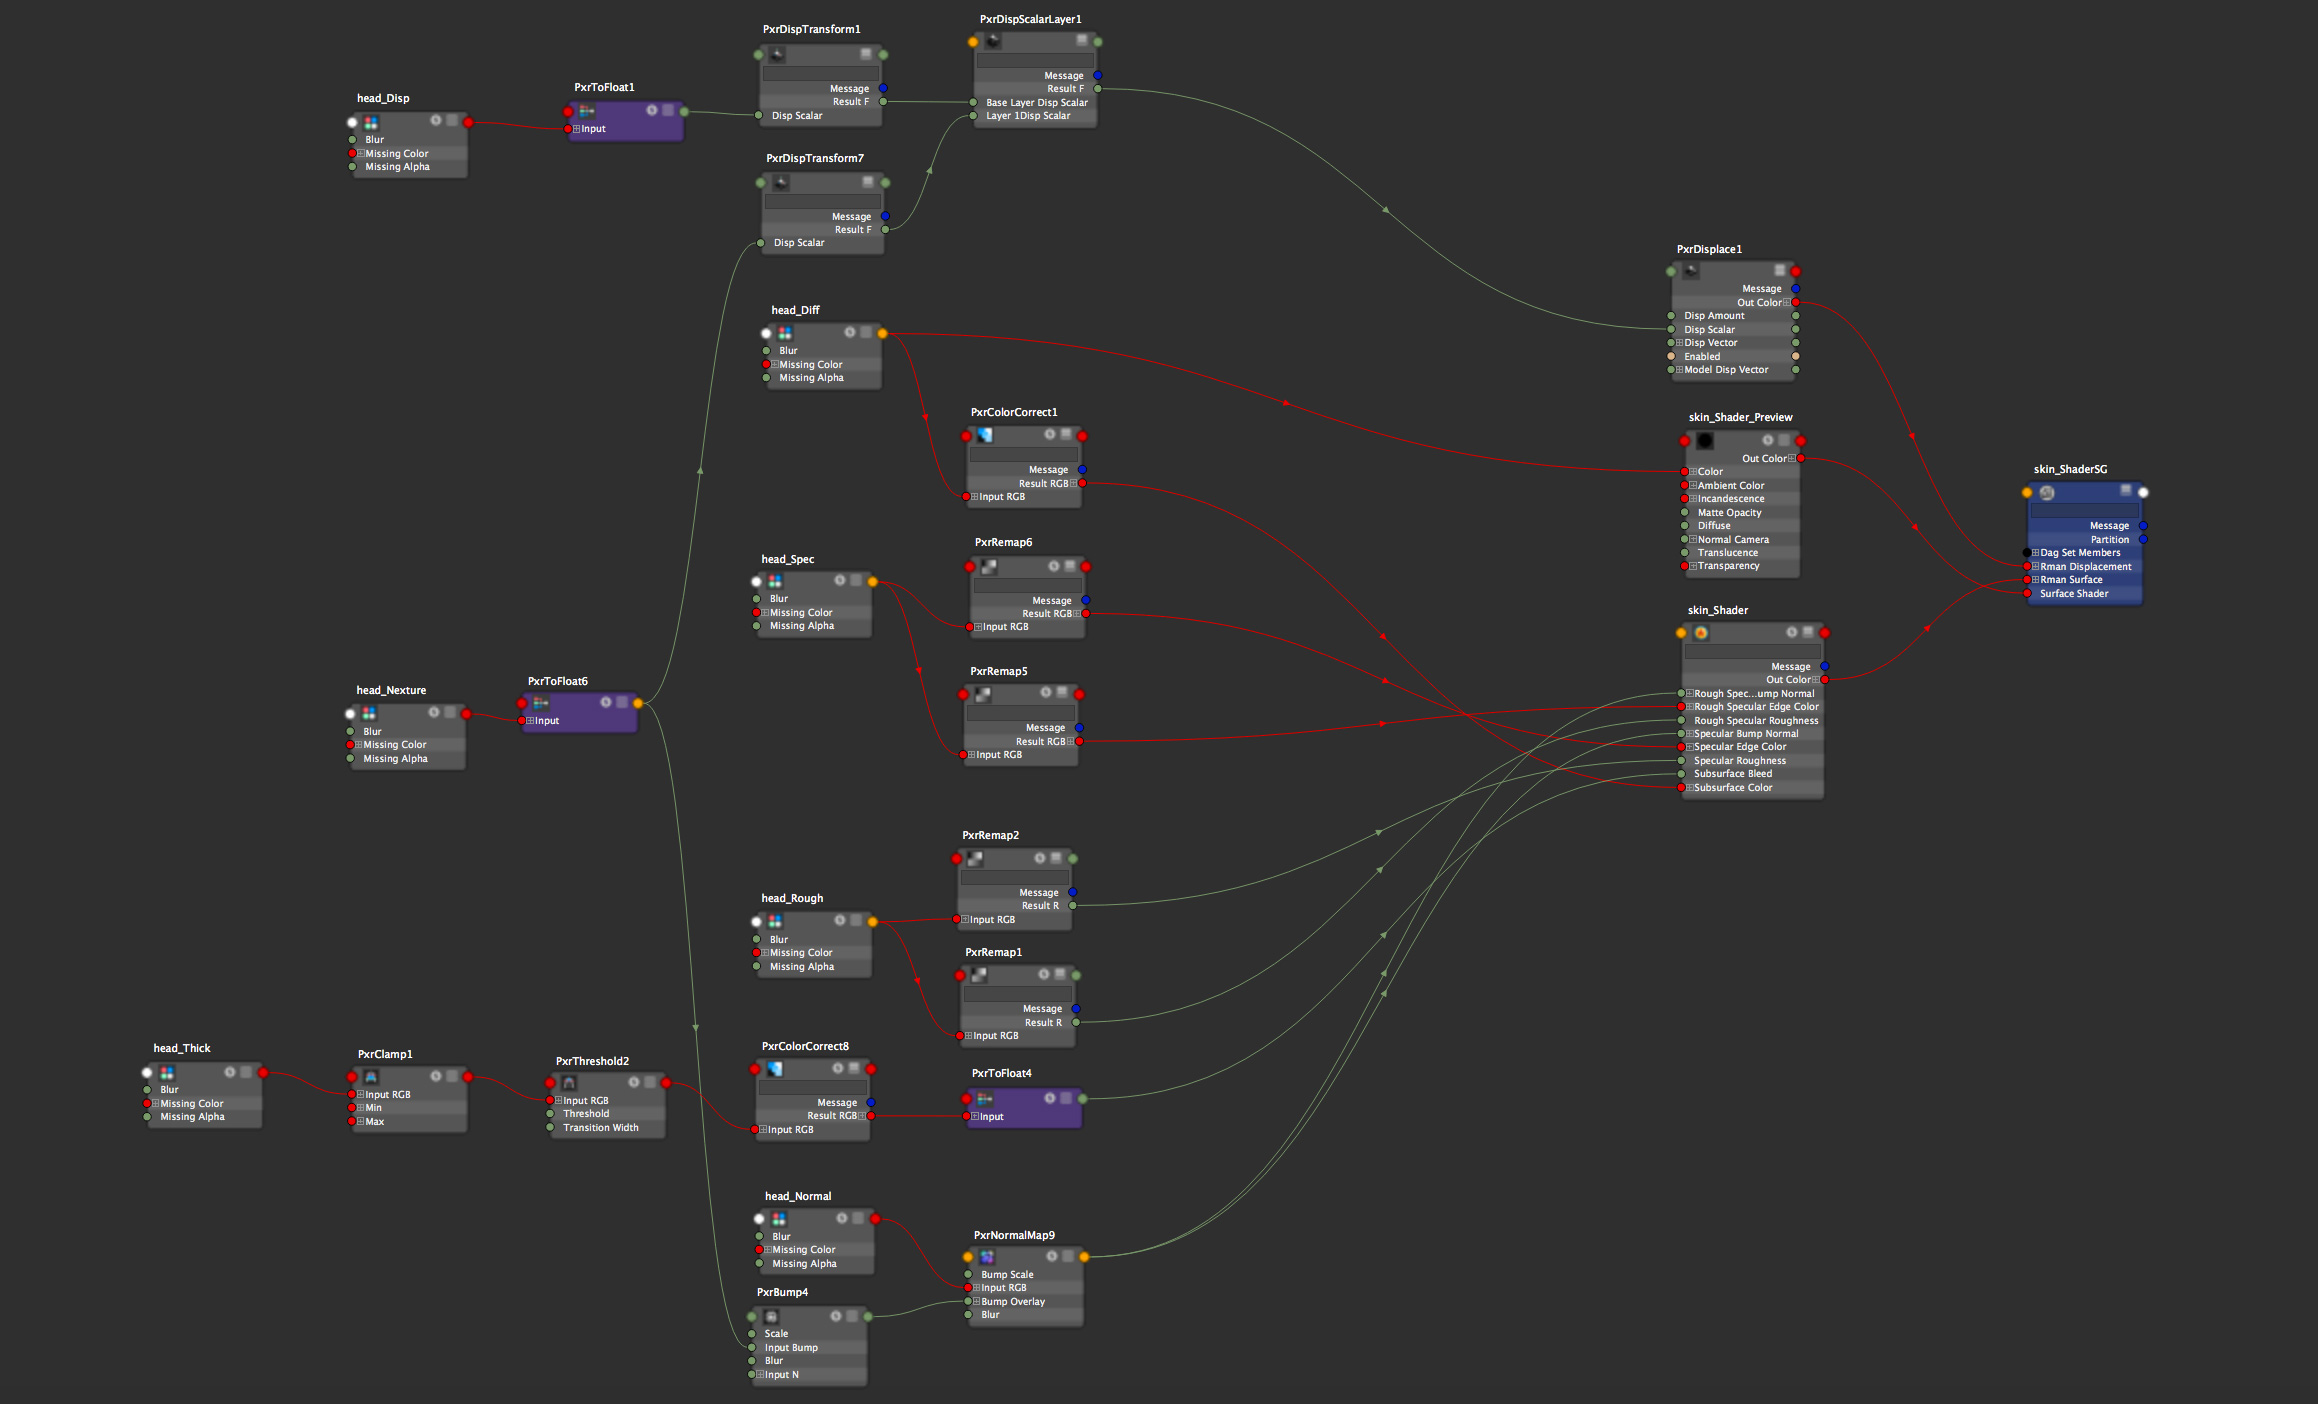
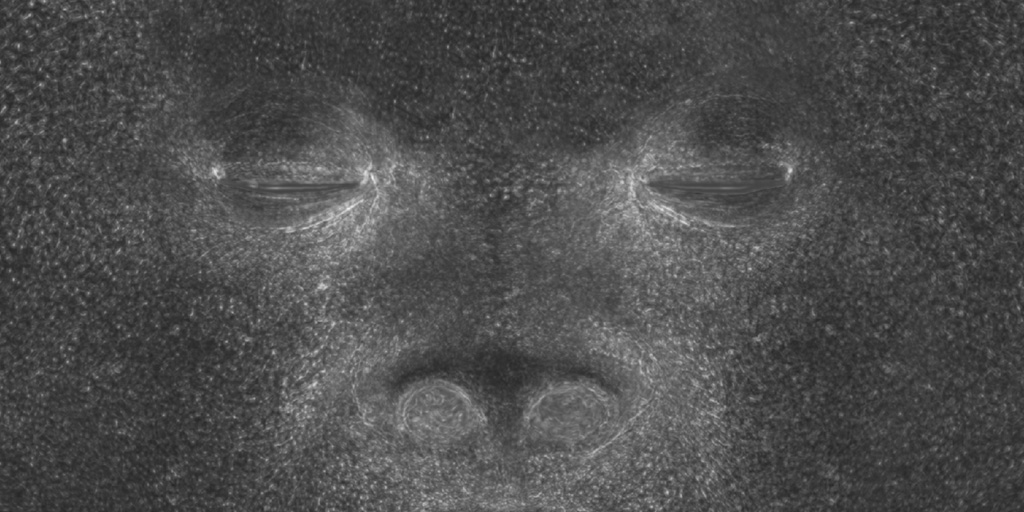
We are combining two floating point Displacements, which consists in the original displacement map for Louise (4K) and a micro displacement map (8k) generated by Nexture from the 4k map. This will give us the best detail possible.
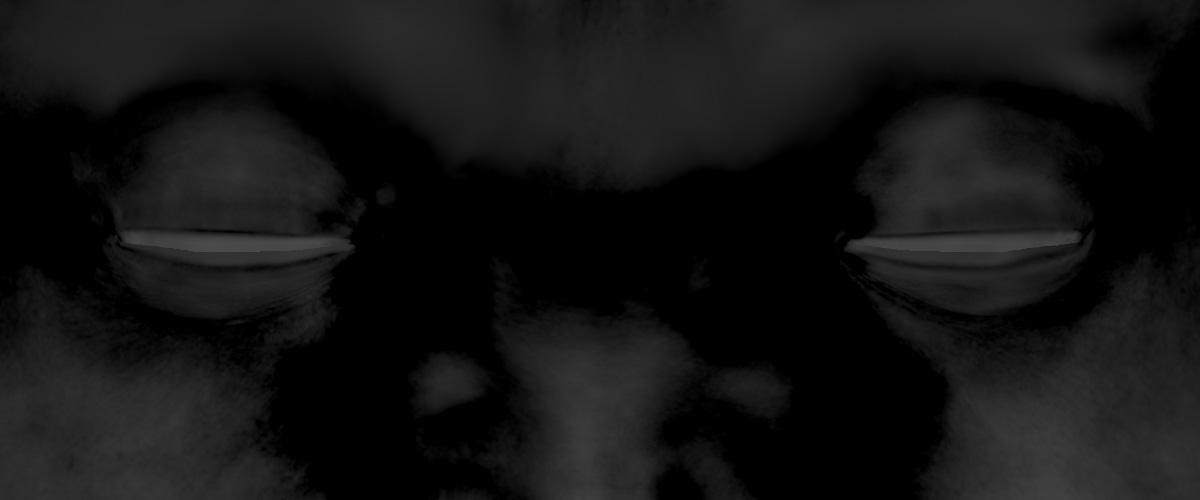
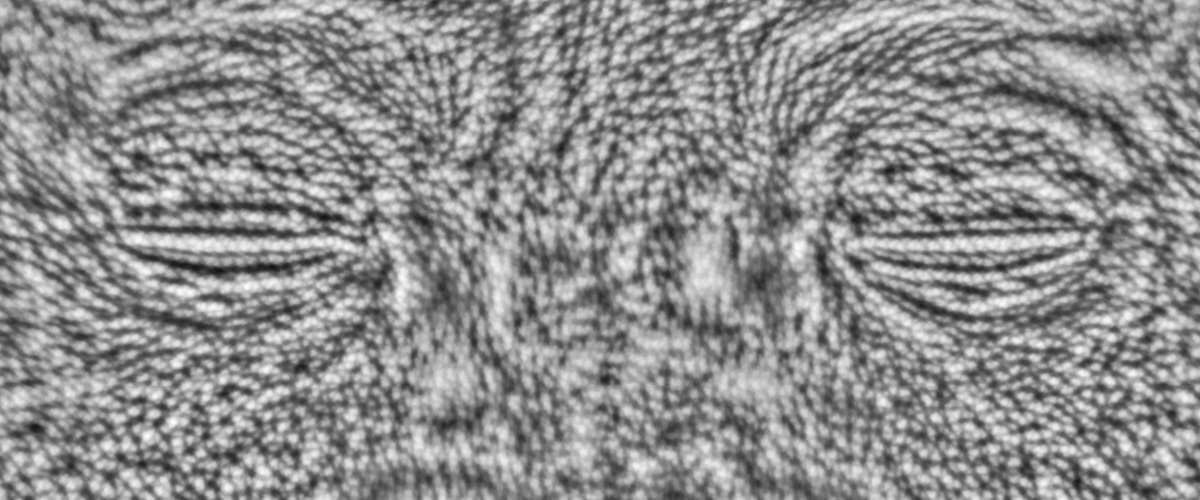
Left: Original displacement map. Right: Nexture micro displacement.
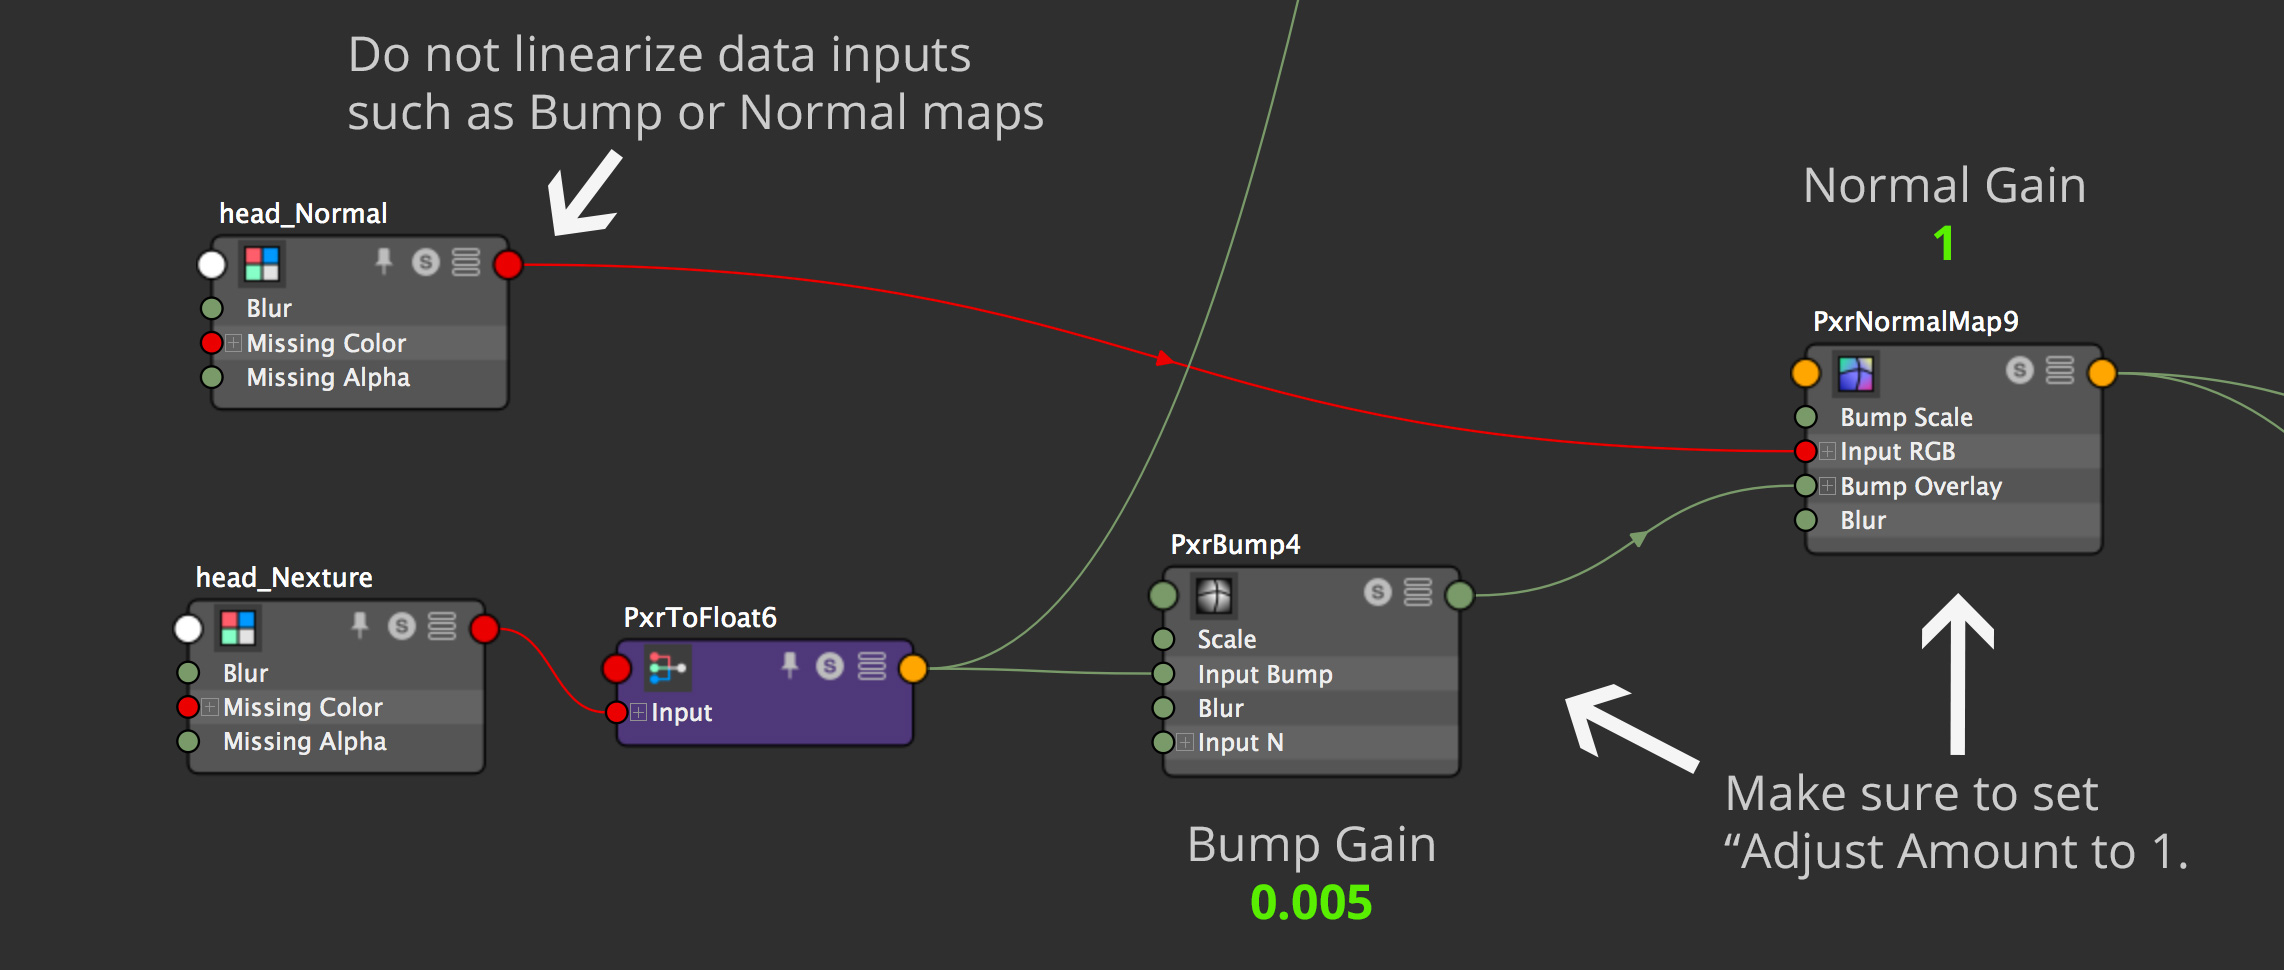
Each displacement texture is being fed to RenderMan via a PxrTexture node, which we will not linearize (color correct) as the data needs to remain untouched, and subsequently connected to a PxrDispTransform, which deals with the encoding of the displacement file.
In this case, our textures are grayscale displacement maps, so we're using Scalar as our data type in the PxrDispTransform node. The Eisko Louise displacement map thankfully comes with very accurate negative and positive values, which will recede or protrude the surface appropriately so we don't need to modify the Remapping Mode. The Nexture map does not have negative values, so we could set the remapping mode to centered, which will set the non-displaced value to 0.5, but I've opted not to change this as the detail is very small and displacing outward is more predictable to the overall silhouette of the character.
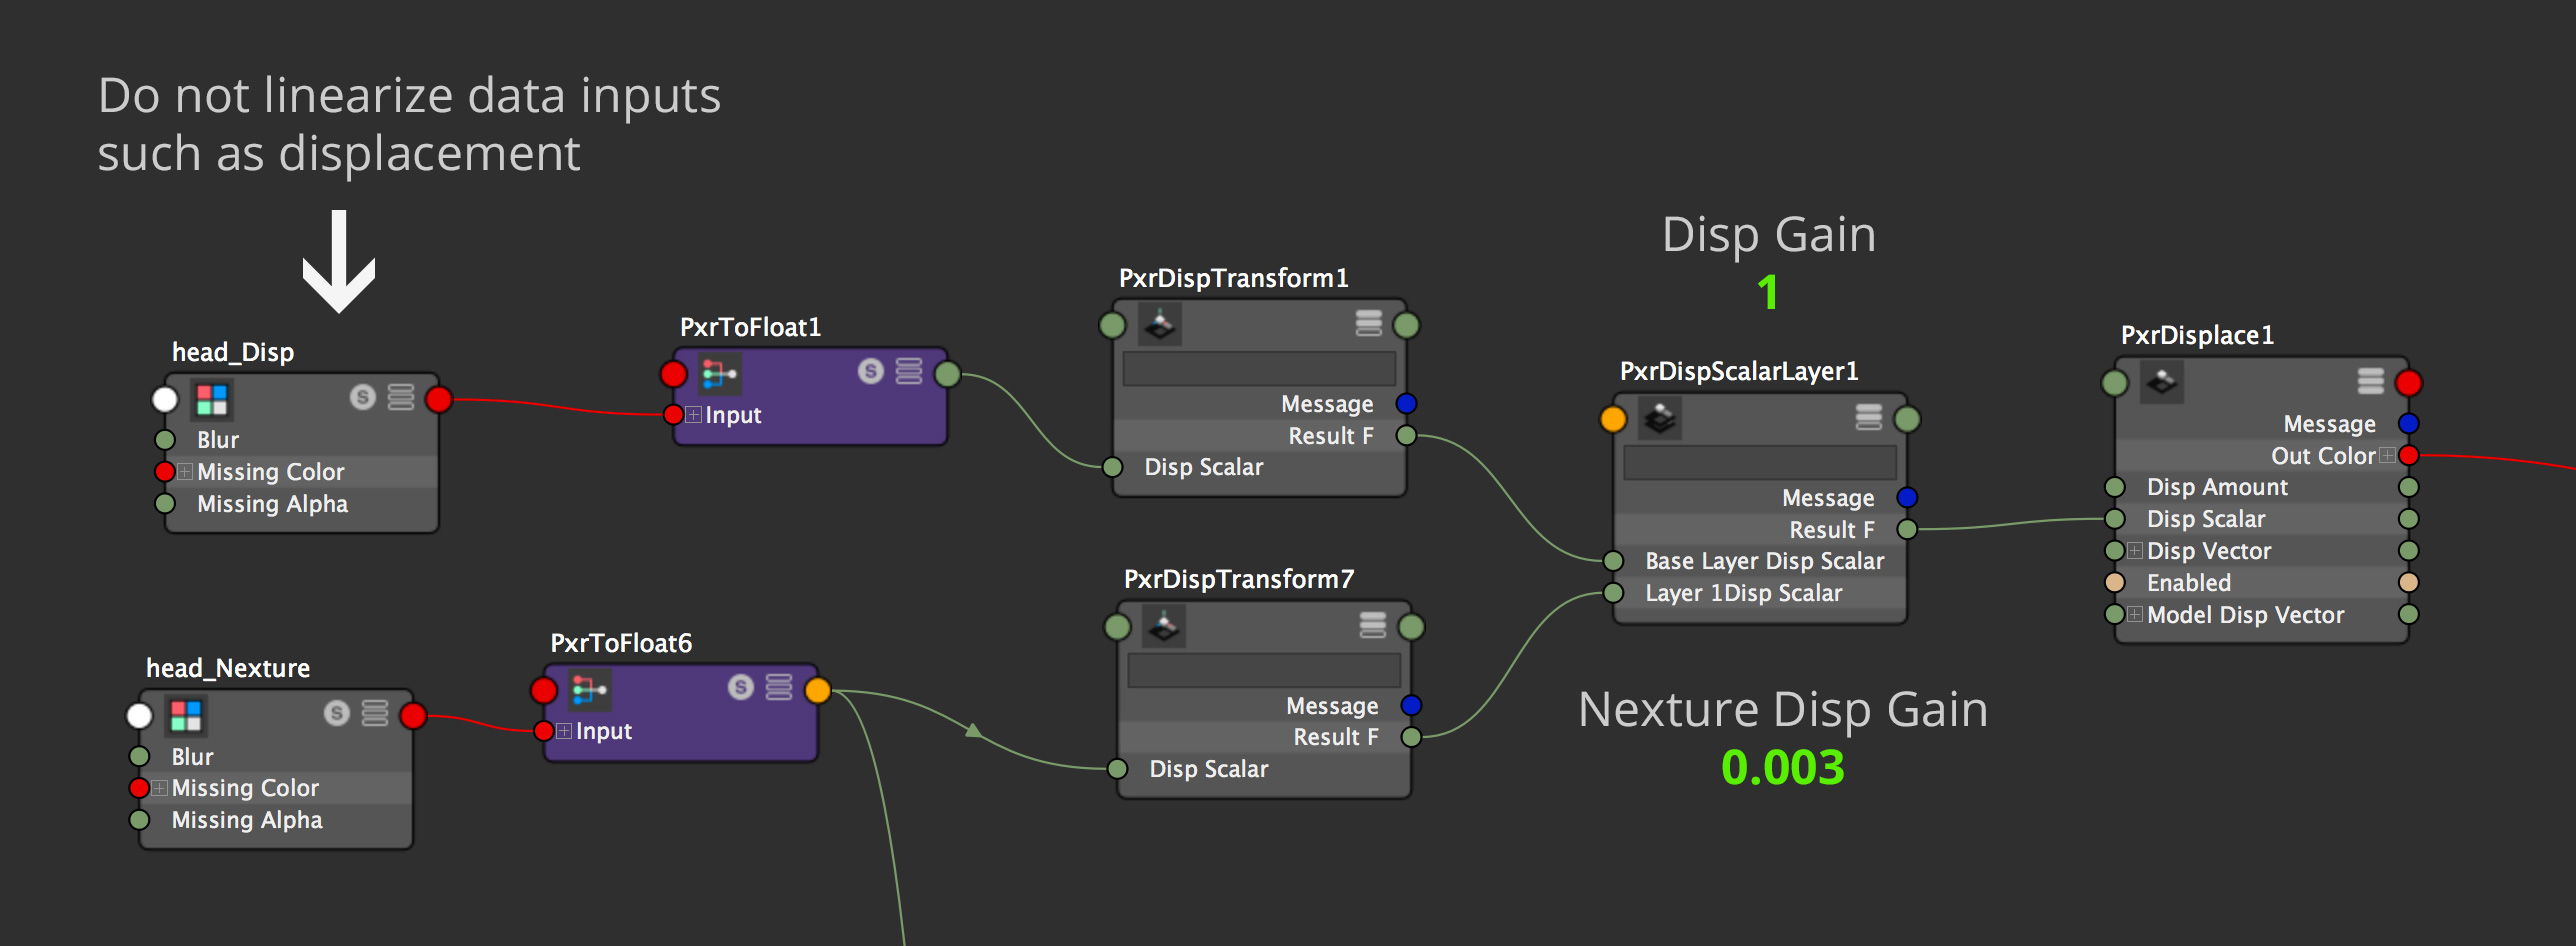
Displacement Network
Once we have everything in place, we're combining the maps with PxrDispScalarLayer, which allows us to layer multiple displacement maps and give them independent values. This will come in handy, because balancing multiple displacement amounts can be tricky. We've left the gain for the main Eisko displacement map to 1, because it comes with precise values. The Nexture displacement map needs more fine tuning or else we'll get overly bumpy skin. We've chosen to set the gain to 0.003, which is enough to see a significant amount of detail added, but not enough to overwhelm the original features.
The resulting displacement drives a PxrDisplace node which deals with the total amount of displacement.
Something very important to keep in mind is the geometric attribute "Displacement Bound" which is a crucial attribute in RenderMan for specifying a bounding box for the displacement. For our head, 0.2 will extend the surface bounding box 20%, which is enough to account for any slight displaced skin features such as moles. Leaving it at the default of 0.1 is usually ok, as we compute any minor discrepancies automatically.
Setting the Displacement Bound too high is inefficient and can make your render slow, so try to set this value as tight as possible.
Let's see what our efforts look like so far...
It is important to use the highest bit depth possible for data maps to avoid compression or banding artifacts. Thankfully all the maps are floating point EXR.
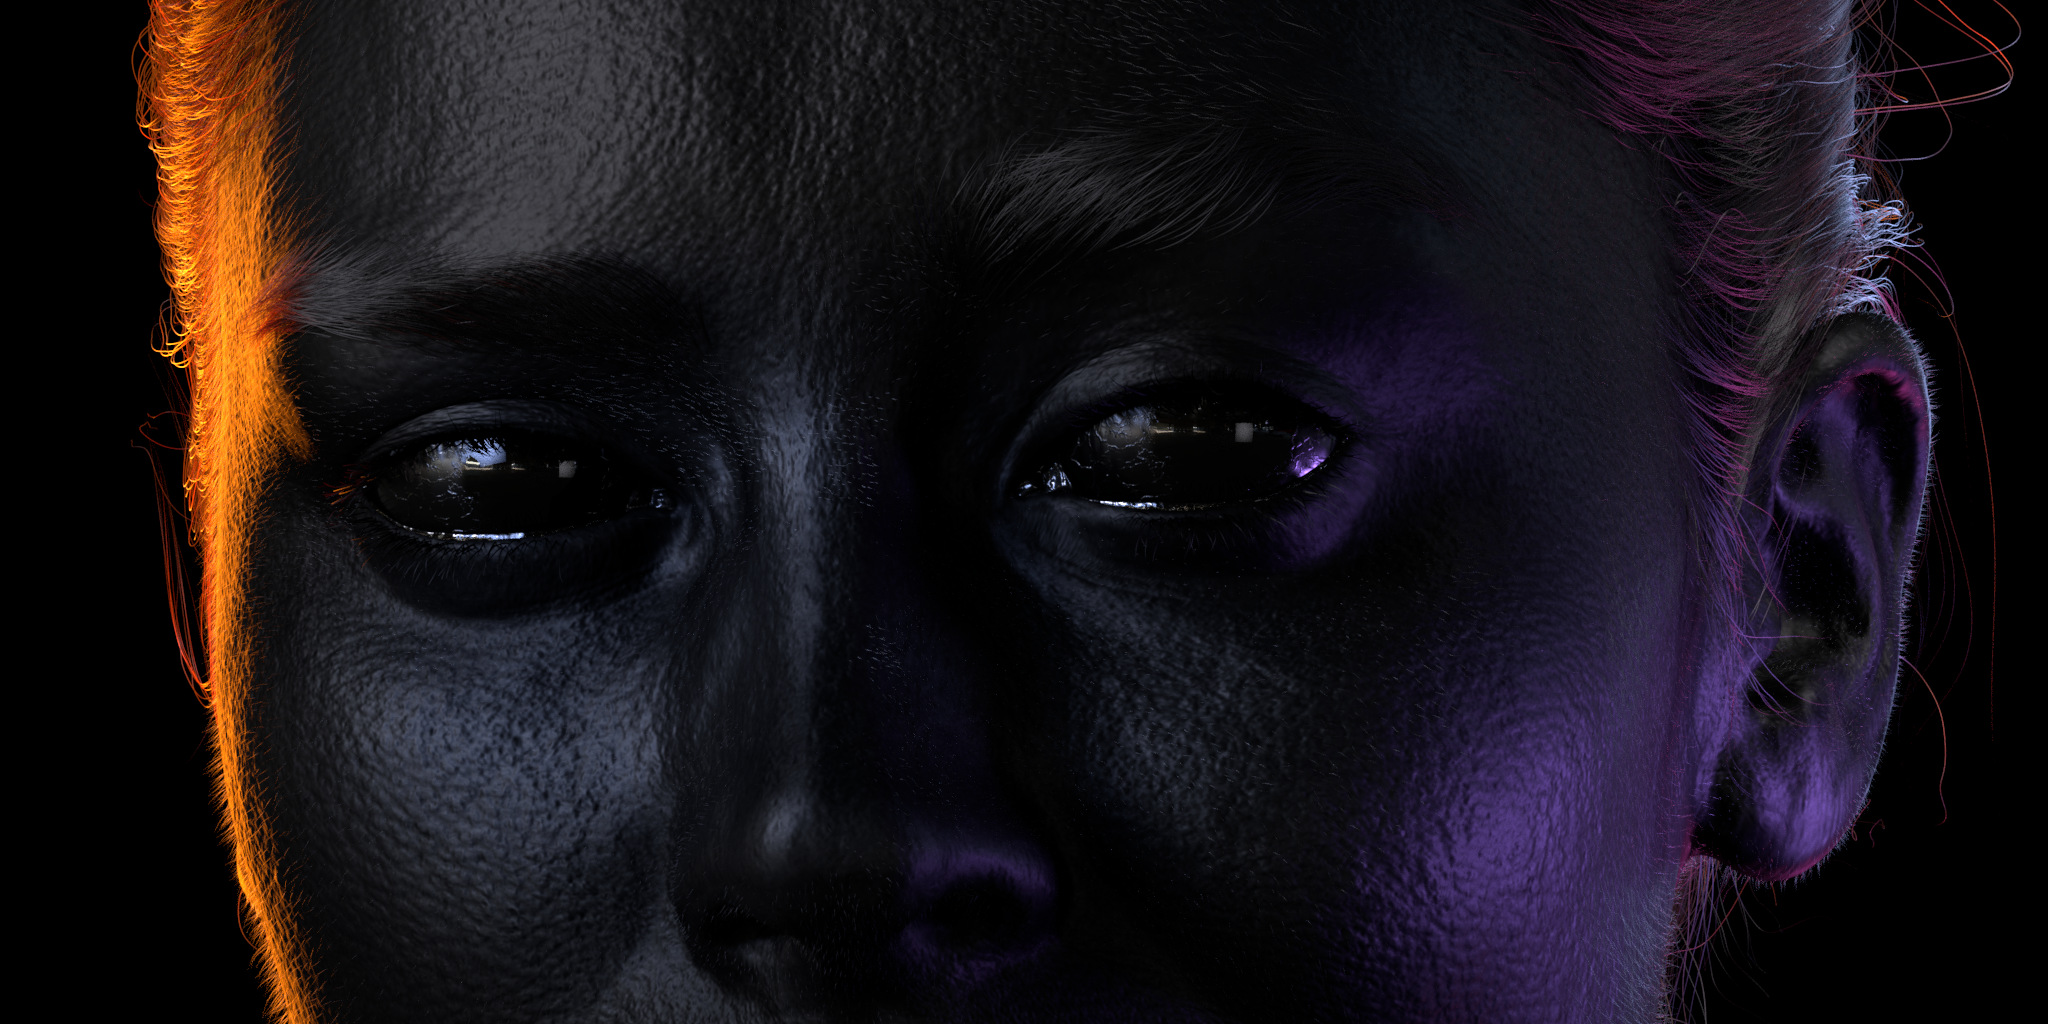
As we can see in the material network below, we are not only using displacements to drive surface detail, but also bump and normal mapping, we'll go into that during our shading sub-chapter.
The heart of realistic skin shading lies in Subsurface Scattering, which is the penetration and subsequent scattering of light into a surface. The resulting luminance created by this complex scattering of light, gives the skin a glow of scattered light, softening the light terminator. RenderMan's Pixar Surface Material, used in all Pixar productions and many VFX studios, has 7 different subsurface algorithms which can handle these effects very well, from cartoony to realistic, including cutting-edge Path Traced Subsurface models, which we like to confusingly call PTSSS...
It is important to note that skin doesn't have perfect direct light reflection, so we are not using the diffuse lobe. For energy to be accurate, we will set our subsurface gain to 1, this way all incoming light will be scattered.
RenderMan gives the user lots of flexibility by providing 6 different subsurface models, plus 1 single scatter model...so which subsurface model do I use? Well...to understand this better, we need to separate them into four categories: Dipole, Multiple Mean Free Path, Single Scatter, and Path-Traced.
For realistic skin the most natural dipole model is Burley Normalized. Jensen and d'Eon dipole, on the other hand, are great for gummy surfaces which need to scatter light more sparsely, this could be great for cartoony characters.
Dipole Diffusion models have energy distribution limitations in very thin and backlit geometry, so it is always important to add Single Scattering for areas which are prone to these limitations, such as the nose, lips, and ears. This will ensure the most accurate energy distribution.
Single Scattering can be used on its own, but is generally better suited to complement the other subsurface models when they have issues with thin geometry.
RenderMan also provides a manual Multiple Mean Free Path mode for artistic control. This model is useful for per-dermis layer customization, but we will focus on the recommended energy conserving workflows.
We've actually chosen to use Non-Exponential Path Traced, instead of Exponential Path Traced, as it has all the benefits of the latter plus a useful "Bleed" attribute which softens the subsurface results while keeping subtle detail. This subsurface model will provide the sharpness we need in pores and wrinkles.
PTSSS also comes with Single Scatter as part of the algorithm, so we have to worry less about thin surfaces. If it's still becoming an issue and you see slight darkening, you can fix the problem areas by adding some diffuse lighting with the diffuse blend parameter, or simply add a slight amount of single scattering.
The differences in subsurface models are small, but added accuracy, as small as it might seem, is important for photorealism.
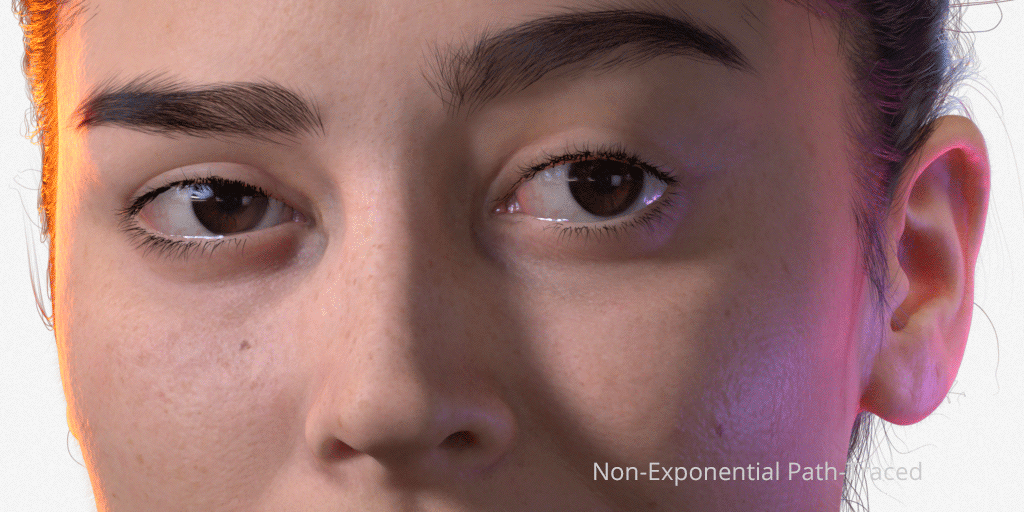
Burley Normalized vs Non-Exponential Path-Traced Subsurface on skin.
The Subsurface Color is the most important attribute for the look of our skin, and lucky for us, we have a great albedo map based on a real-life scan. To hook this up, we're using a PxrTexture node and plugging it into the Subsurface Color attribute. We need to make sure this texture map is color managed by enabling the "Linearize" checkbox.
We've also made sure to paint out any hair in all texture maps.
How do I paint my other dermis layers? No need to! All Diffusion and Path Traced models in RenderMan include an albedo inversion technique (see paragraph 4.2 - pages 77 to 79), and an implementation derivation for D'Eon Dipole.
Path Traced SSS expands on this technique by adding anisotropic scattering (see chapter 6 - page 7). With this approach, a non varying DMFP (distance and color) will be automatically “modulated" (ie solved/inverted) from the varying albedo, in our case, the head color texture map.
Well, that got complicated...
Think about it this way, deep down, SSS works with volumetric absorption and scattering properties, but these are not artist friendly and moreover have a sort of non linear relationship to the final color. So instead, we take a diffuse albedo map and a single constant DMFPC value, and internally derive (solve/invert) the varying absorption and scattering properties. Once this is done, the albedo is not used anymore (contrary to a regular BRDF, where we post multiply the response by the albedo), this sounds complicated (and it is), but it makes for a simple and predictable user experience...paint your map and RenderMan does the work!
There are 2 main attributes to consider for DMFP:
Diffuse Mean Free Path Color is the most important of the two, because it specifically allows per-channel wavelength penetration, meaning if RGB values are: 4, 1, 8, light would penetrate 4 units in the red channel, 1 unit in green, and 8 units in blue. This allows for complex scattering effects.
A recommended value for DMFP Color is the average subsurface color pushed to a maximum value, meaning, independent of the hue and saturation values, the value intensity must be set to 1, so that the distance multiplier (DMFP Distance) will be more predictable when you tweak it. .
You can also make choices based on a table of values available in the documentation, which is a great starting point for many real-world materials, including skin.
So...since RenderMan calculates SSS absorption automatically, does this mean I lose control? No. In fact, you can use painted DMFP Color maps to further control the variance of subsurface across the skin. This flexibility can be great to exaggerate these effects, but keep in mind that it is recommended that you let RenderMan modulate the SSS depth automatically. If you're looking for gummy subsurface effects around the ear, or other thin areas it is recommended you use the new "Bleed" attribute instead...more on that in a bit...
Diffuse Mean Free Path Distance is the multiplier for the color, by manipulating this single value, we can modify the distance without having to compensate for 3 separate RGB values. This is very helpful if the scale of the model changes and we want to tweak easily.
RenderMan's unit size for subsurface is millimeters (Maya is cm), so we've settled for a value of 3. We've reached this number somewhat artistically since the average face skin thickness is between 0.5 mm and 3 mm. It helps that Louise has very accurate measurements, at 21.5 cm for the face, so tweaking this value is very predictable.
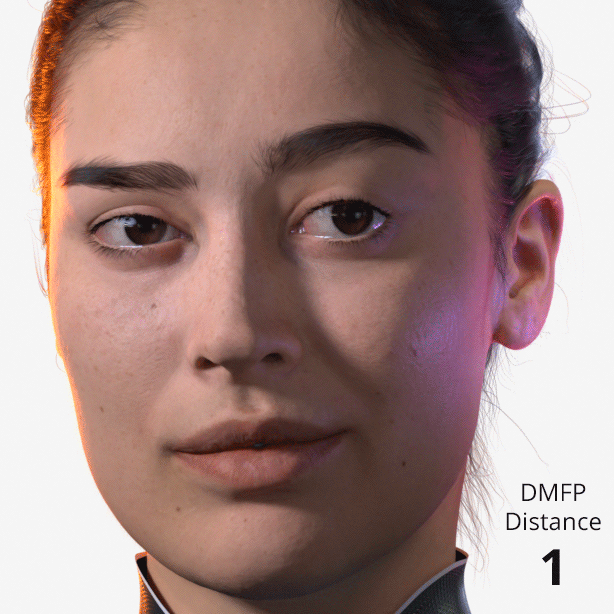
Above we can see how easy it is to get a harsh falloff or a jellyfish look, so it's important to always keep physicality in mind, but don't lose sight of your artistic touch.
Lighting can play tricks on your shading judgement, so it's best when we have accurate data to match the CG counterpart.
We are setting the Directionality to 0.8, which will accentuate the result in thin areas such as the ears, eyelids, nose, and mouth by scattering light forward. The effect is subtle, but is more obvious when backlighting is used.
With our skin values rich in pinks, more exaggerated red wavelengths mean more flesh-like results.
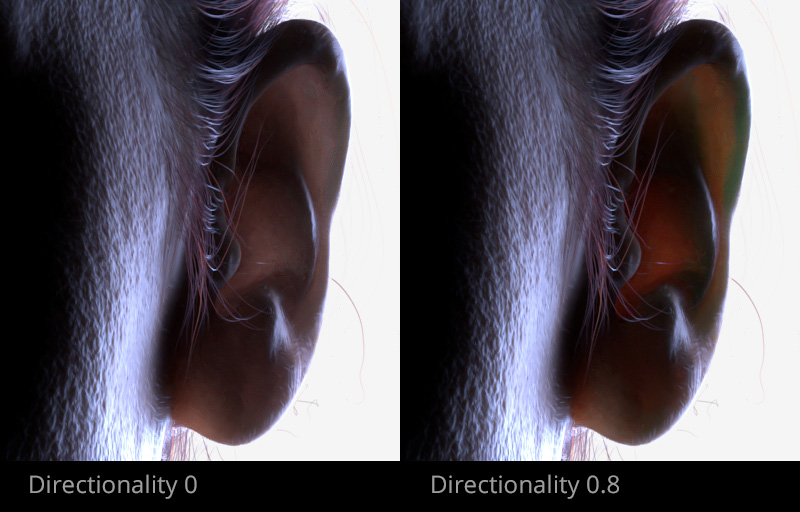
Be careful not to push values too high as I did, or else you'll get inverse colors when the wavelength escapes the surface. You can note a bit of green with a value of 0.8.
This new attribute is great for making gummy-looking skin without losing detail, a problem usually associated with modifying the DMFP Distance. This fits really well for cartoony characters, but not so much for a realistic render like Louise. I put a network in place to try with this effect, but quickly decided it wasn't necessarily helping realism.
There are two important advanced settings to consider when shading skin, especially when combined with hair, tears, and other intersecting surfaces which are typical in CG characters.
This is absolutely crucial to skin shading, because subsurface calculations in RenderMan always connect all surfaces...which might be useful for intersecting gummy surfaces, but it's a bit tricky for skin.
Making Trace Sets allows us to isolate the computation to only the subsurface objects, effectively isolating them from intersecting geometry which can cause unwanted shadowing and bias artifacts. To achieve this I've made a new Maya set called "Skin" and included all subsurface geometry. All I need to do after this, is type Skin in the Trace Set attribute of all our Subsurface materials.
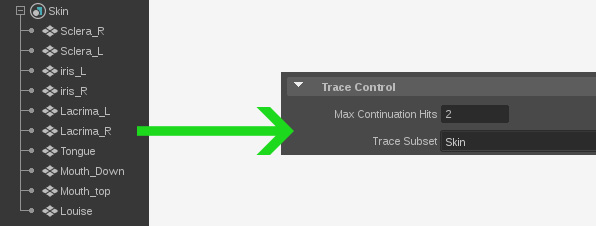
This is also a crucial attribute to enable so that RenderMan can treat intersecting subsurface geometry as a single object, instead of trying to shadow thin crevices. If it's not useful in your character, disable it because it can be expensive.
This is a very useful speedup for Dipole Subsurface models, but since Path-Traced Subsurface random walk calculations will never equal to diffuse, this attribute needs to be disabled.
Once we have all this together, we can see the difference in intended light transport accuracy. Nice!
Now that we understand subsurface scattering better, let's talk a bit about specular choices...
Skin has many layers of oils or sebum which give it a subtle sheen and Louise comes with very useful maps to achieve this effect. Since we're aiming for realism, we are choosing "Physical" for our Fresnel Mode, which will make reaching a physically plausible specular much more predictable.
Adjusting the specular under different lighting scenarios is crucial for aesthetic purposes, just like a make-up artist will powder an actor's face to limit sweat or flatten unwanted skin features in a specific shot.
We are using two specular lobes, Primary Specular and Rough Specular. Thankfully Louise comes with very handy Specular and Roughness maps, which we are using to control those exact two attributes.
Left: Specular -- Right: Roughness
The texture map values range between 0-1 which means we need to remap them to aesthetically pleasing ranges.
We are remapping these values between 0.5 and 0.9, since we don't want the skin to look too oily or sweaty. If we intended to render such effects, using Clear Coat Specular is a great way to achieve this non destructively.
We won't be adding normal or bump mapping to our global surface, we're only adding it to the specular lobes to simulate a layer of oil on top of the main displaced surface.
The scan comes with a detailed Normal map and we're also using the Nexture displacement map as bump...you can never have enough detail...
Following a similar logic to that of the displacement maps, the Normal strength can be left at 1 and Nexture Bump amounts need to be dialed in manually, 0.005 seems to be giving a subtle but useful amount of detail.

Left: NO Specular Bump-- Right: Specular Bump
An important attribute to keep in mind is "Adjust Amount" in the PxrBump and PxrNormalMap nodes, which forces RenderMan to flatten the edges, keeping it from flipping the normals and creating artifacts.
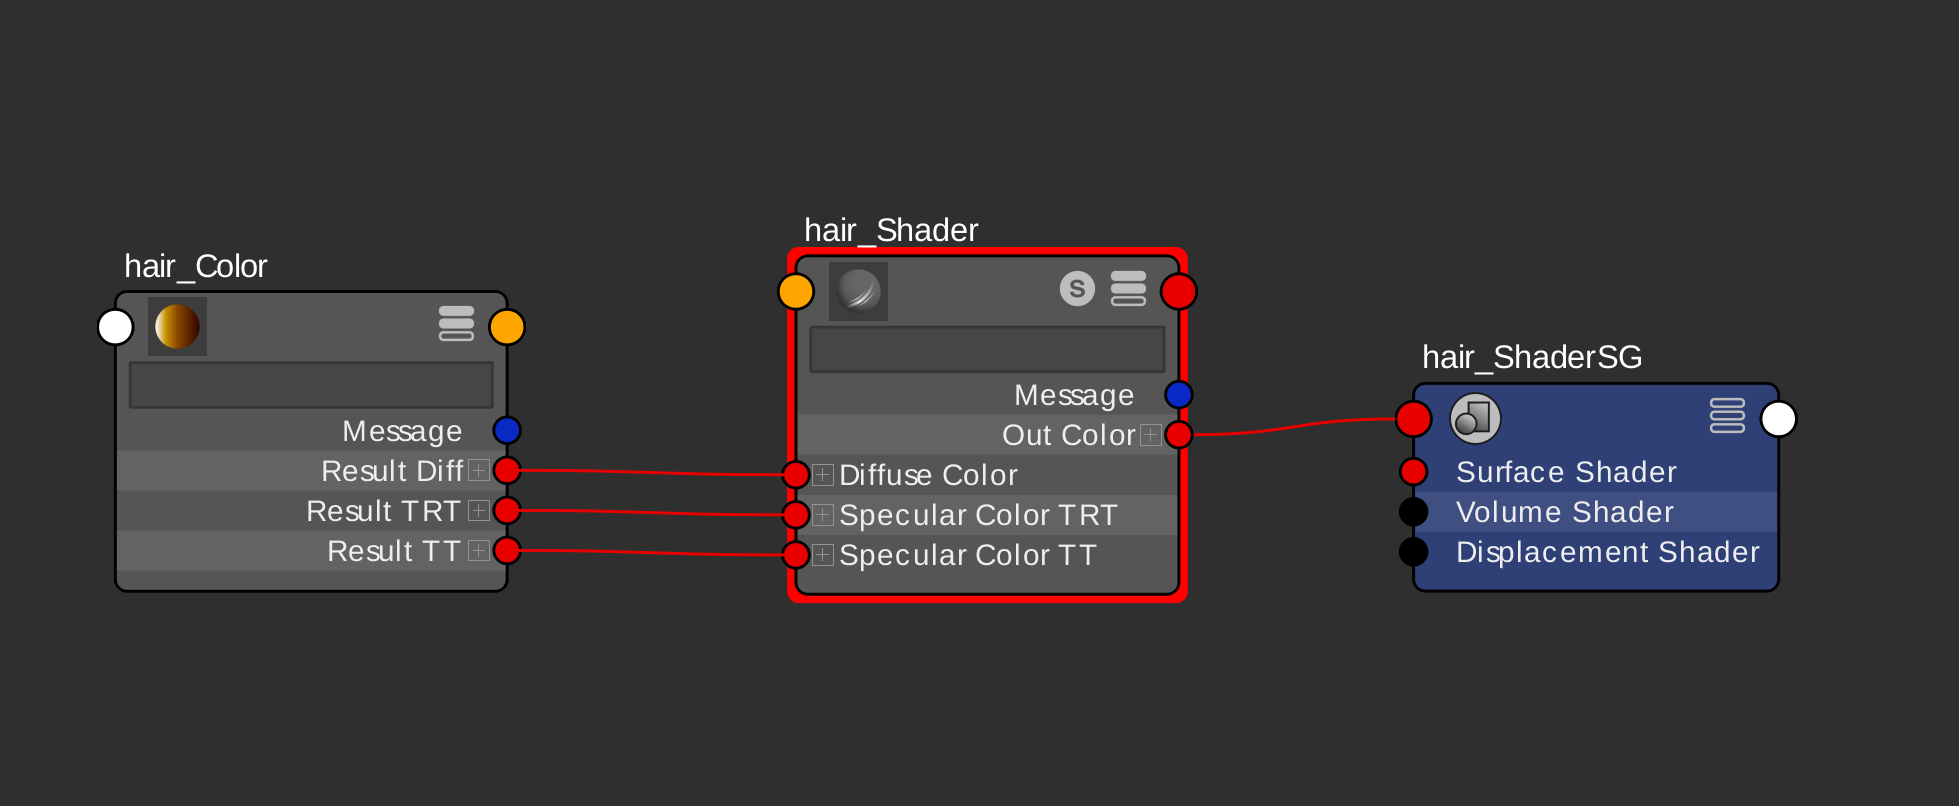
Rendering hair can be quite the tweaking experience, not only is the accuracy of the curve shape important, but the shading and light transport play a crucial role in the believability. Thankfully RenderMan comes with an incredibly capable Marschner Hair shader used in Pixar productions, which can simulate very complex light scattering, melanin, and multiple specular lobes.
Marschner Hair has a great ability to do sophisticated refraction and light absorption through hair, simulating very subtle hair transmission.
![]()
Note how the light scatters through the peach fuzz follicles.
Each Specular value needs to be artistically tweaked, as hair can vary tremendously in sheen, depending on the level of moisture, cleanliness, etc.
We've tried to match the reference as much as possible, where the hair has a subtle sheen, but the eyelashes and peach fuzz differ from the main hair. The latter is usually very subtle, so we're toning down the main speculars and heavily relying on transmission specular so that it subtly breaks the silhouette without distracting in the front.
Peach fuzz is often a very subtle effect.
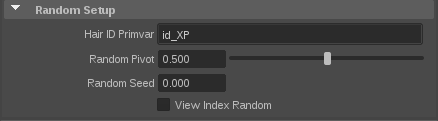
For realism, it's very important to create per-follicle variation and RenderMan makes it easy by reading Xgen ID information directly. All we need to do is connect a PxrHairColor node and add the variable id_XP to the Hair ID Primvar.
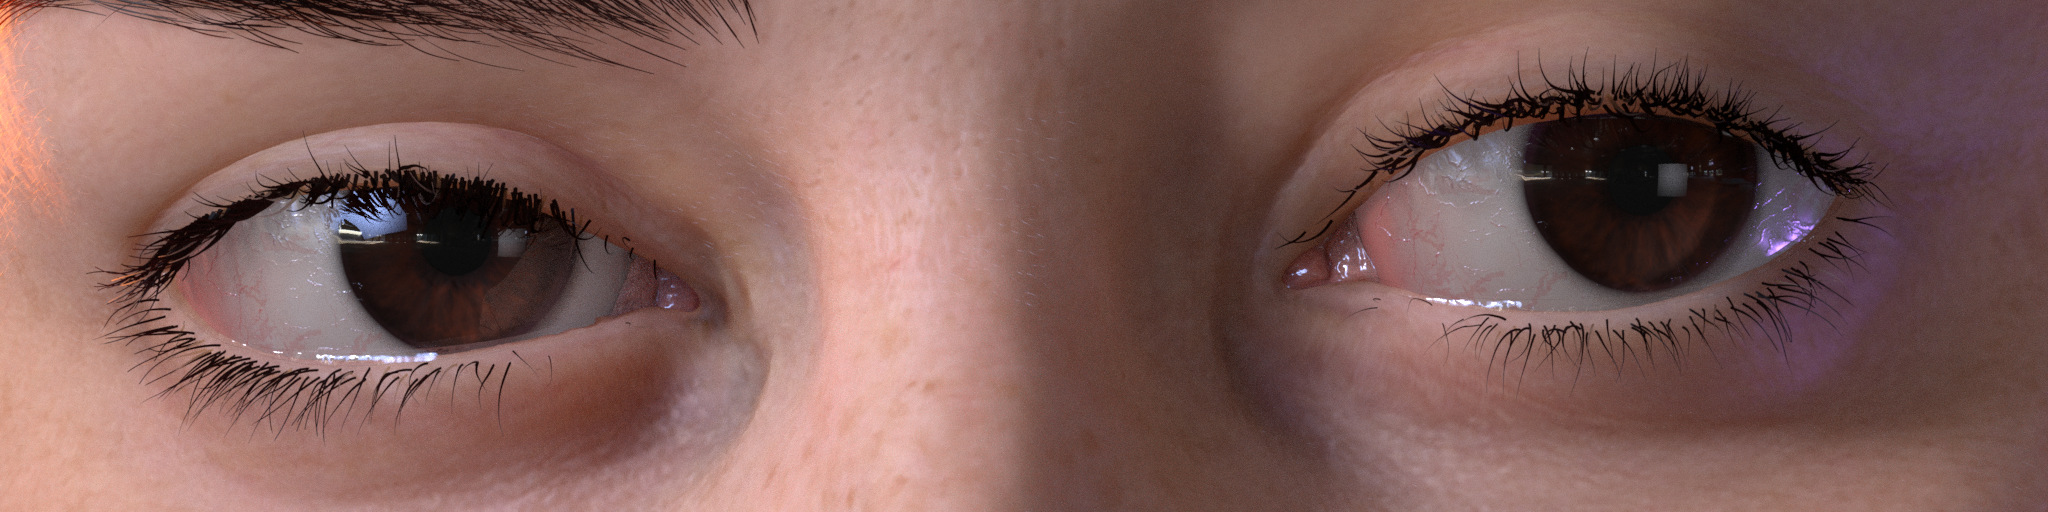
Because of how the model was constructed, we're using a Pixar Layer Surface. This model was designed with the iris as a separate surface from the sclera (traditionally one object) and the cornea as part of the sclera (traditionally the lens is a separate surface).
Because of this, we're using a mask to transition between two BXDF:
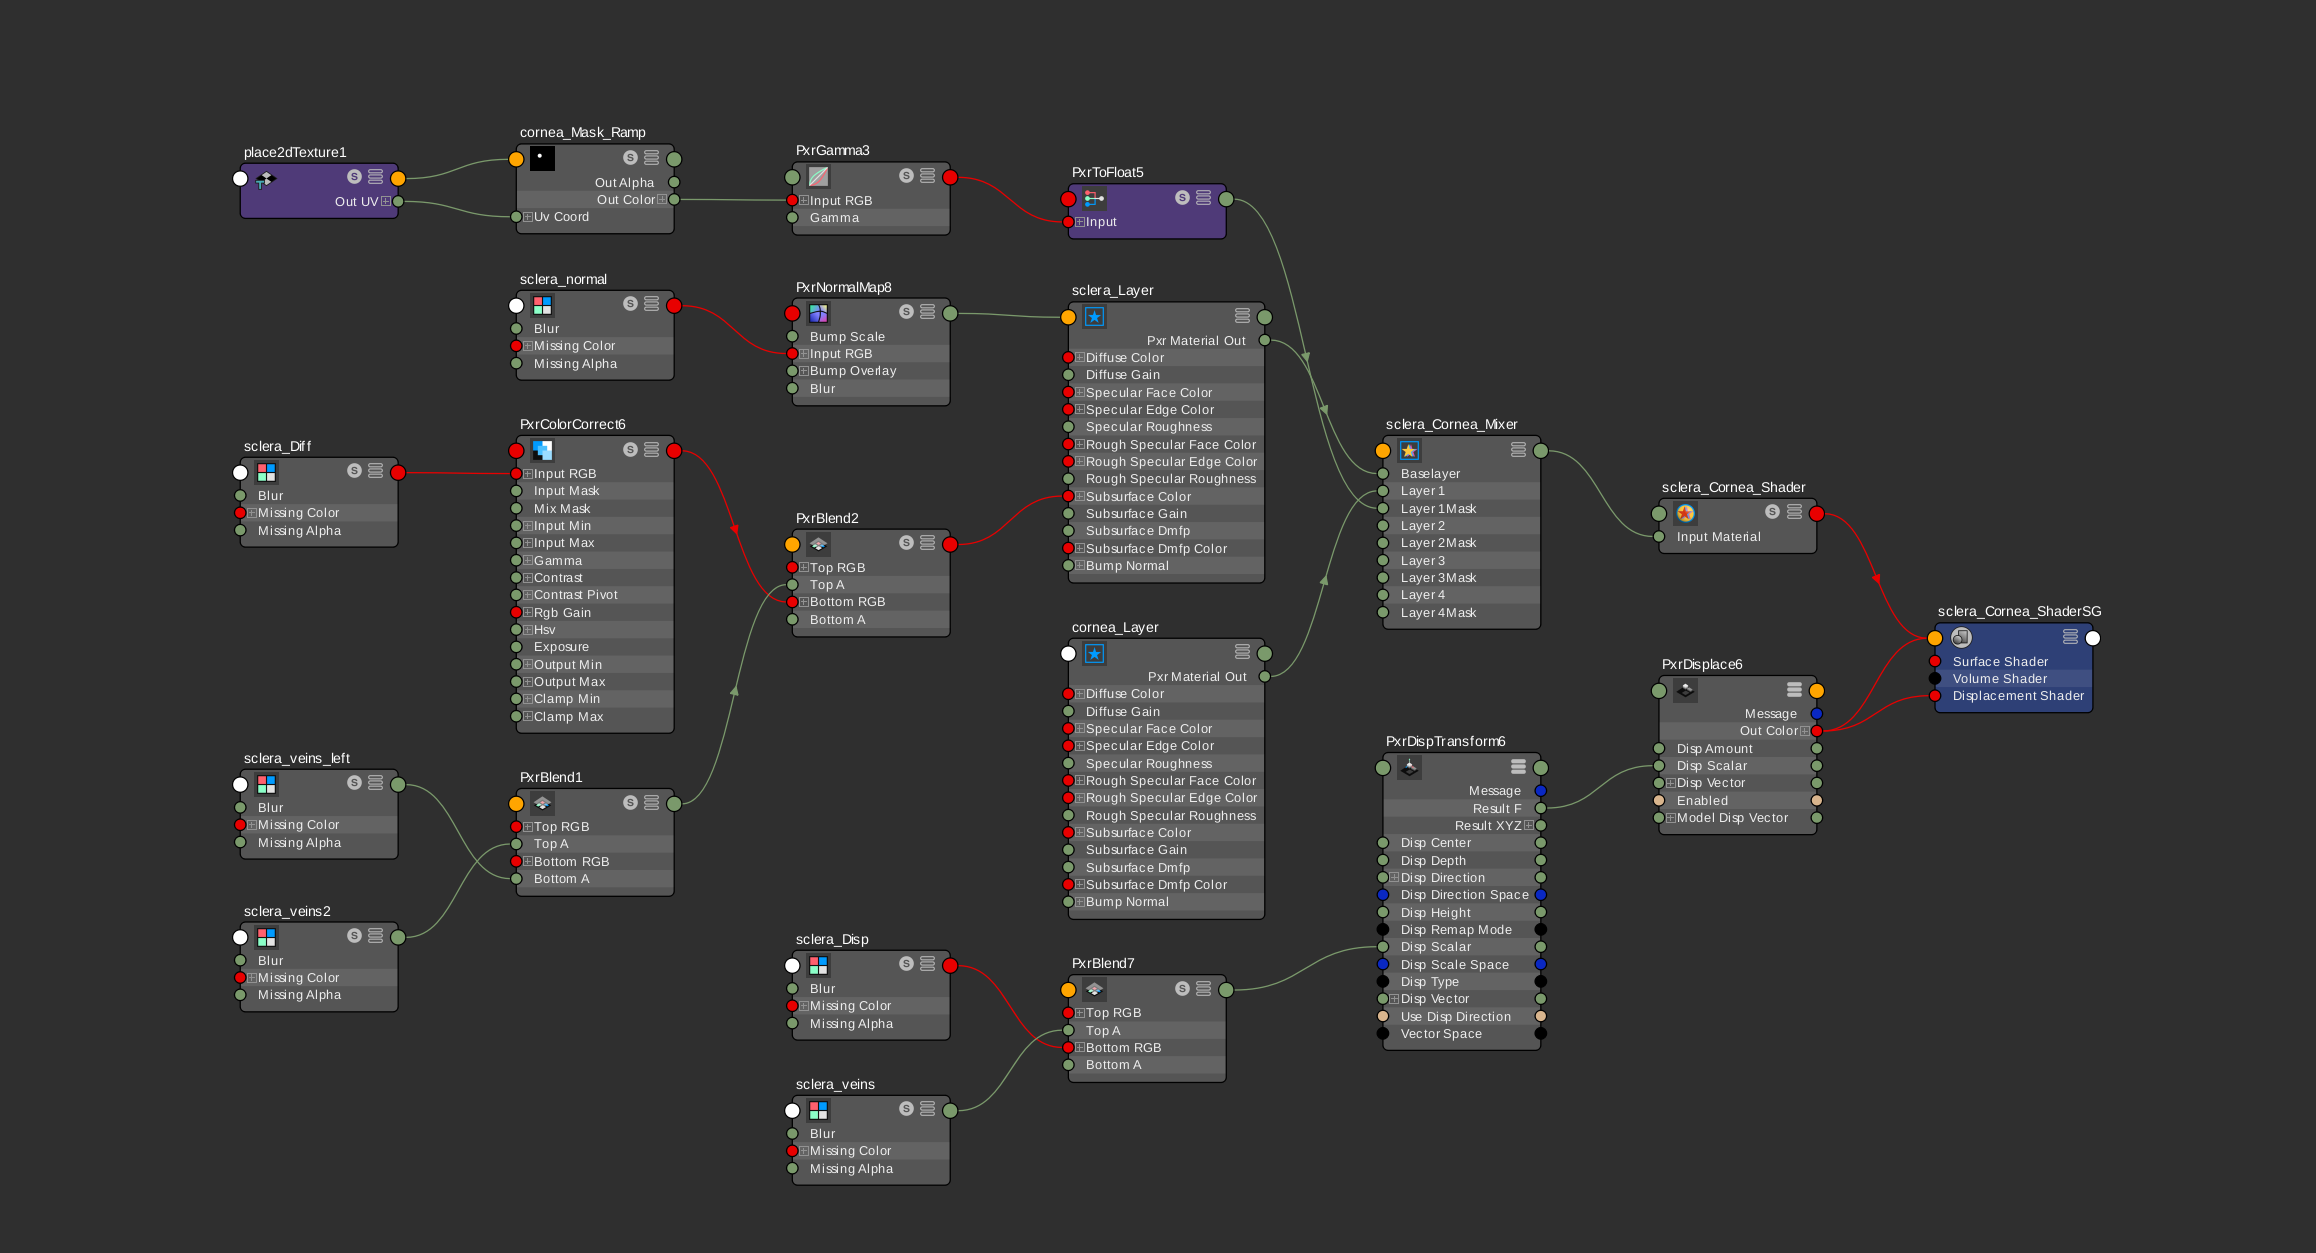
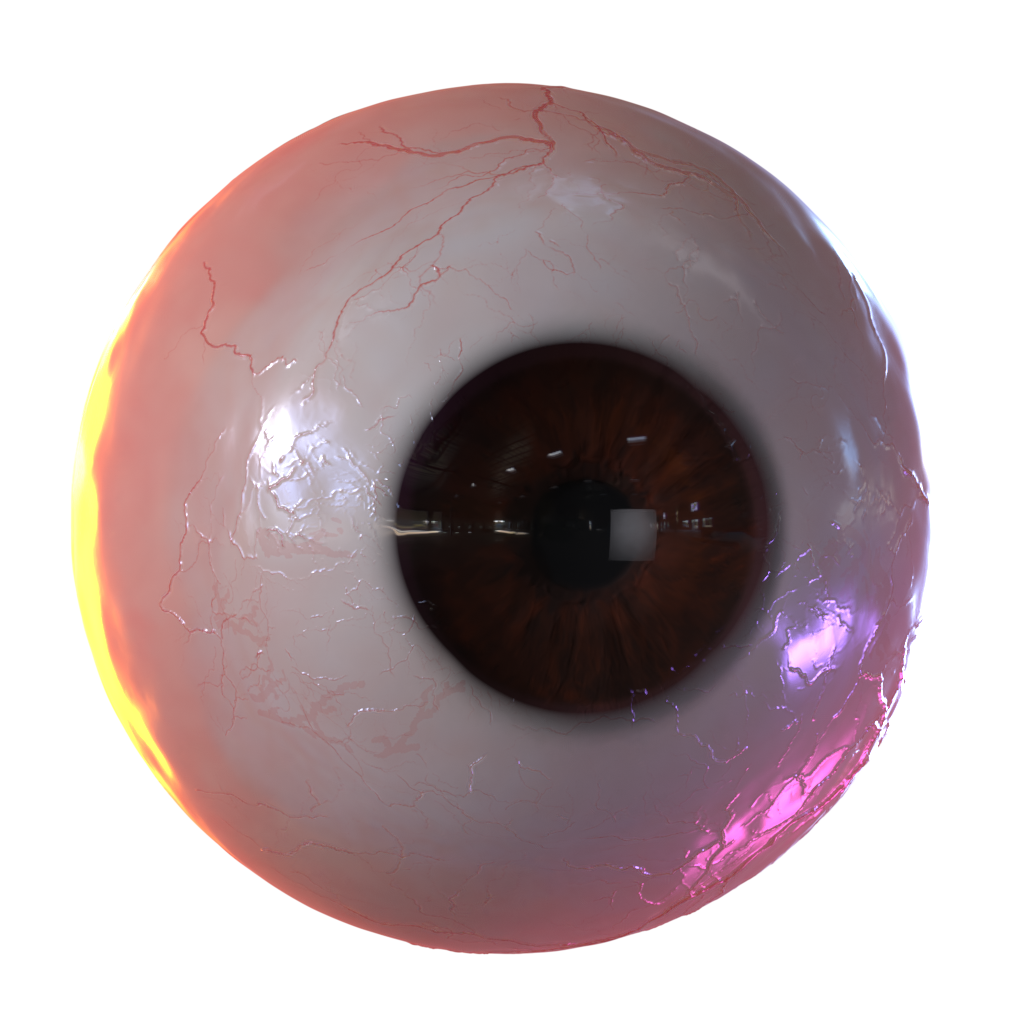
The eye texture has very bright whites, which is not physically accurate (the whitest surface has a value no higher than 0.8), so we're manipulating the values to achieve more appropriate white values.
RenderMan has expanded its toolset to achieve realistic eyes better than ever with the inclusion of Manifold Next Event Estimation (MNEE) or Manifold Walk, a technique that can render caustics through very small and thin surfaces very efficiently. MNEE combined with PTSSS (say that three times fast!), are fundamental for believable eyes.
As we can see MNEE is adding beautiful caustics in a fraction of the time it would traditionally take to compute caustics in either uni or bi-directional pathtracing. We can see the difference MNEE can make when compared with traditional thin shadows below.
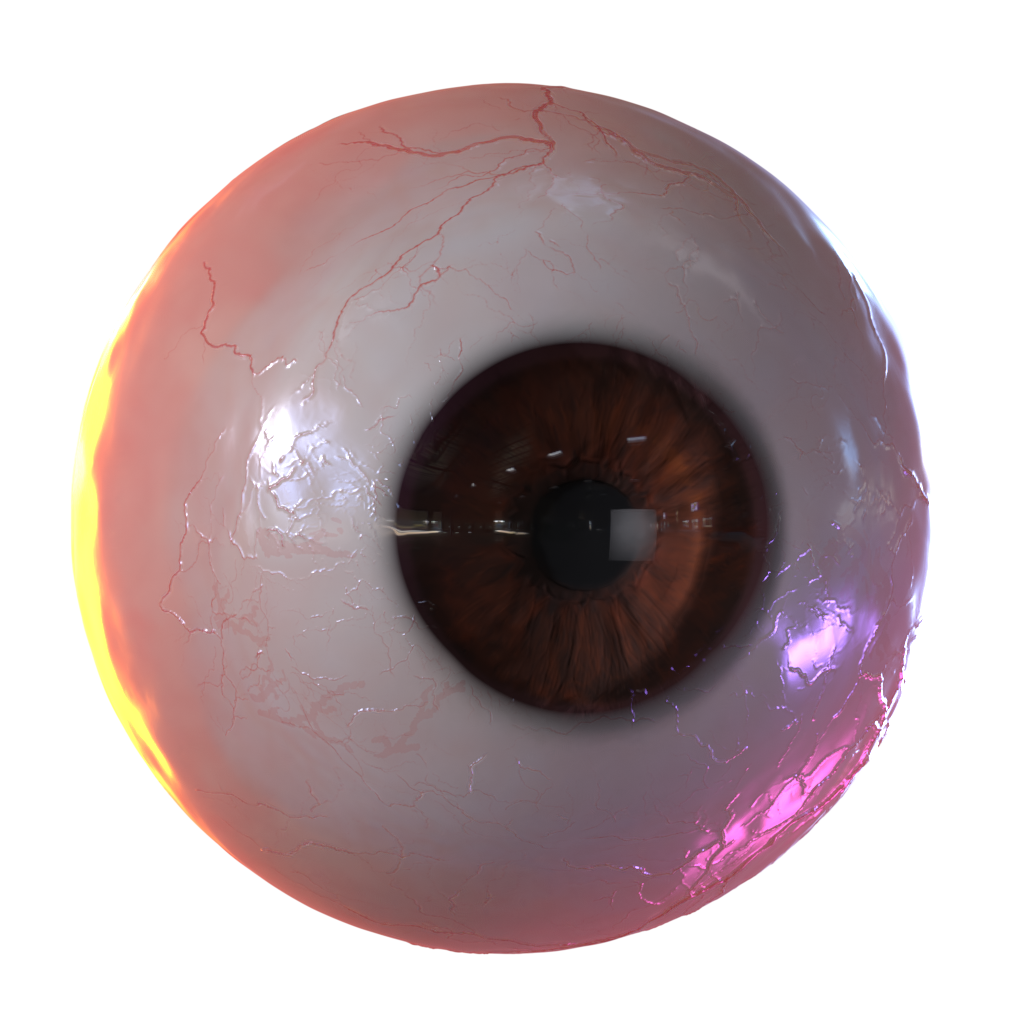
I know...it's creepy...but check out the great caustics on the right!
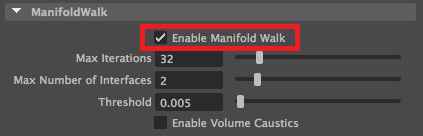
To achieve this in RfM we have to do do 3 simple steps:
Manifold Walk, in the Glass section of Pixar Surface, is added to the surface producing the caustic (retina) and Manifold Exploration, in the Global section of Pixar Surface, is added to the surface receiving the caustic (iris). Thankfully, we're only a couple of checkboxes away...

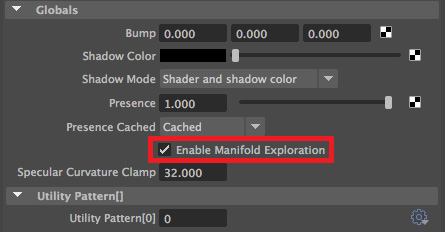
For this tech to work, we need to use the Pixar Unified Integrator. It's simple enough to do this, simply turn on the checkbox...
I've increased the Max Iterations from 10 to 32, which delays the walk from giving up on a caustic path. This should be more accurate for little rendering cost.
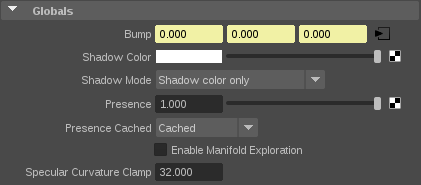
The eye meniscus is a liquid that forms between the eye and the eyelid. It is generally a very small feature, but enough to give a nice specular highlight. Without it, a digital character looks like they have dry eyes...killing realism.
Because of its small size, it is prone to shadow bias artifacts and it's best to turn its shadowing off. We can do this by setting the Shadow Color to White and the Shadow Mode to Shadow Color Only in the Globals of Pixar Surface.
We're also adding some slight bump mapping with a RenderMan procedural texture in order to break up the specular.
Pixar Unified Integrator has more tricks up its (metaphorical) sleeve, such as hair optimizations, indirect path guiding, bi-directionality, among other things. It also has some limitations, such as no holdouts, so make sure you evaluate if it's right for your project.
The final result looks like this...
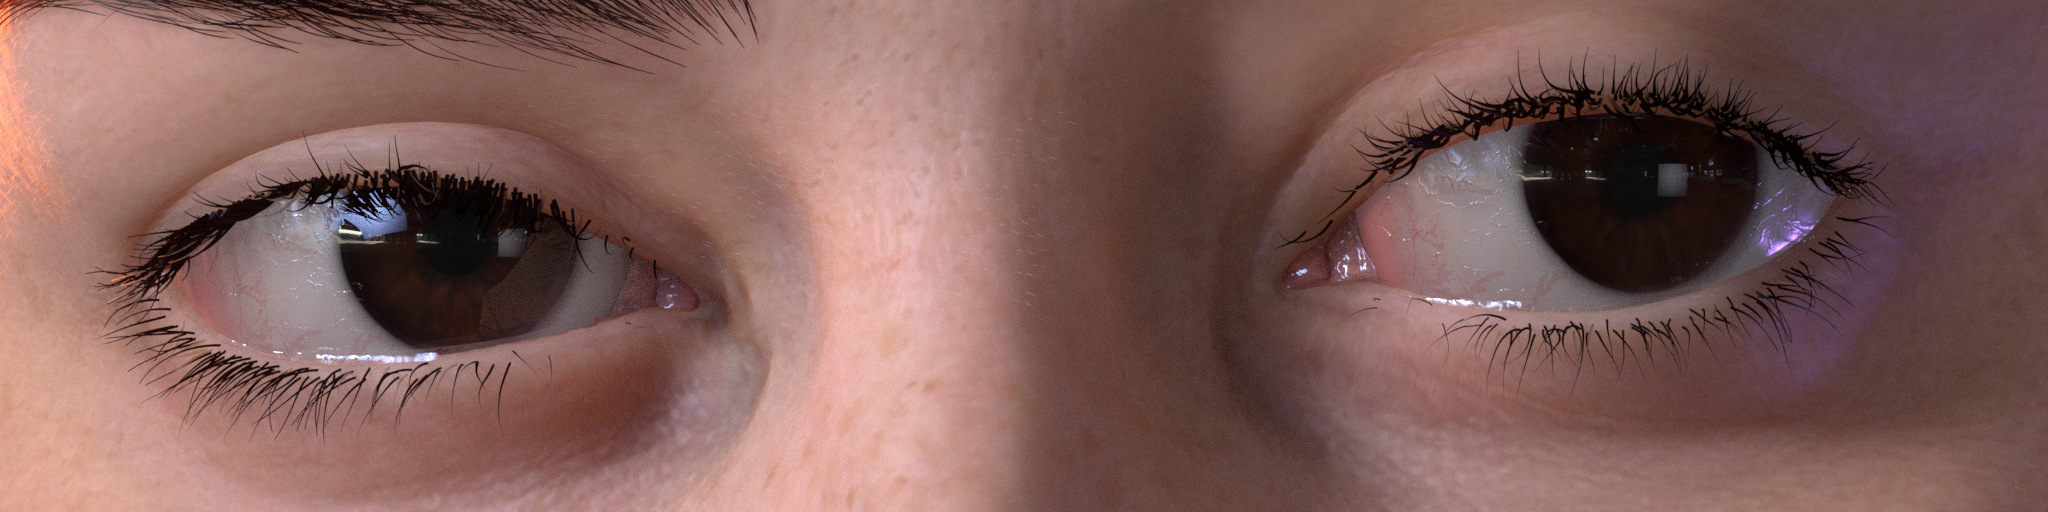
Left: MNEE OFF (thin shadows) -- Right: MNEE ON...looking good!
I can promise a short sub-chapter here...
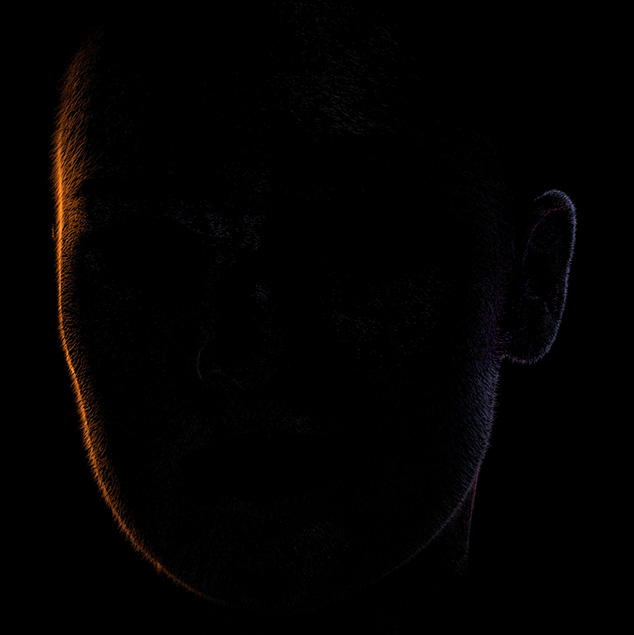
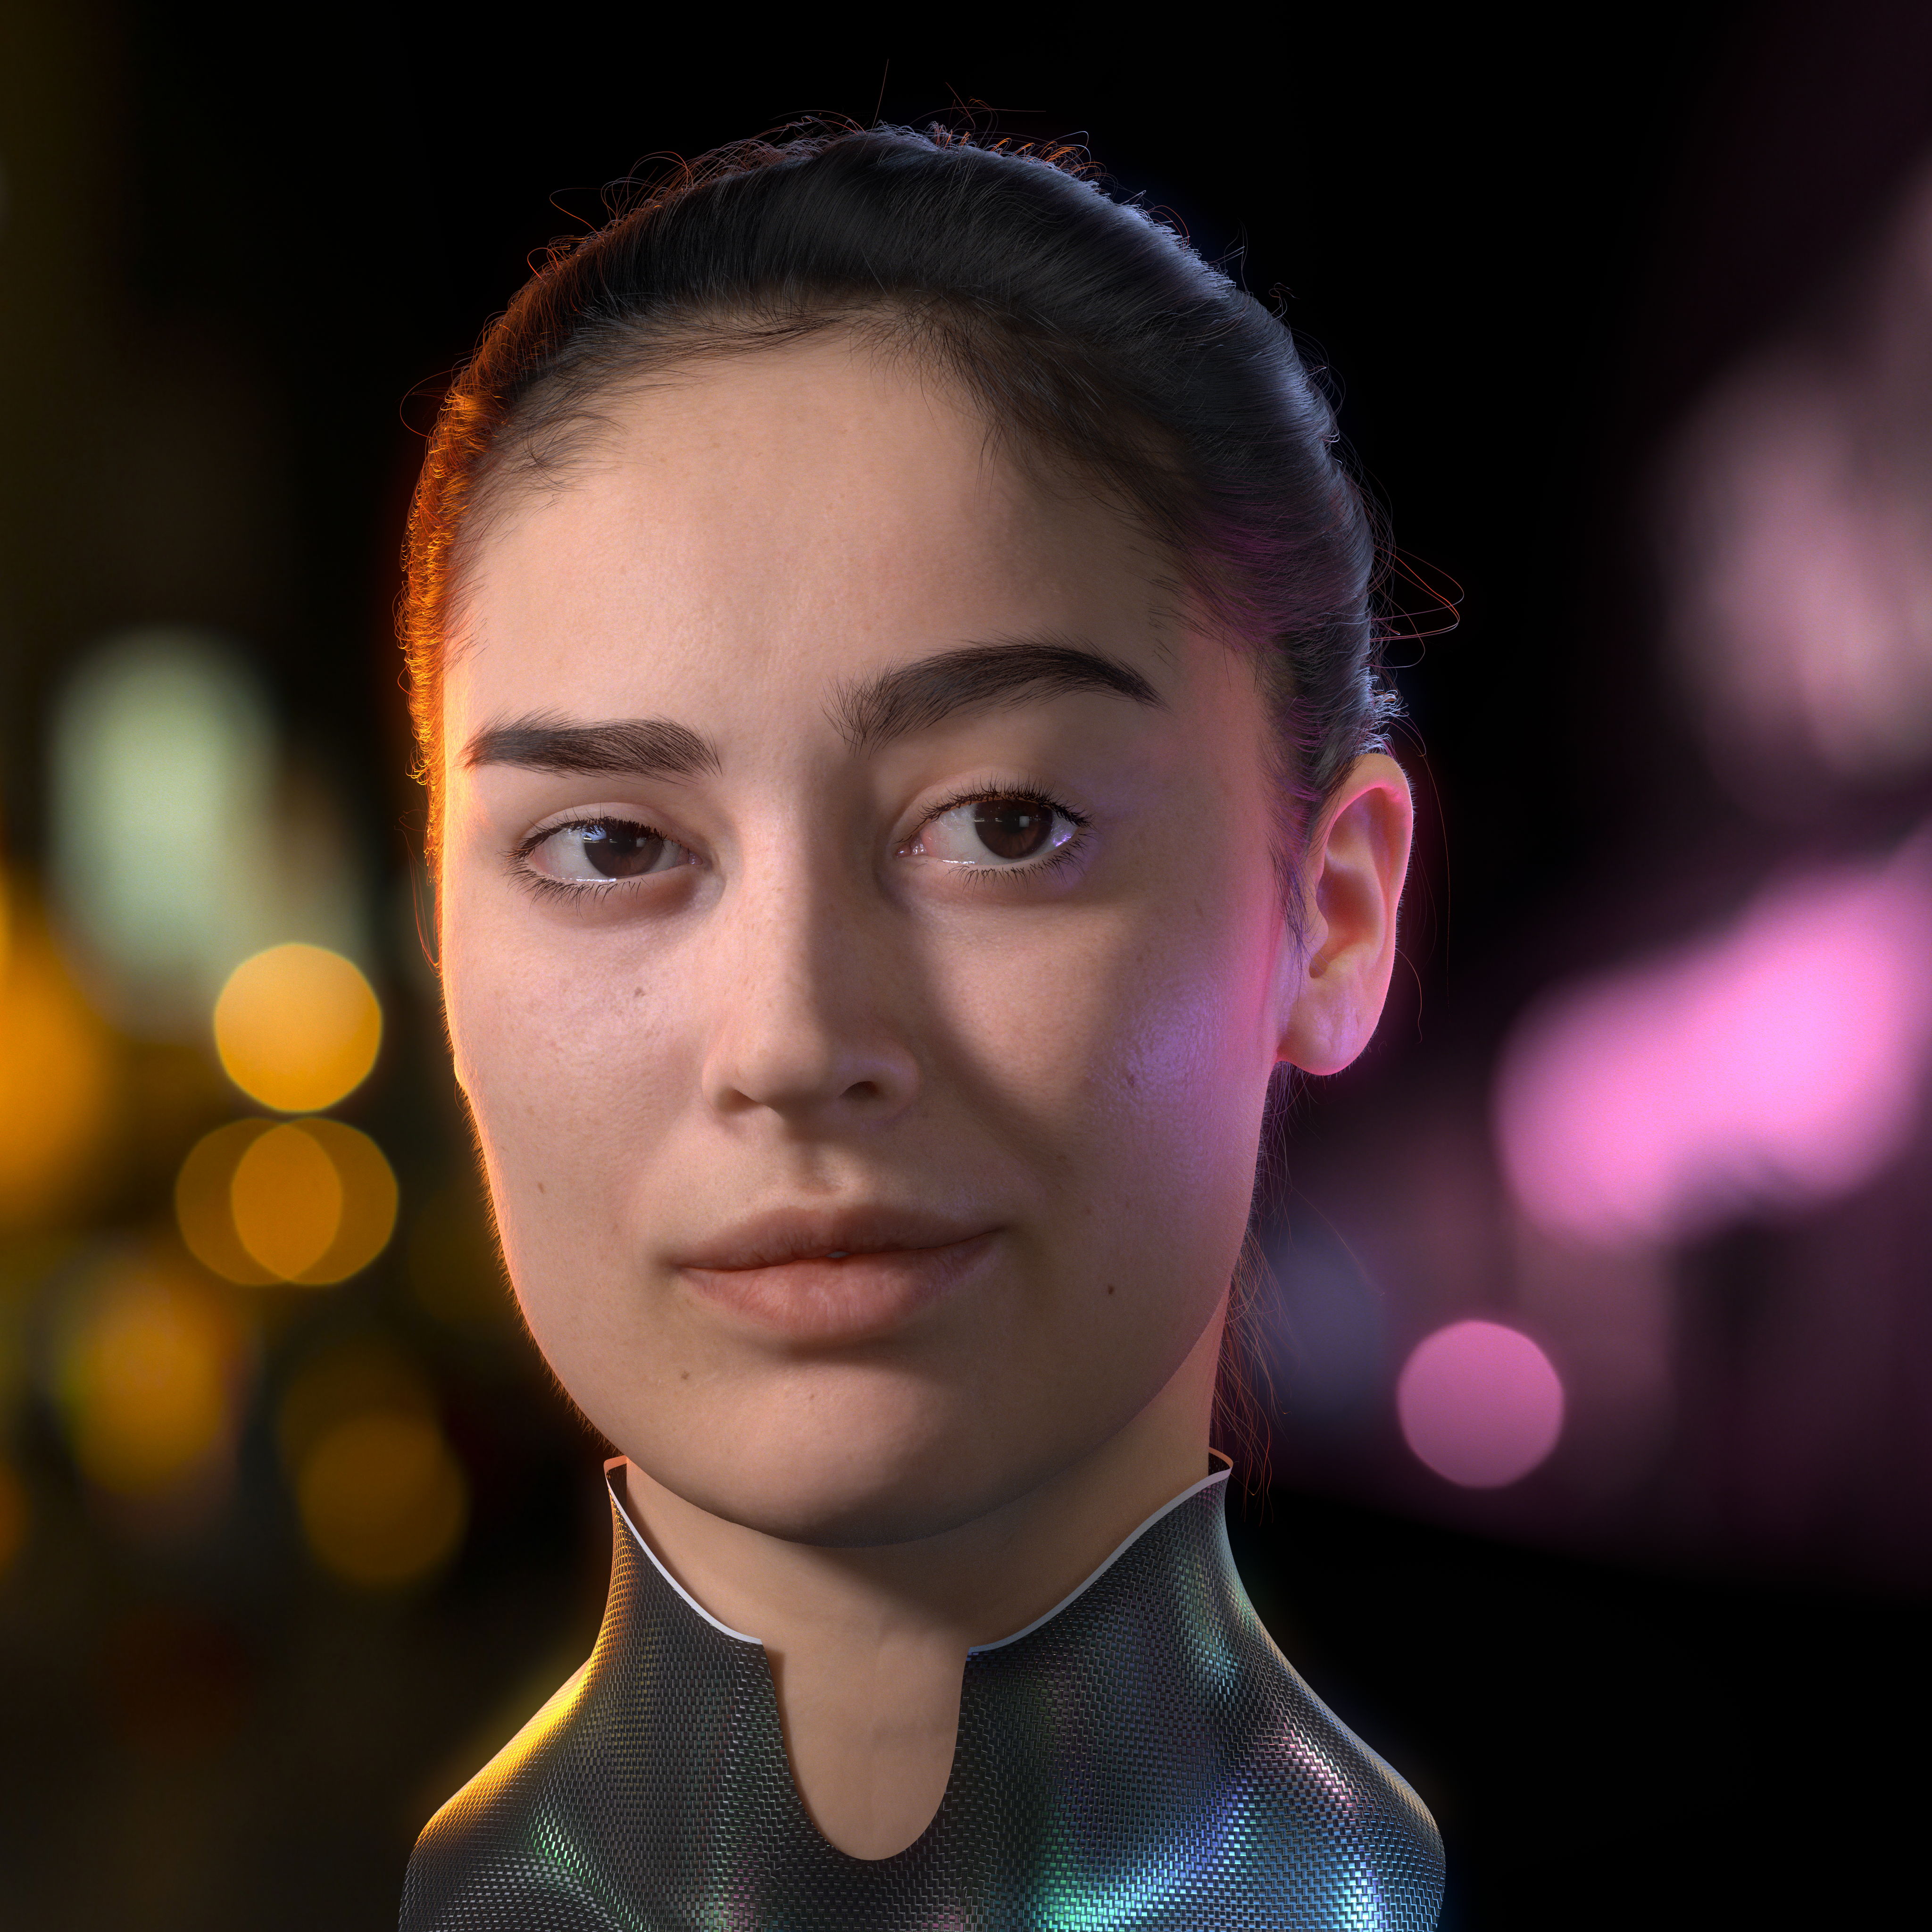
I'm using a dome light as a base light with a strong key light. I'm giving Louise a classic silhouette by adding several kicker lights with some sci-fi colors to match her space suit...
All lights benefit from either light temperature or color, try to avoid pure white light for improved realism.
I also have some blockers to make sure she doesn't get over exposed in the chin, which minimizes the peach fuzz in unwanted areas. This is a really great feature of RenderMan, heavily used in production, which allows us to modify contribution, color, and shape without having to touch our existing light rigs.
Some arbitrary lights are added to add specular highlights in the suit and to accentuate the cheek bone and hair. Pixar lights make it easy to do this by modifying the specular and diffuse contribution separately.
It's a great time saver to be able to light in the viewport
For the final image I'm doing minimal post, which consists in adding some glow and a lightwrap in Nuke.
All data enclosed in this datapackage are licensed under Creative Commons Attribution-NonCommercial – NoDerivatives 4.0 International License. Click here to view a full copy of this license.
Animatable Digital Double of Louise by Eisko © ( www.eisko.com ).
Micro displacement detail supplied by Cronobo Nexture.
Thanks to Christophe Hery, Senior Lead Software Engineer at Pixar and co-architect with Ryusuke Villemin of Pixar Surface Material, for ensuring the best workflow possible.
From pitch to delivery, Leif Pedersen is a CG Generalist who's worn many hats in production for over 10 years. His background in traditional arts mixed with technical foundations has allowed him to work with a varied client list in both television and commercial work, and has now joined Pixar's RenderMan team.