Welcome to RenderMan for Maya!
Welcome to RenderMan for Maya!

Quick Introduction
RenderMan for Maya (RfM) is a Maya plugin distributed with RenderMan. RfM allows us to render in Maya using the renderer RenderMan Pro Server (PRMan).
PRMan provides two renderers: Reyes and RIS (Rix Integration Subsystem). RIS is the latest and greatest renderer which provides high quality raytracing.
Configuration
You will want to configure RenderMan, depending which operating system you are using. Please follow the appropriate instructions below.
RfM on OS X/Windows
You are all set! The installer fully configures the environment variables and writes the module file. Skip reading this section and see Start RenderMan Maya Plugin.
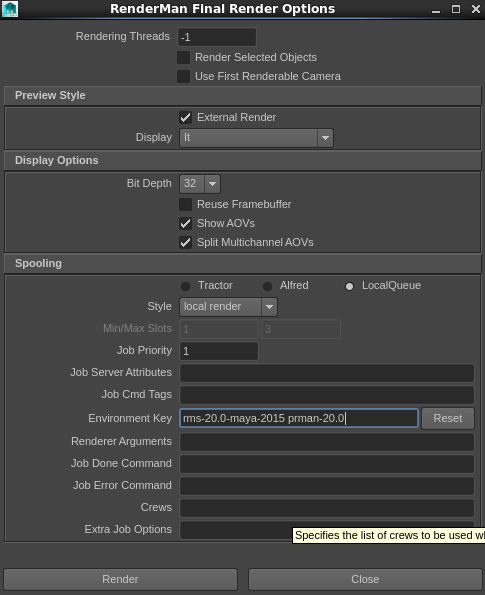
Using external renderer
If you want to use an external renderer via Local Queue, you will need to add an environment key called "prman-20.1" in the RenderMan Render Options.
RfM on Linux
To run RenderMan for Maya (RfM), we need to do the following steps. Note that it is very important to follow the instructions in order.
1) RenderMan for Maya Module Path
Check your /opt/pixar/RenderManStudio-20.1-maya2016/etc/RenderMan_for_Maya.module file. This file is necessary for Maya to load RenderMan plugin, resource files, scripts, and icons.
It must have the following:
//Module file for Maya.  Helps Maya find resources for RenderMan for Maya.
+ RenderMan_for_Maya 20.1 /opt/pixar/RenderManStudio-20.1-maya2016
If your installed /opt/pixar/RenderManStudio-20.1-maya2016/etc/RenderMan_for_Maya.module does not have the line for ''+ RenderMan_for_Maya...'', do the following:
- Create a module file with the exact name called RenderMan_for_Maya.module in a location that is writable.
- Copy and paste the required content for the module file above to your module file.
- Set MAYA_MODULE_PATH to your module path location.
For Linux, to set the path for your RenderMan for Maya module file:
Bash:
export MAYA_MODULE_PATH=<modulePath>
C-Shell:
setenv MAYA_MODULE_PATH <modulePath>
2) Environment Variables
For some platforms such as Linux, the following environment variables are required to load RfM successfully. This will set the location of PRMan and RfM Maya plugin.
- RMANTREE - set the installed directory for the PRMan renderer.
- RMSTREE - set the installed the RMS (Renderman Studio/Maya).
Bash:
export RMANTREE=/opt/pixar/RenderManProServer-20.1
export RMSTREE=/opt/pixar/RenderManStudio-20.1-maya2016
C-Shell:
setenv RMANTREE /opt/pixar/RenderManProServer-20.1
setenv RMSTREE /opt/pixar/RenderManStudio-20.1-maya2016
Start RenderMan for Maya
1. Launch Maya
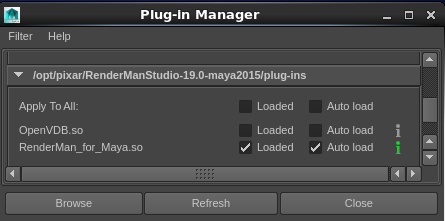
2. Load Renderman for Maya Plugin
We can load RenderMan_for_Maya plugin in Maya using the Plug-In Manager.
Windows > Settings/Preferences > Plug-In Manager
Set Up Scene
Select the Renderer
First, select the renderer. PRMan provides two renderers: Reyes and RIS. For instance, to choose RIS:
RenderMan > Renderer > RenderMan/RIS
Set Up Lights
To use RenderMan, we first will need to create RenderMan light(s) using one of the following ways:
- Select a light from the RenderMan > RMS Lights.
- Select the light icons from the RenderMan shelf.
See Lighting for different light types supported by RenderMan.
Like Maya lights, RenderMan lights could be repositioned using the light manipulators as well as looking through the light's camera.
Set Up Materials
RenderMan for Maya comes with built-in materials. There are several ways to access the materials:
- RenderMan > RMS Materials.
- Window > Create Node > RenderManRIS.
- Window > Node Editor, right click to bring up Create Node... or hit tab and start typing the name of the material, then select a material from the list and hit ENTER.
- Select the shading icons from the RenderMan shelf.
Materials
For RIS, RfM ships with built-in production-quality Materials (aka shaders or "Bxdfs") that serve as the basis of shading in PRMan's RIS mode. These materials include:
- A LM Materials shading system that combines simple, production-ready base materials with a layering workflow. See A Practical Guide to PxrLM for how to use LM materials.
- Our implementation of Disney's principled BRDF, PxrDisney *. Note that PxrDisney is not a layerable material.
- Additional simpler implementations of materials such as for hair.
Patterns
RfM includes an extensive set of Pattern nodes, supporting various methods of manipulating your shading, including:
- Textures
- Bumps
- Colors
- Manifolds
- Geometric Functions
- Scripting Nodes
- Additional Utilities
Manifolds are like Maya's 2d/3d placement nodes. You can also use Maya's 2d/3d placement nodes.
Click here for Supported Maya Nodes for RIS,
Render Setup
Render Controls
Before we select the render button, we need to set up our render quality and global settings. See RenderMan Controls.
Available RenderMan Controls will be displayed appropriately depending on the renderer selected so it is important to select the renderer before adjusting these render control settings.
Render Methods
See Rendering for different rendering methods such as interactive rendering, batching rendering, and IPR rendering.
Outputs
We can tell PRMan to output different passes where we could post process such as in Nuke or other compositing tools. See Outputs.
In RIS, like in Reyes, AOVs were traditionally known as arbitrary output variables where we can write the values of these variables to another display channel. In RIS, The Light Path Expressions is a built-in expression parser for specifying what goes into the AOVs.
When rendering interactively, the AOVs be will be displayed under the main render in "it" image tool. When rendering in batch mode, the AOVs will be written to files.
Render!
- To render, there are several ways:
- Select RenderMan > Render for final quality preview render.
- Select RenderMan > IPR Render for interactive preview render.
- Select RenderMan > Batch Render for batch render.
- The render button on the RenderMan shelf.
- Inside "it" image tool.
Viewing The Render
For interactive rendering, the render will be displayed in "it" with the name of the scene file. If there are AOV outputs, it will go under the main (beauty) render. Simply expand the expand arrow icon before the name to see the AOVs.
For IPR rendering, the render will be displayed in "it" with the "rerender" label.
For batch rendering, the render will be outputting to the maya project's renderman/<scene>/images directory.
Learning More About RenderMan
Video Intro to RenderMan for Maya
- For new users, follow along this learning path.